question

campervandan avatar image
campervandan asked

Campervan Schematics

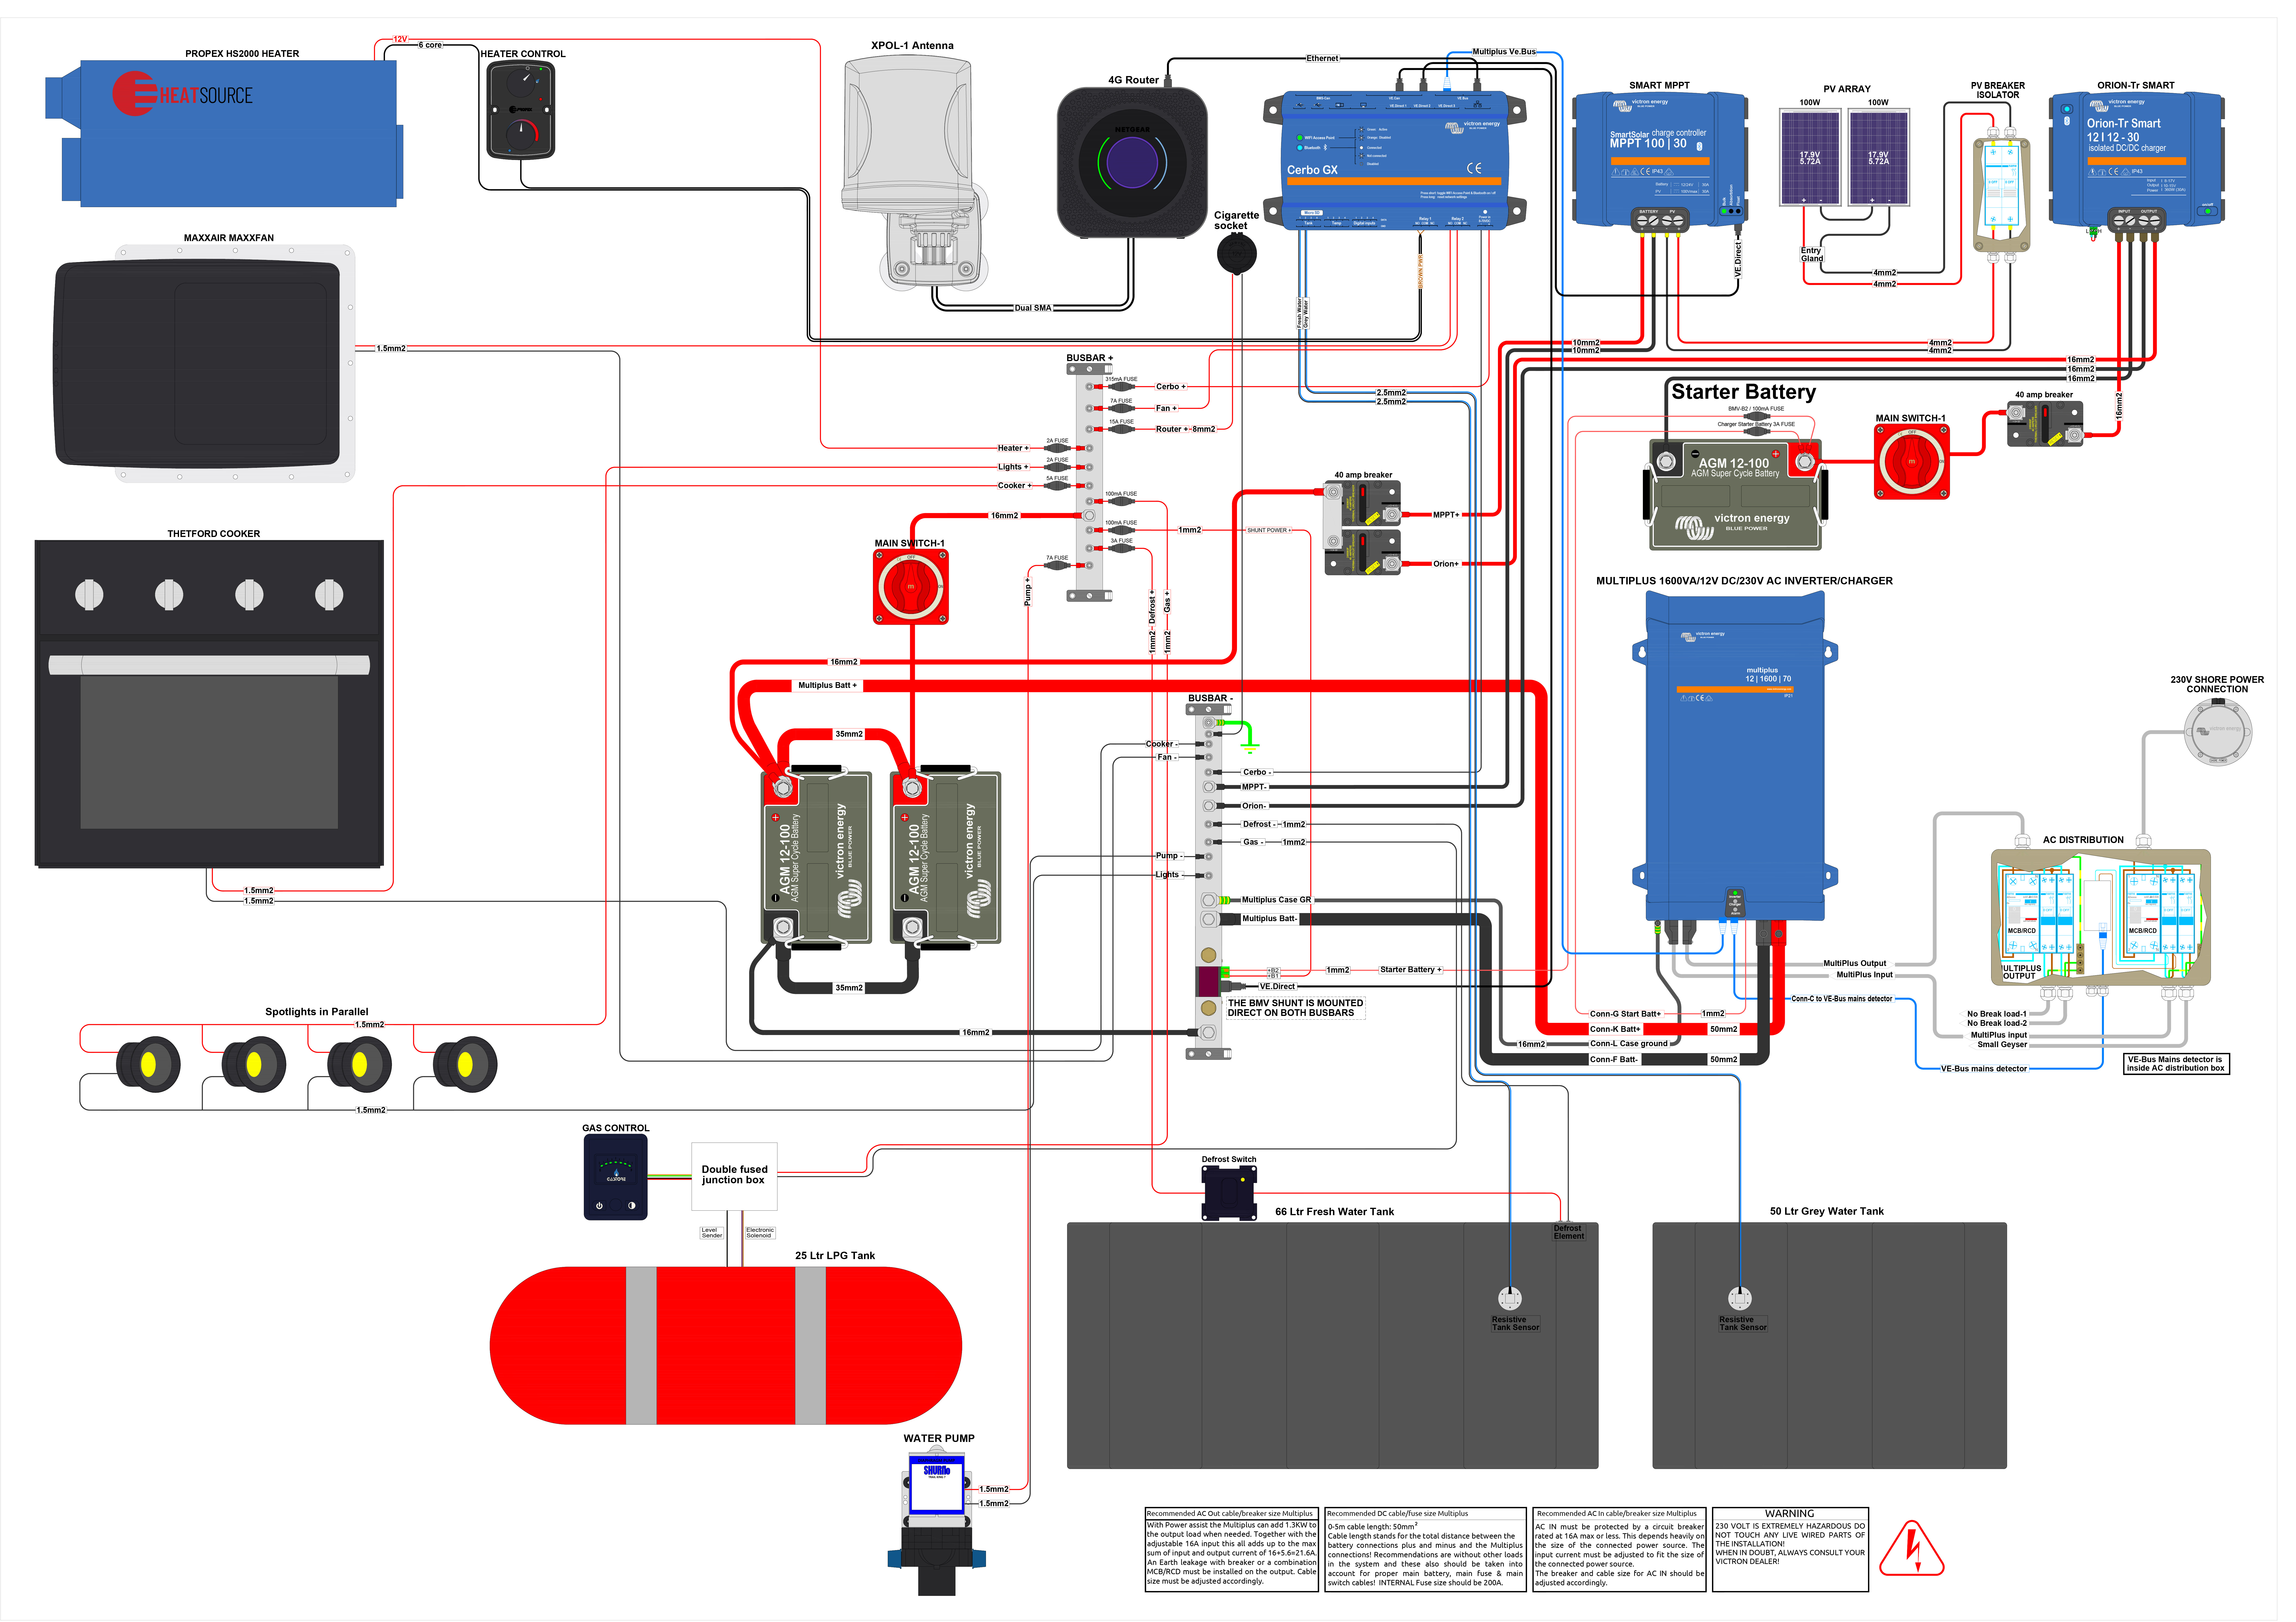
electrical-system-campervan.jpgHi All,

I have finished my first revision of the campervan schematics, I am sure I would have forgotten a few items (such as the Dometic fridge, a shower solution etc), but this is the general installation. I wanted some people to check it over and to see if everything looks legit in terms of wiring etc. I suspect the solar wattage should be enough considering I have the DC-DC charger? Also in terms of AC power, can someone advise on a suitable distribution box that will work seamlessly with the Multiplus and the correct wire sizes for this also please?

Let me know if anything looks wrong. I plan to fit what I can and get it approved by an electrician.

MPPT ControllersPhoenix InverterOrion DC-DC Converters not smartcampervanschematics
2 comments
2 |3000

Up to 8 attachments (including images) can be used with a maximum of 190.8 MiB each and 286.6 MiB total.

Paul B avatar image Paul B commented ·

Hi campervandan Nice Drawing, whats the program that you are using for this, just checking as there are few around but sometimes new ones pop up that are interesting.

Ill have a good look at the diagram latter today and let you know my thoughts.

0 Likes 0 ·
campervandan avatar image campervandan Paul B commented ·

Thank you! I used Autocad. The drawing for the most part was drafted up based on original Victron schematics. I just tweaked it to suit my proposed plan.

Imported a PDF in to Illustrator, exported as DWG and then in to Autocad. I had to clean up literally all the geometry and draw up some appliances Victron didn't supply plus my own appliances. Pretty much it really. Definitely worth doing if you have the programs, makes editing much easier in the future.

0 Likes 0 ·
7 Answers
Kevin Windrem avatar image
Kevin Windrem answered ·

Just a few issues:

  1. There is no main battery fuse.
  2. There is no Multi DC fuse/disconnect.
  3. Fuses/breakers protect against wire shorts. Keep them close to the source of most current, generally that means the battery as other currents are not significant enough to cause wire heating.
  4. You show a 16mm2 wire from battery negative to the shunt but then a 50mm2 wire from the bus to the Multi.
  5. Connect the positive lead for the shunt as close as possible to the battery, generally ON the battery post, to avoid misreading battery voltage. This should actually be done with the temperature sensor as the AGM batteries require temperature compensation for charging profile.
  6. The MaxxAir fan won't restart if power is removed (at least mine does not).


1 comment
2 |3000

Up to 8 attachments (including images) can be used with a maximum of 190.8 MiB each and 286.6 MiB total.

campervandan avatar image campervandan commented ·

Thanks, i will amend plan to add fuses to both the battery and multi.

I will add all fuses as close as possible to the source.

The battery wiring I knew I got that wrong, I am not sure what the correct wiring size connecting the batteries should be. That includes the negative.

As I am actually installing the fuse boxes, the smart shunt won't sit on a busbar so I will connect directly on to the Neg post of the battery. Thank you.

As for the Maxxair fan, I guess it is a bad idea to connect this via a relay switch on the Cerbo then? Just hardwire that in to the fuse box then? i don't understand why it wouldn't restart to be honest?

0 Likes 0 ·
seb71 avatar image
seb71 answered ·

Yeah, lots of issues.


First thing to change is to wire each battery to the busbars (with a fuse on each positive wire). Positive wire should be equal length. Negative wires should be equal length.


What's that cooker? It's connected to the DC bus, with 1.5mm2 wires.

1 comment
2 |3000

Up to 8 attachments (including images) can be used with a maximum of 190.8 MiB each and 286.6 MiB total.

campervandan avatar image campervandan commented ·

Yeah, I did miss the battery fuses, I will add them to the plan. I thought wiring them in parallel was the correct way to keep a consistent level of voltage flowing through both batteries?

The cooker, is going to be a Thetford gas cooker. The wiring is wrong as it would be supplied with a power cord and plug. Really what I want is a gas cooker with a wiring solution to hook up the ignition.


0 Likes 0 ·
dazey77 avatar image
dazey77 answered ·

Others have picked up battery wiring isuses (currently missing proper return cable and return cable from wrong battery- solved if wiring both batteries to the bar as per prev. post)

Consider adding a switch panel/switches. Certainly helpful to be able to switch the fridge on and off as its a high load. I find it helpful to be able to turn off my router too. I also have a dashboard switch in the split-charge feed from the alternator as in summer, if you drive in the morning then you are wasting petrol charging the aux battery rather than using your solar.

Are you really going to use lots of inline fuses rather than a fuse box for 12v? thats going to be really messy.

Consider at the design stage how you are going to mark all your cables to differentiate them. Permanant labels, different colours, cable numbers, coloured marking rings etc.

200w of solar could be light for the system but it all depends how you intend to use it. I had 200w to run a 60l fridge, no inverter but then I am in UK and expect it to run most of the year with no split charge input. Depends on where you are, how often you move, how picky you can be on where you park, how deep into winter you expect it to run. What size is the missing fridge?

(And- your 'MAIN Switch' is doing virtually nothing. Surely everything should go through this, its a battery disconnect)

1 comment
2 |3000

Up to 8 attachments (including images) can be used with a maximum of 190.8 MiB each and 286.6 MiB total.

campervandan avatar image campervandan commented ·

Hi, thank you for your response. I will amend the plan for a switch panel. I think it will be possible to disconnect the DC-DC charger via the app. I will check on that one. i wasn't aware of any additional fuel consumption by the alternator. Is this still true with a DC-DC charger as it receives charge via the starter battery compared to how a split charge relay works?

As for the inline fuses. I am actually installing fuse boxes now, sorry I should've made that clear. It was just for visual purposes.

All wires will be labelled and managed accordingly.

Ideally, I don't want to be completely reliant on the 'split charge' as I would like a good few days of charge while static. I am in the UK too so I suffer the same fate. Fridge wise, probably 50-60L. Any rough idea on total solar size?

For the main switches. i thought they were correct, there is 3. One disconnecting the DC charger, one for solar and the final one disconnecting all DC appliances?

0 Likes 0 ·
ni-xa avatar image
ni-xa answered ·

Nice schematic although it lack some features it is a good way to start!

Any rough estimate on the cost? (I know it depends on cable lenghts but I mean for your installation)


2 |3000

Up to 8 attachments (including images) can be used with a maximum of 190.8 MiB each and 286.6 MiB total.

kevgermany avatar image
kevgermany answered ·

The others covered most things.

I'd suggest using an easysolar unit instead of separates. And as it includes your AC distribution, trips etc, life is much easier.

On the maxxfan, power on behaviour is to close the lid. No matter what it was doing before.DDocumented in the instructions. I think it's for security as when the lid is open, it's easy to remove with a screwdriver.

You mention BMV shunt, but I see no wires BMV.

Guessing you're going to need more solar.

Like the others siggested, rrplace the busbars with fused terminal boxes, much easier if a fuse blows, you'll know ecactly where it is, and if you get the clever ones, an LED comes on by the blown fuse.

Not sure which electric gas shut off you're planning on, bu the Truma one has three wired between valve and switch, plus a DC feed to the switch.

My gas level has DC feed to the display, Single signal cable to tank sender, earth/ground to sender as well.

Cable to neg battery should be same size as positive, both should be same size or larger than the victron cables on the multiplus

You're taking the neg and positive feeds from the same battery. Swap so that neg to busbar is on one battery, pos to busbar is on the other. Might make no difference, but some say the resistance in the cables between the batteries creates an unequal load. All the Victron diagrams show it the way I suggested.

2 |3000

Up to 8 attachments (including images) can be used with a maximum of 190.8 MiB each and 286.6 MiB total.

albertramsbottom avatar image
albertramsbottom answered ·

Was there ever a third version, it would be nice to see or even the autocad file would be nice. This is almost the same as my set up but mine is 24V so cables would half the size and fuses also beyond the main battery mega fuse. I use AI, which isn't as good as autocad for these things

Thanks

2 |3000

Up to 8 attachments (including images) can be used with a maximum of 190.8 MiB each and 286.6 MiB total.

skapicioglu avatar image
skapicioglu answered ·

Greetings to everyone,


I'm new to the forum and I must say I really like it. I will also install a victron system. Can I ask how you drew the diagram above for this?


Do you use a tool to draw this diagram?

2 |3000

Up to 8 attachments (including images) can be used with a maximum of 190.8 MiB each and 286.6 MiB total.