question

Volker avatar image
Volker asked

emulating EM24 ethernet meter via modbusTCP server

Hello all,

I have been trying to include a 3rd party generator into the VRM.

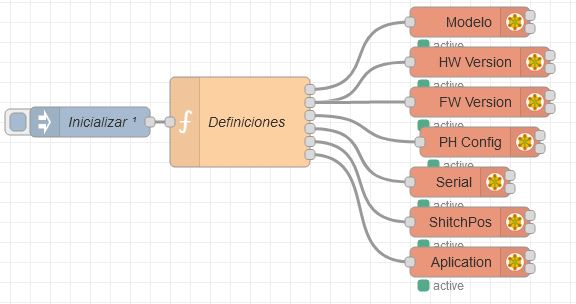
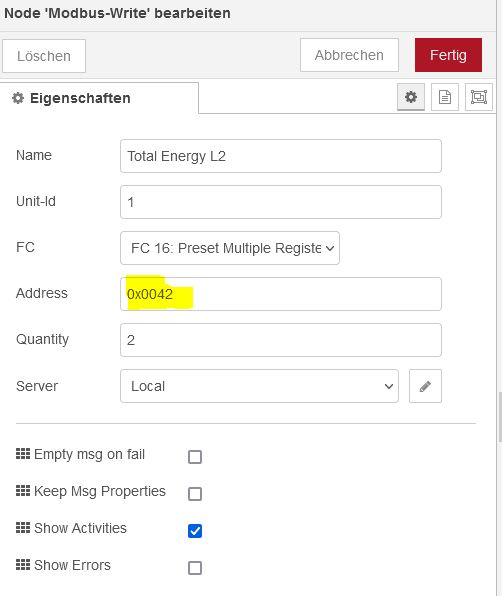
For this I set up a modbusTCP server and populated it with the data from the generator
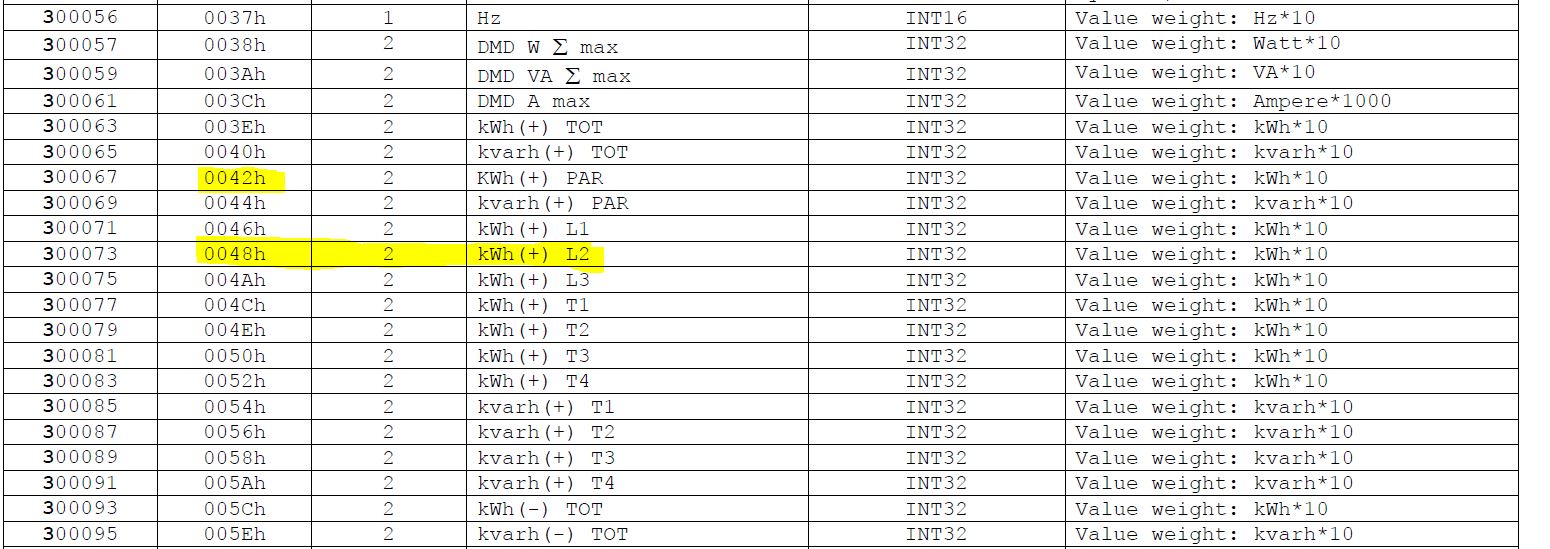
(modbus memory map as defined in this doc => EM24_E1 (Ethernet) COMMUNICATION PROTOCOL (Version 0 Revision 1.2)).

I could detect the emulated meter and connect to it as described here: https://www.victronenergy.com/live/energy-meters:em24-eth.

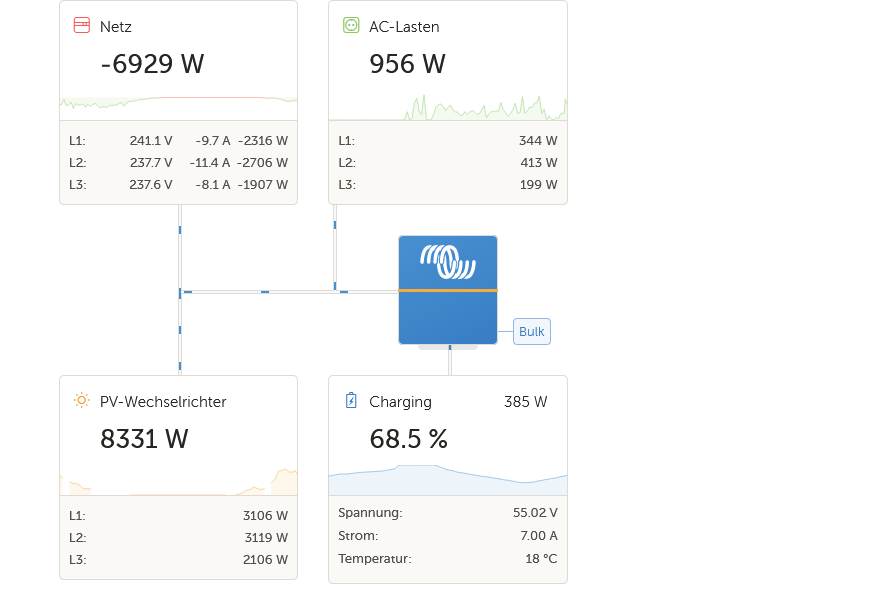
It shows up in the device list as "CG EM24 Ethernet Energy Meter" and after configuring the device as "PV inverter", the data (U,I,P) also show up in the widgets and dashboard as intended.

What I do not understand, however, is why the device in the remote console shows as "Not Connected" and all data in the associated submenue (AC Phase 1, ... AC totals, ... Energy L3) show "--" (no value).

REM: no intention to replace the 485 connected ESS grid-meter ET340 - the emulation is actually just intended for correct viewing of the setup in the dashboad/advanced overview.

FW-version is 2.73

Thanks a lot for any any help and suggestion!

Kind regards - Volker

VRMModbus TCPem24
1 comment
2 |3000

Up to 8 attachments (including images) can be used with a maximum of 190.8 MiB each and 286.6 MiB total.

markw-1 avatar image markw-1 commented ·
Hello Volker,


seems like we have the same thoughts of emulating an EM24. Mine are a bit younger and I started my research just yesterday as i finna got my Multi.

Can you provide information how you did that? Probably with node red? So I hopefully can follow you then and find a solution for the visualization issue.

My first thought is something like a keep alive signal that might be missing. I’m new to modbus and more the CAN guy but that’s standard in this area.

Best Regards

Mark

0 Likes 0 ·
17 Answers
hansie avatar image
hansie answered ·

Seems like you make a wrong conversion from em24 parameter to victron. Use RMMS to check your values. I made the same project. Best regards.

2 |3000

Up to 8 attachments (including images) can be used with a maximum of 190.8 MiB each and 286.6 MiB total.

Volker avatar image
Volker answered ·

Hey - sorry for answering late.

On my side this works quite stable now.

@Mark: What I did is just install a docker-based modbus-TCP server which behaves on read-access like an EM24. Updating of data (i.e. register writing) is continously done by a homeserver which has knowledge on the generator status.

two remaining questions:
(1) in the dashboard I see details (U,A,P per phase when details are enabled) for all blocks besides for the "PV inverter" that is emulated. The device itself shows those values.
=> Is this a limitation of the dashboard?
(2) the fact tat in the dashboard the summation is not displayed correctly is (still) a artefact of the ET340 that I use - correct?
(rem: currently on FW 2.84)


1 comment
2 |3000

Up to 8 attachments (including images) can be used with a maximum of 190.8 MiB each and 286.6 MiB total.

christian-k-1 avatar image christian-k-1 commented ·
Hi Volker,

could you please provide more information about your configuration of the modbus TCP docker image?

I try the same with my 3 Zeversolar Inverters.


Wich homeserver do you use? Home Assistant?

0 Likes 0 ·
dafyddhirst avatar image
dafyddhirst answered ·

I Use a USR-302 it allows modbus tcp to rtu protocol conversion works a charm.

2 |3000

Up to 8 attachments (including images) can be used with a maximum of 190.8 MiB each and 286.6 MiB total.

der-neue avatar image
der-neue answered ·

can someone help me with the implementation? Has anyone implemented this with nodered and can explain it to me a little?

2 |3000

Up to 8 attachments (including images) can be used with a maximum of 190.8 MiB each and 286.6 MiB total.

pau1phi11ips avatar image
pau1phi11ips answered ·

Wouldn't it be easier to add a new driver for this? You could use the existing Carlo Gavazzi driver as a starting point.

https://github.com/victronenergy/dbus-modbus-client/blob/master/carlo_gavazzi.py

https://github.com/victronenergy/venus/wiki/howto-add-a-driver-to-Venus

2 |3000

Up to 8 attachments (including images) can be used with a maximum of 190.8 MiB each and 286.6 MiB total.

christian-k-1 avatar image
christian-k-1 answered ·

Hi @Volker

could you please provide more information about your configuration of the modbus TCP docker image?

I try the same with my 3 Zeversolar Inverters.


Wich homeserver do you use? Home Assistant?

2 |3000

Up to 8 attachments (including images) can be used with a maximum of 190.8 MiB each and 286.6 MiB total.

alferez avatar image
alferez answered ·

I have managed to emulate a Carlo Gavazzi EM24 with Modbus TCP using NodeRED.

As data source I have used a Shelly EM. Of course if you want to use it as a three phase you would need a Shelly 3EM and modify the flow to take the data from the other meters, in my case it was not necessary, but I have left it ready for it.


I have published both the instructions and the flow on my website:

https://www.alferez.es/iot/carlo-gavazzi-em24-node-red-modbus-tcp/


Sorry my website is in Spanish.


I hope this message does not bother, because it is related to the subject and is intended for use in conjunction with Victron, because I only write in the memory addresses that Victron consults.

10 comments
2 |3000

Up to 8 attachments (including images) can be used with a maximum of 190.8 MiB each and 286.6 MiB total.

t81s avatar image t81s commented ·

Hi alferez,

wow thank you for that, you just saved me a lot of money!

The code works great and is up and running in my system.

Just if any one is wondering, my grid meter (DD3 2R10 DTA - ODZ1) is providing most of the necessary parameters via the optical interface (the missing ones like amps on the phases are calculated later). In NodeRed im using node-red-contrib-smartmeter to read the data and passing it to alferez code.

0 Likes 0 ·
alferez avatar image alferez t81s commented ·

I am happy that you were able to adapt it with your meter.

The idea was precisely to make it as standard as possible so that, as I use shelly, you can use any other meter from which you can obtain data. Including for example an inverter.

0 Likes 0 ·
lichtaus avatar image lichtaus commented ·
Hi Alferez, just what I have been looking for (except it does not run on a Siemens Logo and I do not speak Spanish :-)
0 Likes 0 ·
alferez avatar image alferez lichtaus commented ·

The nodered code is easy to read and easy to adapt.

The text on my website is simply explaining what each part does, but it is easily understandable and if not, there is always Google Translate ;)

0 Likes 0 ·
napal avatar image napal commented ·

Hi alfarez,


Your solution is exactly what I was looking for. However, as a data source a Kostal inverter (Plenticore), whose grid values I query via modbus tcp.

I get the values from the inverter without problems in node red.

Unfortunately I can't get a connection to your flow in Venus OS. No device is found.


I am not an expert regarding modbus. It could be that I have a basic error in my approach:

PV inverter -> Node Red -> Venus OS


I send my flow, maybe you or someone else can help me here.

Node Red EM24 emulated

0 Likes 0 ·
Jannes Peschel avatar image Jannes Peschel napal commented ·
I am unable to download your flow.

On which device are you running NodeRed?

I am running NodeRed inside iobroker on a raspberry and setting the Modbus Server IP Address to e.g. 192.168.188.60 was not working. I had to set the IP to 0.0.0.0 and then the emulated EM24 was found by the GX device at the IP Address of the raspberry.


0 Likes 0 ·
Jannes Peschel avatar image Jannes Peschel commented ·

Hello Alferez,

great work! thank you for sharing!

Can you provide information about the initialization part of your flow? I am trying to understand the "definitions" part and the registers you write the EM24 defenitions. I can not find all the information in the communication protocol of the EM24.

em24-flow.jpg

Another thing I can not find the answer for:
Some registers of the EM24 are working fine, e.g. voltage oder current registers (0x0000, 0x000C). page 8 of the following document.

http://docplayer.net/54399643-Em24-din-communication-protocol-version-2-revision-0.html

But I have problems with the energy registers. I have to use register 0x0042 to get the Energy of L2 right in the software of carlo gavazzi, but according to the protocol the correct register should be 0x0048. Any ideas where this can be caused by?

em24-register-l2-total-energy.jpg

total-energy-l2.jpg


0 Likes 0 ·
christian-k-1 avatar image christian-k-1 Jannes Peschel commented ·

Did you found a solution for this? I have the same issue. I try to get the produced energy to the Cerbo as well

0 Likes 0 ·
marommel avatar image marommel commented ·

hi @Alferez which pallet / plugin are you using for the modbus nodes?

    modbus-client
    modbus-server
    modbus-write


0 Likes 0 ·
Walter Leibetseder avatar image Walter Leibetseder commented ·
Thank You, this helps a lot.
0 Likes 0 ·
crash-override avatar image
crash-override answered ·

Hi,

my solution is like other peoples here, I use Node Red to get all values from my plc which has meters connected and populated it via a custom dbus script.

My meter has no phase saldation so I counted it via Node RED.

Here are my files used, if it helps you.

https://git.bit-cloud.de/carsten.schmiemann/VictronGX_Custom_Sensors

2 |3000

Up to 8 attachments (including images) can be used with a maximum of 190.8 MiB each and 286.6 MiB total.

stephan-kloidt avatar image
stephan-kloidt answered ·

Hi @Alferez,

thank you so much for sharing your node red solution emulating the EM24 with us. I got the system on venus os (running on a raspberry pi 3b) running, but I am only able to send data via Modbus TCP once. There is no update of the numbers visible in venus os. If i re-install the emulated energy meter, i can again set the values (for debugging) once, but then, they're frozen within venus os... do you have any recommendations?

So far, I am only using fixed debugging values and no continous input. But even this does not work.

Thanks, Stephan

2 |3000

Up to 8 attachments (including images) can be used with a maximum of 190.8 MiB each and 286.6 MiB total.

alferez avatar image
alferez answered ·

Hello,


It is strange because I also use it from a rpi 3b and no problem, other colleagues use it with Cerbo and also have had no problems.


Try to put a debug module behind the json that converts the Shelly EM data. You should get data every 5 seconds.

2 |3000

Up to 8 attachments (including images) can be used with a maximum of 190.8 MiB each and 286.6 MiB total.

stephan-kloidt avatar image
stephan-kloidt answered ·

... Data generation is no problem, its running perfectly. Even writing into Modbus registers seem to work: If i re-install the Modbus TCP Energy Meter with proper IP and Port in Venus OS, the new values are correctly displayed! That works every time i re-install it. But: If i do not re-install the device, i only see the initial values constantly. Seems there is a kind of trigger needed to get venus os pulling new data out of the modbus registers (?). Any suggestions? That would be really helpful. Thank you very much in advance!

Stephan

1 comment
2 |3000

Up to 8 attachments (including images) can be used with a maximum of 190.8 MiB each and 286.6 MiB total.

krypto81 avatar image krypto81 commented ·
Hello,
@alferez, thank you very much. That's exactly what I was looking for.

@stephan-kloidt, I had the same problem. Maybe that is a solution for you too. After installing the EM24 on my Cerbo, the display of the test value worked. After changing the test value in Node-Red and distributing the flow, the transmission didn't work anymore. I had to delete and recreate the EM24 on my cerbo.
The reason was the "re-deployment" in Node-Red after changing my test value. The connection was simply not reestablished by my Cerbo.
Because I deploy changes in Node-Red quite often, I deactivated the modbus server in alferez flow and provided a separate modbus server via docker.

Maybe that's the solution for you too.

Regards
0 Likes 0 ·
ulfilas avatar image
ulfilas answered ·

Hi, i am new here and i had a similar idea. But now I stuck because my cerbo does not connect to my gateway.

I use FHEM for my Modbus TCP gateway and i am also emulating an EM24

I can connect the EM24 with the usc7 an all looks fine.

When i look on my gateway all requests Form the cerbo are answerd properly.

The cerbo is running in a ESS with a MP2 and is alredy connected to an EM24 via RS485.

Does anyone has a hint what i am missing or any other hint?

Grate thanks.

Edit:
Now i got my problem after playing arround with the parameters i found that VenusOS can not handle space characters in the serial number.
Now it is running fine :-)) I am so happy to see the selvconsumption now.

1683274255890.png

My Installation Dashboard


1683274255890.png (48.7 KiB)
2 |3000

Up to 8 attachments (including images) can be used with a maximum of 190.8 MiB each and 286.6 MiB total.

johanneszechner avatar image
johanneszechner answered ·

Hallo Ulfilas, welche Register hast du verwendet, um den Cerbo einen EM24 zu emulieren?

Kannst du mir eine Config oder dergleichen geben?

2 |3000

Up to 8 attachments (including images) can be used with a maximum of 190.8 MiB each and 286.6 MiB total.

ulfilas avatar image
ulfilas answered ·

Hi Johannes i have implemented register 0-80 and some system registers, you can find them in the aatached config. Pleas be aware, i made some calculations to merge für Inverter to the one virtual meter and for the total energy i had to add some offset values.

define PVHaus ModbusAttr 21 server global:5020 TCP
attr PVHaus obj-h0000-len 2
attr PVHaus obj-h0000-reading gridVoltage
attr PVHaus obj-h0000-revRegs 1
attr PVHaus obj-h0000-setexpr $val * 10
attr PVHaus obj-h0000-unpack N
attr PVHaus obj-h0002-len 2
attr PVHaus obj-h0002-reading gridVoltage
attr PVHaus obj-h0002-revRegs 1
attr PVHaus obj-h0002-setexpr $val * 10
attr PVHaus obj-h0002-unpack N
attr PVHaus obj-h0004-len 2
attr PVHaus obj-h0004-reading gridVoltage
attr PVHaus obj-h0004-revRegs 1
attr PVHaus obj-h0004-setexpr $val * 10
attr PVHaus obj-h0004-unpack N
attr PVHaus obj-h0006-len 2
attr PVHaus obj-h0006-reading gridVoltage
attr PVHaus obj-h0006-revRegs 1
attr PVHaus obj-h0006-setexpr $val * 10
attr PVHaus obj-h0006-unpack N
attr PVHaus obj-h0008-len 2
attr PVHaus obj-h0008-reading gridVoltage
attr PVHaus obj-h0008-revRegs 1
attr PVHaus obj-h0008-setexpr $val * 10
attr PVHaus obj-h0008-unpack N
attr PVHaus obj-h0010-len 1
attr PVHaus obj-h0010-reading gridVoltage
attr PVHaus obj-h0010-setexpr $val * 10
attr PVHaus obj-h0010-unpack n
attr PVHaus obj-h0011-len 1
attr PVHaus obj-h0011-reading IDCode
attr PVHaus obj-h0011-setexpr $val
attr PVHaus obj-h0011-unpack n
attr PVHaus obj-h0012-len 2
attr PVHaus obj-h0012-reading gridVoltage
attr PVHaus obj-h0012-revRegs 1
attr PVHaus obj-h0012-setexpr ((ReadingsVal("Sonne","wr1_currentPower",0) + ReadingsVal("Sonne","wr2_currentPower",0)) / 3 + ReadingsVal("Sonne","wr3_currentPower",0)) / $val * 1000
attr PVHaus obj-h0012-unpack N
attr PVHaus obj-h0014-len 2
attr PVHaus obj-h0014-reading gridVoltage
attr PVHaus obj-h0014-revRegs 1
attr PVHaus obj-h0014-setexpr ((ReadingsVal("Sonne","wr1_currentPower",0) + ReadingsVal("Sonne","wr2_currentPower",0)) / 3 + ReadingsVal("Sonne","wr4_currentPower",0))/ $val * 1000
attr PVHaus obj-h0014-unpack N
attr PVHaus obj-h0016-expr $val * 1000
attr PVHaus obj-h0016-len 2
attr PVHaus obj-h0016-reading gridVoltage
attr PVHaus obj-h0016-revRegs 1
attr PVHaus obj-h0016-setexpr (ReadingsVal("Sonne","wr1_currentPower",0) + ReadingsVal("Sonne","wr2_currentPower",0)) / 3 / $val * 1000
attr PVHaus obj-h0016-unpack N
attr PVHaus obj-h0018-len 2
attr PVHaus obj-h0018-reading 0
attr PVHaus obj-h0018-revRegs 1
attr PVHaus obj-h0018-setexpr ((ReadingsVal("Sonne","wr1_currentPower",0) + ReadingsVal("Sonne","wr2_currentPower",0)) / 3 + ReadingsVal("Sonne","wr3_currentPower",0)) * 10
attr PVHaus obj-h0018-unpack N
attr PVHaus obj-h0020-len 2
attr PVHaus obj-h0020-reading 0
attr PVHaus obj-h0020-revRegs 1
attr PVHaus obj-h0020-setexpr ((ReadingsVal("Sonne","wr1_currentPower",0) + ReadingsVal("Sonne","wr2_currentPower",0)) / 3 + ReadingsVal("Sonne","wr4_currentPower",0)) * 10
attr PVHaus obj-h0020-unpack N
attr PVHaus obj-h0022-len 2
attr PVHaus obj-h0022-reading 0
attr PVHaus obj-h0022-revRegs 1
attr PVHaus obj-h0022-setexpr (ReadingsVal("Sonne","wr1_currentPower",0) + ReadingsVal("Sonne","wr2_currentPower",0)) / 3 * 10
attr PVHaus obj-h0022-unpack N
attr PVHaus obj-h0024-len 2
attr PVHaus obj-h0024-reading 0
attr PVHaus obj-h0024-revRegs 1
attr PVHaus obj-h0024-setexpr ((ReadingsVal("Sonne","wr1_currentPower",0) + ReadingsVal("Sonne","wr2_currentPower",0)) / 3 + ReadingsVal("Sonne","wr3_currentPower",0)) * 10
attr PVHaus obj-h0024-unpack N
attr PVHaus obj-h0025-reading 0
attr PVHaus obj-h0026-len 2
attr PVHaus obj-h0026-reading 0
attr PVHaus obj-h0026-revRegs 1
attr PVHaus obj-h0026-setexpr ((ReadingsVal("Sonne","wr1_currentPower",0) + ReadingsVal("Sonne","wr2_currentPower",0)) / 3 + ReadingsVal("Sonne","wr4_currentPower",0)) * 10
attr PVHaus obj-h0026-unpack N
attr PVHaus obj-h0028-len 2
attr PVHaus obj-h0028-reading Zero
attr PVHaus obj-h0028-revRegs 1
attr PVHaus obj-h0028-setexpr (ReadingsVal("Sonne","wr1_currentPower",0) + ReadingsVal("Sonne","wr2_currentPower",0)) / 3 * 10
attr PVHaus obj-h0028-unpack N
attr PVHaus obj-h0030-len 2
attr PVHaus obj-h0030-reading Zero
attr PVHaus obj-h0030-revRegs 1
attr PVHaus obj-h0030-setexpr ((ReadingsVal("Sonne","wr1_currentPower",0) + ReadingsVal("Sonne","wr2_currentPower",0)) / 3 + ReadingsVal("Sonne","wr3_currentPower",0)) * 10
attr PVHaus obj-h0030-unpack N
attr PVHaus obj-h0032-len 2
attr PVHaus obj-h0032-reading Zero
attr PVHaus obj-h0032-revRegs 1
attr PVHaus obj-h0032-setexpr ((ReadingsVal("Sonne","wr1_currentPower",0) + ReadingsVal("Sonne","wr2_currentPower",0)) / 3 + ReadingsVal("Sonne","wr4_currentPower",0)) * 10
attr PVHaus obj-h0032-unpack N
attr PVHaus obj-h0034-len 2
attr PVHaus obj-h0034-reading Zero
attr PVHaus obj-h0034-revRegs 1
attr PVHaus obj-h0034-setexpr (ReadingsVal("Sonne","wr1_currentPower",0) + ReadingsVal("Sonne","wr2_currentPower",0)) / 3 * 10
attr PVHaus obj-h0034-unpack N
attr PVHaus obj-h0036-len 2
attr PVHaus obj-h0036-reading gridVoltage
attr PVHaus obj-h0036-setexpr $val * 10
attr PVHaus obj-h0036-unpack n
attr PVHaus obj-h0038-len 2
attr PVHaus obj-h0038-reading gridVoltage
attr PVHaus obj-h0038-setexpr $val / 23 * 400
attr PVHaus obj-h0038-unpack n
attr PVHaus obj-h0040-len 2
attr PVHaus obj-h0040-reading Zero
attr PVHaus obj-h0040-revRegs 1
attr PVHaus obj-h0040-setexpr (ReadingsVal("Sonne","wr1_currentPower",0) + ReadingsVal("Sonne","wr2_currentPower",0) + ReadingsVal("Sonne","wr3_currentPower",0) + ReadingsVal("Sonne","wr4_currentPower",0)) * 10
attr PVHaus obj-h0040-unpack N
attr PVHaus obj-h0042-len 2
attr PVHaus obj-h0042-reading Zero
attr PVHaus obj-h0042-revRegs 1
attr PVHaus obj-h0042-setexpr (ReadingsVal("Sonne","wr1_currentPower",0) + ReadingsVal("Sonne","wr2_currentPower",0) + ReadingsVal("Sonne","wr3_currentPower",0) + ReadingsVal("Sonne","wr4_currentPower",0)) * 10
attr PVHaus obj-h0042-unpack N
attr PVHaus obj-h0044-len 2
attr PVHaus obj-h0044-reading Zero
attr PVHaus obj-h0044-revRegs 1
attr PVHaus obj-h0044-setexpr (ReadingsVal("Sonne","wr1_currentPower",0) + ReadingsVal("Sonne","wr2_currentPower",0) + ReadingsVal("Sonne","wr3_currentPower",0) + ReadingsVal("Sonne","wr4_currentPower",0)) * 10
attr PVHaus obj-h0044-unpack N
attr PVHaus obj-h0046-len 1
attr PVHaus obj-h0046-reading Zero
attr PVHaus obj-h0046-revRegs 0
attr PVHaus obj-h0046-setexpr $val
attr PVHaus obj-h0046-unpack n
attr PVHaus obj-h0047-len 1
attr PVHaus obj-h0047-reading Zero
attr PVHaus obj-h0047-revRegs 0
attr PVHaus obj-h0047-setexpr $val
attr PVHaus obj-h0047-unpack n
attr PVHaus obj-h0048-len 1
attr PVHaus obj-h0048-reading Zero
attr PVHaus obj-h0048-revRegs 0
attr PVHaus obj-h0048-setexpr $val
attr PVHaus obj-h0048-unpack n
attr PVHaus obj-h0049-len 1
attr PVHaus obj-h0049-reading Zero
attr PVHaus obj-h0049-revRegs 0
attr PVHaus obj-h0049-setexpr $val
attr PVHaus obj-h0049-unpack n
attr PVHaus obj-h0050-len 1
attr PVHaus obj-h0050-reading Zero
attr PVHaus obj-h0050-setexpr $val
attr PVHaus obj-h0050-unpack n
attr PVHaus obj-h0051-len 1
attr PVHaus obj-h0051-reading Freq
attr PVHaus obj-h0051-setexpr $val * 10
attr PVHaus obj-h0051-unpack n
attr PVHaus obj-h0052-len 2
attr PVHaus obj-h0052-reading 0
attr PVHaus obj-h0052-revRegs 1
attr PVHaus obj-h0052-setexpr (ReadingsVal("Sonne","wr1_totalEnergy",0) + ReadingsVal("Sonne","wr1_offsetEnergy",0) +  ReadingsVal("Sonne","wr2_totalEnergy",0) + ReadingsVal("Sonne","wr2_offsetEnergy",0) + ReadingsVal("Sonne","wr3_totalEnergy",0) + ReadingsVal("Sonne","wr4_totalEnergy",0)) * 10
attr PVHaus obj-h0052-unpack N
attr PVHaus obj-h0054-len 2
attr PVHaus obj-h0054-reading Zero
attr PVHaus obj-h0054-revRegs 1
attr PVHaus obj-h0054-setexpr (ReadingsVal("Sonne","wr1_totalEnergy",0) + ReadingsVal("Sonne","wr1_offsetEnergy",0) +  ReadingsVal("Sonne","wr2_totalEnergy",0) + ReadingsVal("Sonne","wr2_offsetEnergy",0) + ReadingsVal("Sonne","wr3_totalEnergy",0) + ReadingsVal("Sonne","wr4_totalEnergy",0)) * 10
attr PVHaus obj-h0054-unpack N
attr PVHaus obj-h0055-len 1
attr PVHaus obj-h0055-reading 0
attr PVHaus obj-h0055-revRegs 1
attr PVHaus obj-h0055-setexpr (ReadingsVal("Sonne","wr1_totalEnergy",0) + ReadingsVal("Sonne","wr1_offsetEnergy",0) +  ReadingsVal("Sonne","wr2_totalEnergy",0) + ReadingsVal("Sonne","wr2_offsetEnergy",0) + ReadingsVal("Sonne","wr3_totalEnergy",0) + ReadingsVal("Sonne","wr4_totalEnergy",0)) * 10
attr PVHaus obj-h0055-unpack N
attr PVHaus obj-h0056-len 2
attr PVHaus obj-h0056-reading Zero
attr PVHaus obj-h0056-setexpr (ReadingsVal("Sonne","wr1_currentPower",0) + ReadingsVal("Sonne","wr2_currentPower",0) + ReadingsVal("Sonne","wr3_currentPower",0) + ReadingsVal("Sonne","wr4_currentPower",0)) * 10
attr PVHaus obj-h0056-unpack N
attr PVHaus obj-h0058-len 2
attr PVHaus obj-h0058-reading Zero
attr PVHaus obj-h0058-setexpr (ReadingsVal("Sonne","wr1_currentPower",0) + ReadingsVal("Sonne","wr2_currentPower",0) + ReadingsVal("Sonne","wr3_currentPower",0) + ReadingsVal("Sonne","wr4_currentPower",0)) * 10
attr PVHaus obj-h0058-unpack N
attr PVHaus obj-h0060-len 2
attr PVHaus obj-h0060-reading Zero
attr PVHaus obj-h0060-setexpr (ReadingsVal("Sonne","wr1_totalEnergy",0) + ReadingsVal("Sonne","wr1_offsetEnergy",0) +  ReadingsVal("Sonne","wr2_totalEnergy",0) + ReadingsVal("Sonne","wr2_offsetEnergy",0) + ReadingsVal("Sonne","wr3_totalEnergy",0) + ReadingsVal("Sonne","wr4_totalEnergy",0)) * 10
attr PVHaus obj-h0060-unpack N
attr PVHaus obj-h0062-len 2
attr PVHaus obj-h0062-reading Zero
attr PVHaus obj-h0062-setexpr (ReadingsVal("Sonne","wr1_totalEnergy",0) + ReadingsVal("Sonne","wr1_offsetEnergy",0) +  ReadingsVal("Sonne","wr2_totalEnergy",0) + ReadingsVal("Sonne","wr2_offsetEnergy",0) + ReadingsVal("Sonne","wr3_totalEnergy",0) + ReadingsVal("Sonne","wr4_totalEnergy",0)) * 10
attr PVHaus obj-h0062-unpack N
attr PVHaus obj-h0064-len 2
attr PVHaus obj-h0064-reading Zero
attr PVHaus obj-h0064-revRegs 1
attr PVHaus obj-h0064-setexpr ((ReadingsVal("Sonne","wr1_totalEnergy",0) + ReadingsVal("Sonne","wr1_offsetEnergy",0) +  ReadingsVal("Sonne","wr2_totalEnergy",0) + ReadingsVal("Sonne","wr2_offsetEnergy",0)) / 3 + ReadingsVal("Sonne","wr3_totalEnergy",0)) * 10
attr PVHaus obj-h0064-unpack N
attr PVHaus obj-h0066-len 2
attr PVHaus obj-h0066-reading Zero
attr PVHaus obj-h0066-revRegs 1
attr PVHaus obj-h0066-setexpr ((ReadingsVal("Sonne","wr1_totalEnergy",0) + ReadingsVal("Sonne","wr1_offsetEnergy",0) +  ReadingsVal("Sonne","wr2_totalEnergy",0) + ReadingsVal("Sonne","wr2_offsetEnergy",0)) / 3 + ReadingsVal("Sonne","wr4_totalEnergy",0)) * 10
attr PVHaus obj-h0066-unpack N
attr PVHaus obj-h0068-len 2
attr PVHaus obj-h0068-reading Zero
attr PVHaus obj-h0068-revRegs 1
attr PVHaus obj-h0068-setexpr (ReadingsVal("Sonne","wr1_totalEnergy",0) + ReadingsVal("Sonne","wr1_offsetEnergy",0) +  ReadingsVal("Sonne","wr2_totalEnergy",0) + ReadingsVal("Sonne","wr2_offsetEnergy",0)) / 3 * 10
attr PVHaus obj-h0068-unpack N
attr PVHaus obj-h0070-len 2
attr PVHaus obj-h0070-reading Zero
attr PVHaus obj-h0070-revRegs 1
attr PVHaus obj-h0070-setexpr (ReadingsVal("Sonne","wr1_totalEnergy",0) + ReadingsVal("Sonne","wr1_offsetEnergy",0) +  ReadingsVal("Sonne","wr2_totalEnergy",0) + ReadingsVal("Sonne","wr2_offsetEnergy",0) + ReadingsVal("Sonne","wr3_totalEnergy",0) + ReadingsVal("Sonne","wr4_totalEnergy",0)) * 10
attr PVHaus obj-h0070-unpack N
attr PVHaus obj-h0071-len 1
attr PVHaus obj-h0072-len 2
attr PVHaus obj-h0072-reading Zero
attr PVHaus obj-h0072-revRegs 1
attr PVHaus obj-h0072-setexpr $val
attr PVHaus obj-h0072-unpack N
attr PVHaus obj-h0074-len 2
attr PVHaus obj-h0074-reading Zero
attr PVHaus obj-h0074-revRegs 1
attr PVHaus obj-h0074-setexpr $val
attr PVHaus obj-h0074-unpack N
attr PVHaus obj-h0076-len 2
attr PVHaus obj-h0076-reading Zero
attr PVHaus obj-h0076-revRegs 1
attr PVHaus obj-h0076-setexpr $val
attr PVHaus obj-h0076-unpack N
attr PVHaus obj-h0078-len 2
attr PVHaus obj-h0078-reading Zero
attr PVHaus obj-h0078-revRegs 1
attr PVHaus obj-h0078-setexpr $val *10
attr PVHaus obj-h0078-unpack N
attr PVHaus obj-h0080-len 2
attr PVHaus obj-h0080-reading Zero
attr PVHaus obj-h0080-setexpr $val
attr PVHaus obj-h0080-unpack n
attr PVHaus obj-h0103-len 1
attr PVHaus obj-h0103-reading Sonne:temperature
attr PVHaus obj-h0770-len 1
attr PVHaus obj-h0770-reading HW
attr PVHaus obj-h0770-unpack n
attr PVHaus obj-h0772-len 1
attr PVHaus obj-h0772-reading FW
attr PVHaus obj-h0772-unpack n
attr PVHaus obj-h20480-len 1
attr PVHaus obj-h20480-reading Serial0
attr PVHaus obj-h20480-unpack n
attr PVHaus obj-h20481-len 1
attr PVHaus obj-h20481-reading Serial1
attr PVHaus obj-h20481-unpack n
attr PVHaus obj-h20482-len 1
attr PVHaus obj-h20482-reading Serial2
attr PVHaus obj-h20482-unpack n
attr PVHaus obj-h20483-len 1
attr PVHaus obj-h20483-reading Serial3
attr PVHaus obj-h20483-unpack n
attr PVHaus obj-h20484-len 1
attr PVHaus obj-h20484-reading Serial4
attr PVHaus obj-h20484-unpack n
attr PVHaus obj-h20485-len 1
attr PVHaus obj-h20485-reading Serial5
attr PVHaus obj-h20485-unpack n
attr PVHaus obj-h20486-len 1
attr PVHaus obj-h20486-reading Serial6
attr PVHaus obj-h20486-unpack n
attr PVHaus obj-h40960-len 1
attr PVHaus obj-h40960-reading Aplication
attr PVHaus obj-h40960-unpack n
attr PVHaus obj-h4098-len 1
attr PVHaus obj-h4098-reading MeasureConf
attr PVHaus obj-h4098-unpack n
attr PVHaus obj-h41216-len 1
attr PVHaus obj-h41216-reading Switch
attr PVHaus obj-h41216-unpack n
attr PVHaus obj-h4609-len 1
attr PVHaus obj-h4609-reading Zero
attr PVHaus obj-h4609-unpack n

And the fixed readings:

Readings
Aplication   7
FW           5680
Freq         50
HW           4382
IDCode       1648
MeasureConf  0
Serial0      21359
Serial1      27745
Serial2      29270
Serial3      26981
Serial4      30551
Serial5      21041
Serial6      0
Switch       1
Zero         0
gridVoltage  230
2 |3000

Up to 8 attachments (including images) can be used with a maximum of 190.8 MiB each and 286.6 MiB total.

hendrikausb avatar image
hendrikausb answered ·

Hi, I use the EM24 emulator with MQTT in Node-Red.

I have a few questions.

1. My watt values are greater than 65535 and can also go negative. What can I set in the function node so that both work?

2. How do I translate the code for the serial number?


// Para usarlo en el calculo del sumatorio
flow.set('watts1', msg.payload);
var watts = new Int32Array(2);
watts[0] = msg.payload.toFixed(0) * 10;
if (watts[0] < 0) {
    watts[0] = 65535 + watts[0];
    watts[1] = 65535;
}
msg = {};
msg.payload = watts;
return msg;


With this code the negative values work, but values above 65535 do not. What can i do?


Greetings Hendrik

2 |3000

Up to 8 attachments (including images) can be used with a maximum of 190.8 MiB each and 286.6 MiB total.

hendrikausb avatar image
hendrikausb answered ·

I found a solution:

// Para usarlo en el calculo del sumatorio
flow.set('watts1', msg.payload);
var twatts = new Int32Array(2);
var watts = new Int32Array(2);
watts[0] = msg.payload.toFixed(0) * 10;
if (watts[0] < 0) {
    watts[0] = 65535 + watts[0];
    watts[1] = 65535;
}
var valor = (parseInt (watts)).toString(2).padStart(32, '0');

var twatts = new Int32Array(2);
twatts[0] = parseInt(valor.substring(16, 32), 2);
twatts[1] = parseInt(valor.substring(0, 16), 2);

msg = {};
msg.payload = twatts;
return msg;
2 |3000

Up to 8 attachments (including images) can be used with a maximum of 190.8 MiB each and 286.6 MiB total.

mdkeil avatar image
mdkeil answered ·

Hello @hendrikausb !

Your solution didnt work for me.. my absolute negative power values sometimes are < - 14000W .. Does anyone have another node red solution to set these values to INT32 modbus register?

1 comment
2 |3000

Up to 8 attachments (including images) can be used with a maximum of 190.8 MiB each and 286.6 MiB total.

mdkeil avatar image mdkeil commented ·

finally I found a working solution with buffers for modbus flex write:

https://flows.nodered.org/flow/000fe4cfedfa6e80e40432ad24e38d36/in/MXz8Ur8R1PYt

0 Likes 0 ·

Related Resources