I have one of those radio linked floating sensors that gives a bar graph display of the level, but it's not very accurate, I would like an accurate display of my heating oil on the Cerbo, but after an hour of searching and reading all I find is water and LPG tank sensors?
asked
Is there a tank level sensor for heating Oil that will work with the Cerbo GX please
Tap Tap! Hellooooo is anyone there?
Is there any reason a water or LPG level sensor wouldn't work for you? One of the Mopeka bluetooth sensors for example?
Hi Jeremy, Don't think I could use a water sensor in heating Oil it might attack the components, they call it Oil, but it's not really much different to jet aviation fuel. I'm not sure how the LPG sensors work, I know they are detecting it in it's liquid form, but surely it's not inside the tank? you would let all the gas out fitting it? I will have a look at them. Bob
Bob,
The Mopkea sensors are ultrasonic and attach to the outside of the tank. It really shouldn’t matter what kind of liquid it is, as long as the sensor can see through the tank properly.
Just had a look, good sensor but unfortunately not suitable for the Victron Cerbo-GX it requires a resistive device, like a car fuel tank sensor, as it requires two wires to connect to the Cerbo and the Cerbo measures the changing resistance between the wires
Sorry, I should have been more clear, the Cerbo GX supports the Bluetooth Mopeka sensors out of the box.
Hi, ok thank you I have investigated further after you said that and indeed the can connect directly to the Cerbo and would be perfect, but as always there is a "BUT" from what I can see they have to go on the bottom of the tank, that I cannot do because my 1200 ltr heating oil tank is sat on the concrete and it is what is called a "Bunded" tank it's for safety, what it means is that you have a tank within a tank, two skins, and there is no way to access the internal tank with the oil in it from outside other than through the top. I am working with Matt in the other thread here, My tank has a sensor already it's ultrasonic and is in the top, it sends a signal on 433mhz to a receiver decoder in the house which has a little bar graph display, Using an ESp32 and some clever software we can intercept that signal and re direct the MQTT information to the Cerbo, I think this system is best suited as it uses the sensor already in the tank and from the top. Thank you for you help and it's not wasted as I was not aware of this sensor and will probably use it for something else. Bob
Have you looked at the mopeka td40? It is a top mounted sensor.
Hi @wedgehog
I have an Apollo oil sensor they use radio signals to send data from ultrasonic sensor on top of heating oil tank to a small plug/display that's inside the house. I capture this radio frequency using this:
Which is running a separate raspberry pi and then forward it to gx device via MQTT.
Only thing i needed to do on GX device was use the dummy script to make a "virtual tank"
velib_python/dbusdummyservice.py at master · victronenergy/velib_python · GitHub
I imagine you could technically install rtl_433 on the venus os device itself. You'll likely also need to install the drivers for the SDR.
No worries,
I think there's some arduino devices that folk have made to forward on the RTL_433 to mqtt. Using openMQTT I'm not too familiar with making/configuring arduino like devices so just went with raspberry pi zero and just used a script for forward that rtl_433 received onto gx device. (if you go this route double check the oil sensor you have is in the arduino version of the program)
There's a list of sensors on there the rtl_433 site that it works with but where i am (UK) almost all the oil sensors I've seen are Apollo (even if they're not the protocol is identical so works as though it was)
Ahh! I have found a youtube about it, I have ordered the required module and will let you know how I get on, If I get stuck will you give me some advice please Matt
Yeh of course. Happy to share scripts from my setup but think yours will be better if you're doing it straight from arduino/ESP32. Might need just need to tweak the output in C++ to format it into the values you want but that should be doable.(I do the formatting in python on the raspi, pretty much just extracting data from the output json of rtl_443, i've not read up on it in ages but i think there was built in functions for extracting specific data)
Hi Matt, Thank you, The youtube I told you I found, it's a chap called Matt is it you?he shows us this
https://docs.openmqttgateway.com/upload/web-install.html
It is a sytem called Open MQTTgateway and you can upload firmware directly to your ESP32 from the page. I can do that no problem, I can edit the ESP32 script as well provided someon shows me what to edit and what to put.
What I don't understand yet is this, the ESP32 also has standard wireless, so if it is receiving the sensor on 433 can it not directly send the MQTT info to the Cerbo-GX via the wireless network, is any other device or receiver needed? . Bob
Nah that's definitely not me. These folks are far smarter than me!!
I imagine it'll depend what ESP32 board you've got. However you're right it the chip supports wifi/ethernet. And i believe what you're describing is what OpenMQTT does. It forwards data it receives from sensors onto MQTT server. So you can forward the data onto gx MQTT server. The only bit I'm unsure of is how you format the data from what's received from the sensor into a format the GX device wants. That's the bit you'd need to edit in the ESP32 code i think. I'll have a look but not something I've done before.
Mine I use a raspi and do that formatting in python
EDIT: seems like a pretty active community so imagine someone could tell you if formatting exists.
If not then they should be able to tell you where is best to edit the code to get it to work for your needs. I did have a quick look but my c++ isn't the best.
The oil sensor will give you depth. You then need to calculate the values victron needs from that somewhere in c++.
The maths is:
Here's the equivalent in python:
 def vol(depth,radius,length,tankVol):

                        m = depth - radius

                        theta = 2 * math.acos(m/radius)
                        inner = theta - math.sin(theta)


                        return (0.5*radius*radius* inner * length)


                if depth == tankDepth/2:
                    Level = 0.5
                elif depth > tankDepth/2:
                    print("under half")
                    Level = vol(depth,tankDepth/2,tankLength,tankCapacity*1000)/(tankCapacity *1000)

                elif depth < tankDepth/2:
                    print("over half")
                    Level = 1- ((tankCapacity*1000) - (vol(depth,tankDepth/2,tankLength,tankCapacity*1000)))/(tankCapacity*1000)


                Remaining = tankCapacity * Level
See what the community says about where to add that maths.
I'm very much c++ beginner, but i would say you add an if statement in around line 260 to check if the contents of the RTL_433 sensor is your sensor by checking the id (as this will be static). Then if it is the id ie your oil sensor. Then instead of passing all the json data to the mqtt topic you just pass the values you need like level/capacity (after doing the above maths ofc).
Hi Matt. Thanks for that, wouldn't it be the same for the Esp32 as the Raspberry pi as the ESP32 talks mini Python? I don't realy need to know the quantity depth is fine, I know that 15 cm on that tank is around 100 ltrs as I made a dipstick. and 100 ltrs lasts long enough that if I ordered a refil at that it would be here before I ran out
I have ordered the Esp32 with the 433 radio stuff from Aliexpress so it will be a couple or three weeks before it gets here and I can get into it.
Jeremy who is talking to me at the top has shown me the Mopek sensors that I knew nothing about, no good as they have to be on the bottom of a single-skinned tank, but I went and looked at the website and they do an ultrasonic sensor that does go at the top and transmits on Bluetooth
But more importantly, the Cerbo-GX is already set up for them, so it would be plug and play, trouble is the Mopek TD40 which is what I need, I just cannot find in the UK!
anyway, thanks for everything so far and I will be all over this when the ESP32 arrives. Bob
Hi Matt, ok the Lilygo 433 has arrived and I have programmed it with MQTT Gateway, what on earth do I do now :-) I have been looking at this for some time now and these are the conclusions I have.
The Cerbo GX is set up to receive tank signals in three ways.
Hard-wired resistive sender.
Hard-wired Digital sender
Bluetooth BLE
What I don't know is if the Lillygo 433 transmits the MQTT on Bluetooth? and so far I haven't managed to find any specific information about it, just pictures of the board
Another option is Node Red, I understand that the Cerbo-GX if you load the large image has Node Red, I know the Lillygo 433 can talk to Node Red as it is on the OpenMQTT website, not sure if it can be used to create a tank display on the Cerbo.
I read back through your previous messages and noticed you said about creating a virtual tank and linked to a git hub page. I don't understand what that's about and how to use it.
Look forward to hearing from you. Bob
Hi @wedgehog
So the way I would do it is setup a virtual tank using a custom driver. Described here
https://github.com/victronenergy/venus/wiki/howto-add-a-driver-to-Venus
Victron give an example code here:
https://github.com/victronenergy/velib_python/blob/master/dbusdummyservice.py
You need to edit
servicename='com.victronenergy.dummyservice.ttyO1',
To something like
servicename='com.victronenergy.tank.ttyO1',
And update the initial values for tanks (snip of options for tank values below)
This will essentially add a tank to the victorn system without having one connected via a wire etc. This means no data is being received from a wire etc.
Howeber now the victron device has a tank you can write to the mqtt topics with the required data.
The topics and mqtt can be explained here
https://github.com/victronenergy/dbus-mqtt
The topic you'll need is something like
R/{vrm Id}/tank/{device id}/{tank variable}
Where you replace the {} with what's described in there
I'm not familiar with lilygo/arduino but you need to get the specific data to be passed you victron. The data for a tank being:
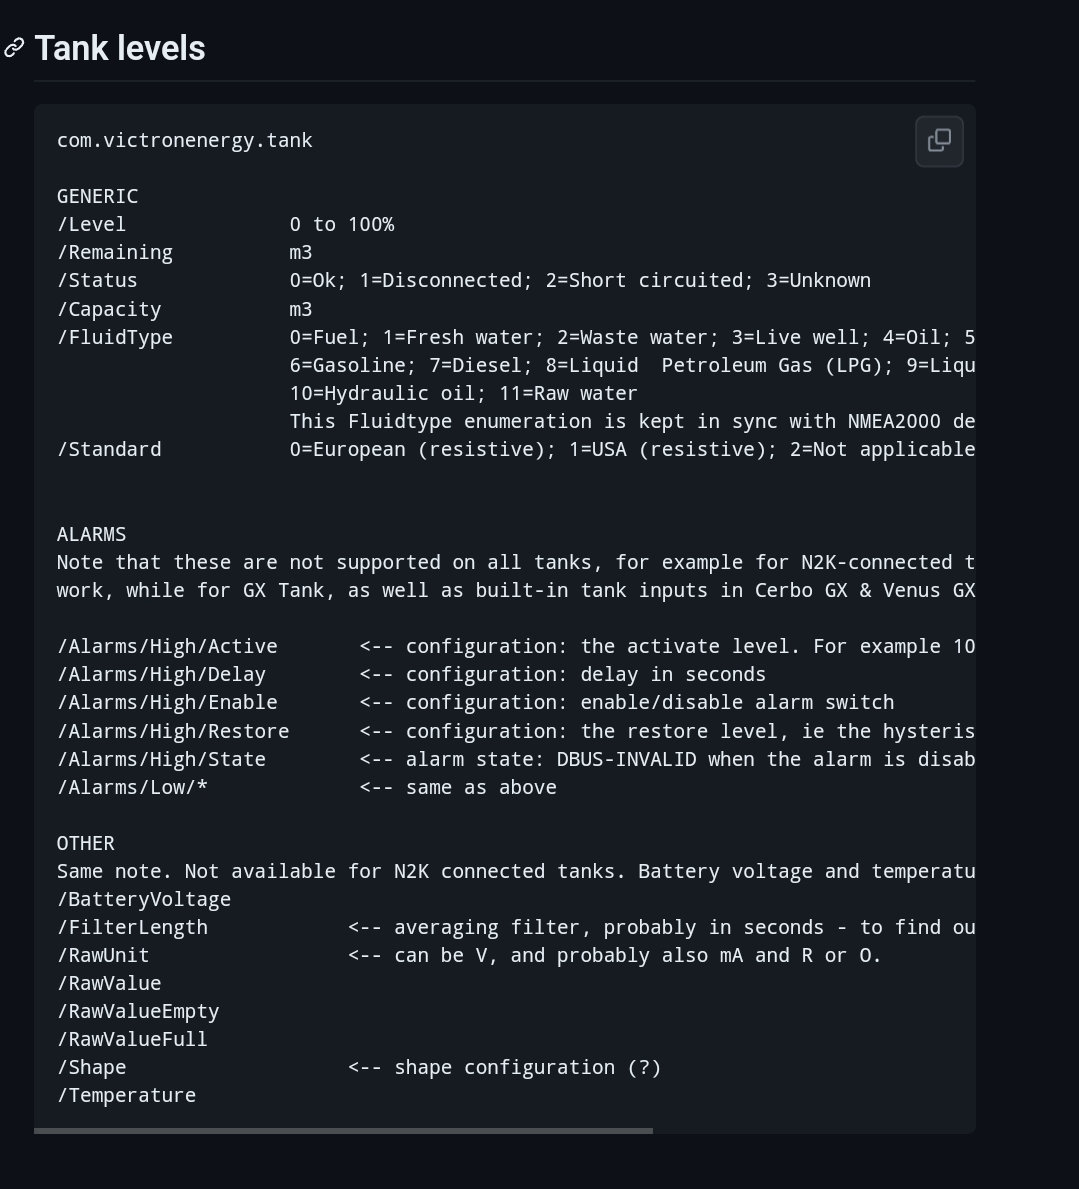
Taken from
https://github.com/victronenergy/venus/wiki/dbus#tank-levels
Hi Matt, thank you for getting back to me, I will have a read of your post and study tomorrow as it's 10:15Pm and I have only just seen it. watching the walking dead at the moment :-)
No worries. I'm not familiar with lilygo side (although interested in replicate your setup ie arduino instead of pi in my next setup)
If you've got anymore queries @ me in your comment. Sends me a notification then and I shouldn't miss it
Hi Matt, well I have spent a lot of time looking at all the information you have given me and I have to say I think it's all over my head, I wish Mr Kevin Windrem would add a virtual tank to his Package manager, I don't think I am going to be able to do this without some help. I have got it all working in Homeassistant, I created a tank with node red and an MQTT receiver and a converter from Msg payload Depth_cm to Litres and I have a nice gauge in HA which shows Litres, but the whole point was to get it on the Cerbo as I don't want to have a RPI running all the time just to run Homeassistant for the Gauge.
Bob
Hi @wedgehog
If you can workout how to format the data into just litres before arduino sends to victron mqtt I can type out instructions and provide scripts for how to setup a virtual tank tonight.
One of these connected to VE.CAN
https://www.maretron.com/products/tlm100-tank-level-monitor-40-depth/
How do I forward the MTQQ from a Lilygo 433 to a Victron Cerbo-gx
Hi @wedgehog
Here's how you setup a virtual tank. You can then write the litres values to this. (If you can edit the output received from ultrasonic oil sensor to just send litres to mqtt topic then you wont need any other devices).
Victron has a more detailed guide here, which explains how you can make the below more robust, and get the drivers to persist over updates etc, however the below works.
So you start with Victrons custom driver but edit it to make it create a tank
#!/usr/bin/env python3

"""
A class to put a simple service on the dbus, according to victron standards, with constantly updating
paths. See example usage below. It is used to generate dummy data for other processes that rely on the
dbus. See files in dbus_vebus_to_pvinverter/test and dbus_vrm/test for other usage examples.

To change a value while testing, without stopping your dummy script and changing its initial value, write
to the dummy data via the dbus. See example.

https://github.com/victronenergy/dbus_vebus_to_pvinverter/tree/master/test
"""
from gi.repository import GLib
import platform
import argparse
import logging
import sys
import os

# our own packages
sys.path.insert(1, os.path.join(os.path.dirname(__file__), '/opt/victronenergy/dbus-systemcalc-py/ext/velib_python'))
from vedbus import VeDbusService

class DbusDummyService(object):
    def __init__(self, servicename, deviceinstance, paths, productname='Thunderstorm Tank', connection='Dummy service'):
        self._dbusservice = VeDbusService(servicename)
        self._paths = paths

        logging.debug("%s /DeviceInstance = %d" % (servicename, deviceinstance))

        # Create the management objects, as specified in the ccgx dbus-api document
        self._dbusservice.add_path('/Mgmt/ProcessName', __file__)
        self._dbusservice.add_path('/Mgmt/ProcessVersion', 'Unkown version, and running on Python ' + platform.python_version())
        self._dbusservice.add_path('/Mgmt/Connection', connection)

        # Create the mandatory objects
        self._dbusservice.add_path('/DeviceInstance', deviceinstance)
        self._dbusservice.add_path('/ProductId', 0)
        self._dbusservice.add_path('/ProductName', productname)
        self._dbusservice.add_path('/FirmwareVersion', 0)
        self._dbusservice.add_path('/HardwareVersion', 0)
        self._dbusservice.add_path('/Connected', 1)

        for path, settings in self._paths.items():
            self._dbusservice.add_path(
                path, settings['initial'], writeable=True, onchangecallback=self._handlechangedvalue)

        GLib.timeout_add(1000, self._update)

    def _update(self):
        with self._dbusservice as s:
            for path, settings in self._paths.items():
                if 'update' in settings:
                    update = settings['update']
                    if callable(update):
                        s[path] = update(path, s[path])
                    else:
                        s[path] += update
                    logging.debug("%s: %s" % (path, s[path]))
        return True

    def _handlechangedvalue(self, path, value):
        logging.debug("someone else updated %s to %s" % (path, value))
        return True # accept the change


# === All code below is to simply run it from the commandline for debugging purposes ===

# It will created a dbus service called com.victronenergy.pvinverter.output.
# To try this on commandline, start this program in one terminal, and try these commands
# from another terminal:
# dbus com.victronenergy.pvinverter.output
# dbus com.victronenergy.pvinverter.output /Ac/Energy/Forward GetValue
# dbus com.victronenergy.pvinverter.output /Ac/Energy/Forward SetValue %20
#
# Above examples use this dbus client: http://code.google.com/p/dbus-tools/wiki/DBusCli
# See their manual to explain the % in %20

def main():
    logging.basicConfig(level=logging.DEBUG)

    from dbus.mainloop.glib import DBusGMainLoop
    # Have a mainloop, so we can send/receive asynchronous calls to and from dbus
    DBusGMainLoop(set_as_default=True)

    pvac_output = DbusDummyService(
        servicename='com.victronenergy.tank.ttyO1',
        deviceinstance=0,
        paths={
            '/Capacity': {'initial': 1.235},
            '/Level': {'initial': 0},
            '/Status': {'initial': 0},
            '/Remaining': {'initial': 0},
            '/FluidType': {'initial': 4},
            '/Standard': {'initial': 2}
        })

    logging.info('Connected to dbus, and switching over to GLib.MainLoop() (= event based)')
    mainloop = GLib.MainLoop()
    mainloop.run()


if __name__ == "__main__":
    main()
Edit initial values. Can also edit tty01.
This file should be saved in data folder. I make another folder to store it all in called virtTank
/data/virtTank/virtualTankTTY01.py
You also need to create a folder
/data/virtTank/service
inside this folder you will make a file named run
run will contain:
#!/bin/sh
python /data/virtTank/virtualTankTTY01.py
Then you need to create a symlink in /service to the folder /data/virtTank/service
This would be done using command:
ln -s /data/virtTank/service/ /service/virtTank/
You should then see a folder be created in /data/virtTank/service/ called supervise and a tank appear in dbus-spy (and on VRM).
There are more details on victron's github about making the above more robust and to persist over updates as well as storing the drivers in /opt/victronenergy however for a simple setup the /data folder is fine. If you're adding more complex programs keeping things neat and stored in correct folders will matter more. Similarly if persisting over updates is critical then read further here:
https://github.com/victronenergy/venus/wiki/howto-add-a-driver-to-Venus
I'm not too bothered with my setup breaking over updates as redoing the above is quick enough once you've done it once.
Now the virtual tank is in venus os/GX device. However you need to get data values into it.
I do this via MQTT.
The topic you'll need to send the remaining and level to are:
Remaining: /W/{VRMID}/tank/{deviceID}/Remaining
Level: /W/{VRMID}/tank/{deviceID}/Level
Where VRMID you can find in settings->VRM Online Portal
of your GX device
And device ID you can either find in GX device list or VRM device list And i believe it's VRM instance ID. If you just copy the above scripts it will be 0.
Hope this helps. Of course you'll need to somehow format the output of the oilsensor that's read by the arduino into level and remaining before sending into victron's mqtt topics that I've noted above.
@wedgehog This all looks very complicated..
Can't you just use a normal 0-190 Ohm pressure sender and manually set the range in the Cerbo.
Something like this can be mounted on a tee on the tank outlet pipe:
https://wema.co.uk/products/pressure-sender
Loads of similar on Amazon etc.
Hi @wedgehog
What file did you use for your lilygo. I've got my custom code running (it's picking up neighbors weather station and a few other devices around the area but not the oil sensor that it's literally right next to).
At first i thought it was because i was compiling with OOK instead of FSK. However I've done that now and still doesnt seem to work (magnet trick doesnt work on mine so i'm having to test once per hour).
I noticed the FSK prebuilt file uses 915mhz not 433. Was curious which file you used.
@matt1309 Hi mate, Upload, upload from the web, Lillgo_rtl_433-fsk. Oh! and don't forget, your tank may only send info a few times a day unless you put a magnet by the internal switch on the sender unit. You can look that information up on the web site for your model of sonic sender
Thanks I'd copied the build settings from that binary except for some reason that binary says its built for 915 not 433 but it wouldn't receive the data with either.
Turned out I needed to clear flash.
Data's received now. Just need to check the code that extracts the data and converts depth to capacity etc then should be done.
(unfortunately magnet trick doesn't seem to work on mine) mine seems to be some obscure model that just uses same data structure but is branded differently