question

philipl avatar image
philipl asked

NodeRed - Ignore AC Input 1 - Multiplus II

Hi,


I am looking for the control to Ignore AC Input I on my Multiplus II system via NodeRed, but can't seem to find it, am I missing something?


I can find the following:

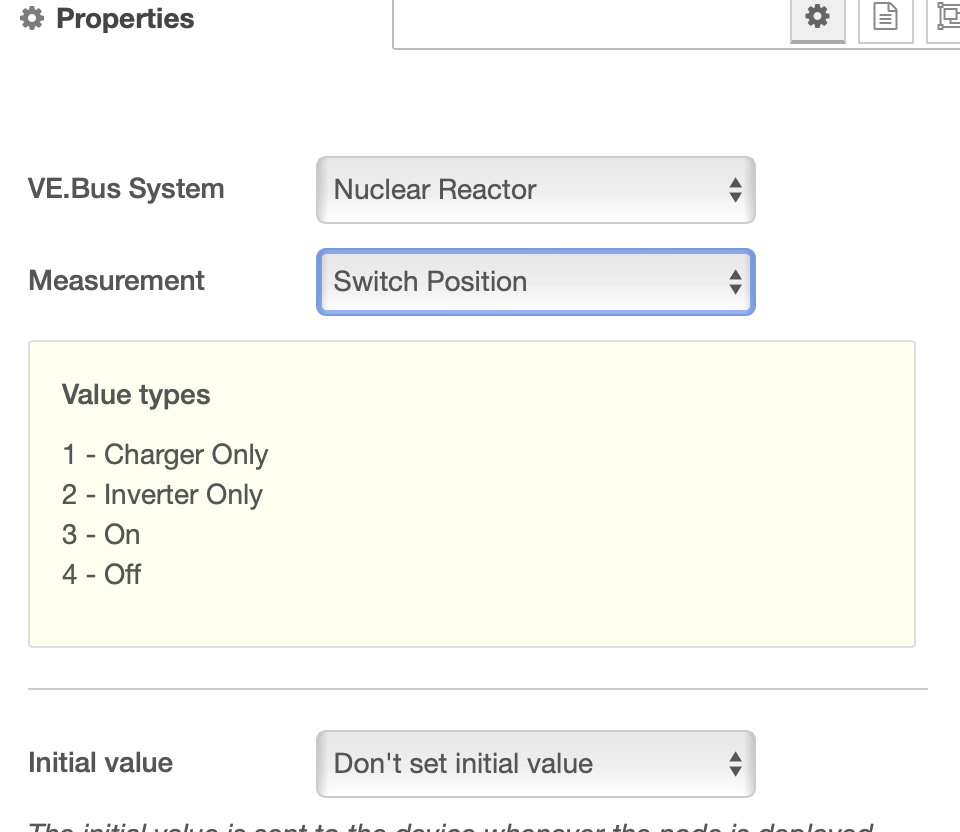
VE.Bus System Node: MULTIPLUS-II, AC input 1 ignored, which gives the state.

Now I am looking for the way to set that so that AC input 1 can be ignored.


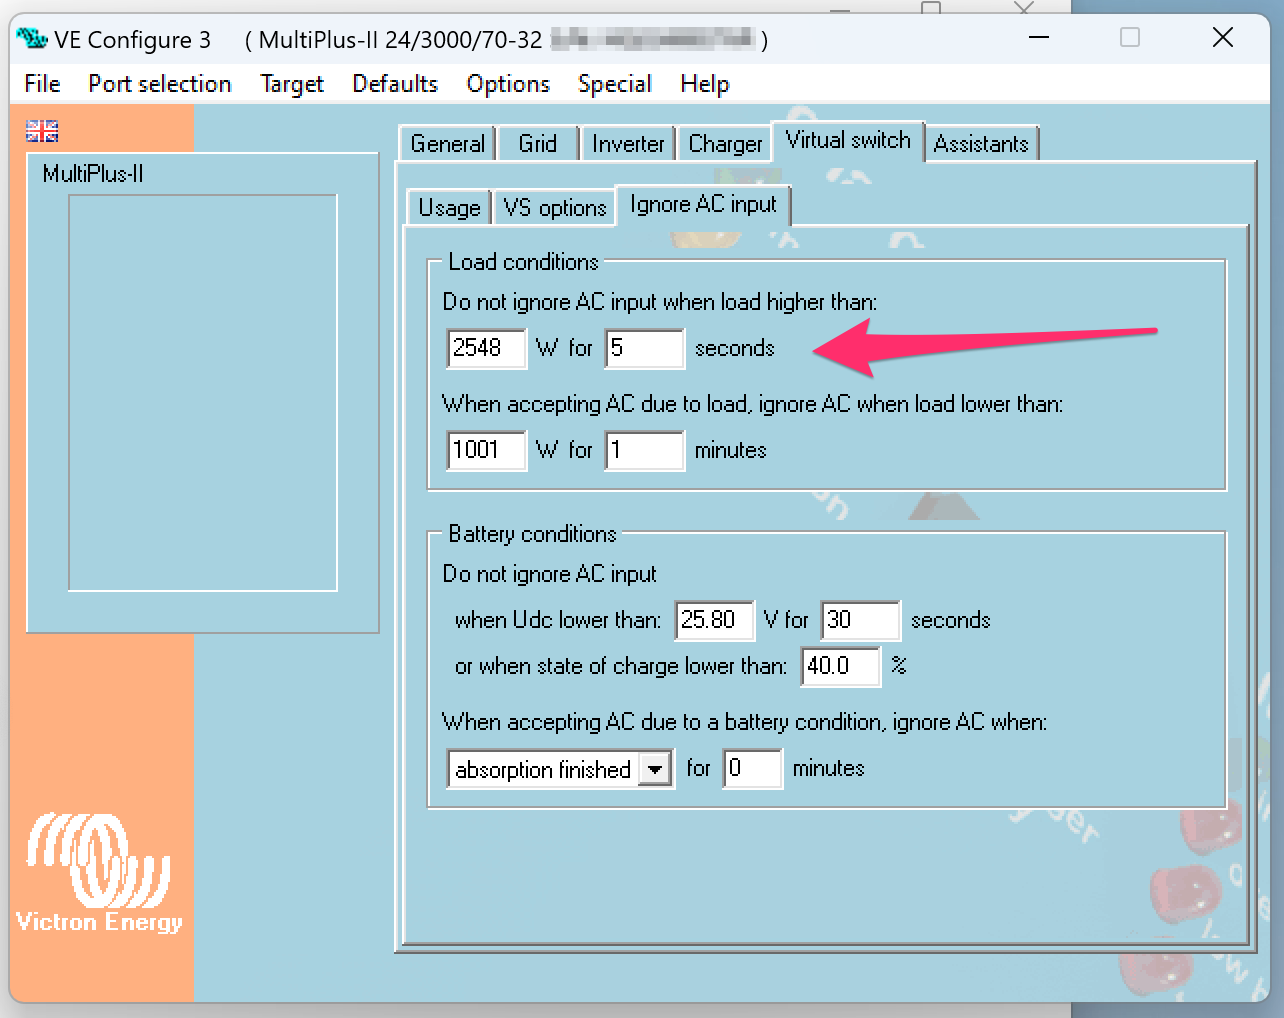
When using an Assistant on the Multiplus, I can do it by using a General flag to Ignore AC input 1.


Can someone please tell me where to find the functionality in NodeRed to be able to tell my Multiplus II to ignore the AC input 1, thus to open the relays of AC Input 1 so it is not connected.


Thanks

Multiplus-IINode-RED
2 |3000

Up to 8 attachments (including images) can be used with a maximum of 190.8 MiB each and 286.6 MiB total.

5 Answers
nickdb avatar image
nickdb answered ·

Use the VEbus system control node.

Select the inverter and use the "switch position" option.

You can also search for the relevant paths here:

https://github.com/victronenergy/node-red-contrib-victron/wiki/Available-nodes


screenshot-2023-08-18-at-071356.png


3 comments
2 |3000

Up to 8 attachments (including images) can be used with a maximum of 190.8 MiB each and 286.6 MiB total.

Alexandra avatar image Alexandra ♦ commented ·

The Fronius will charge the battery in micro grid/off grid.

Like I said you can test it with a manual disconnect from the GX. Without having to dig into the node red to start.

Device list - inverter - switch ... Test it out.

0 Likes 0 ·
nickdb avatar image nickdb ♦♦ Alexandra ♦ commented ·
yip, or enable inverter control on vrm and do it from the top right control button.
0 Likes 0 ·
Ovidiu Stan avatar image Ovidiu Stan nickdb ♦♦ commented ·

Daaang, it works. Wouldn't think so, cause in my understanding stopping the charger would mean literally stopping the charger . Anyway, thanks for the tip, my programming life just became a lot easier.

0 Likes 0 ·
derrick thomas avatar image
derrick thomas answered ·

You can set inverter mode to "invert".

3 comments
2 |3000

Up to 8 attachments (including images) can be used with a maximum of 190.8 MiB each and 286.6 MiB total.

philipl avatar image philipl commented ·

Hi Derrick, thanks for your reply but I don't quite follow. I can't seem to find a setting to set inverter to invert, where do you have that setting? Will that cause the relay to physically disconnect AC input 1?


Thank you

0 Likes 0 ·
derrick thomas avatar image derrick thomas philipl commented ·
You will find it in node ve.bus/switch position
0 Likes 0 ·
philipl avatar image philipl derrick thomas commented ·

Thank you very much. I have tested it and it seems to do what I want.

When I switch the Multiplus II - Switch Position to 2, it seems to disconnect the AC 1 input, and when I switch it to 3, it connects it again.

I have noted that when switching the switch between 2 and 3, the Multiplus II - AC input 1 ignored stays 0. "AC input not ignored" which does seem a bit strange, because when the switch is in position 2, the AC input 1 is "ignored" or disconnected.


I would like to get the detailed documentation on exactly what the difference is between Multiplus switch position "on" and "inverter only". I have gone through the Multiplus Manual and searched but can't find any information of what "inverter only" would do. From the behaviour I deduce that it switches the inverter on, but doesn't connect the AC 1 Input, but I can't find the documentation that describes it. Does anyone know where the documentation is?


What I did find is that for "on": The Inverter will come into operation and an AC voltage connected to the ‘AC in’ terminal will be switched through to the ‘AC out’ terminal, if within specifications.

So what I then guess is that for "inverter only" the AC voltage to the AC in terminal will not be switched through.

Thanks

0 Likes 0 ·
derrick thomas avatar image
derrick thomas answered ·

"inverter only" does same thing as "ignore ac input1". The difference is that the former is accessible from the gui, vrm, or node red. The latter is only accessible from the multi itself via an assistant or virtual switch. Maybe mqtt but I'm not sure on that. You can read the state of ignore ac input via mqtt but I'm not sure if you are able to write to that register or not via mqtt. Ve.bus devices are somewhat limited in regards to some controls externally. You could run dbus-spy and see if it's a writeable register but I don't think so. Maybe someone else will chime in and answer.

2 |3000

Up to 8 attachments (including images) can be used with a maximum of 190.8 MiB each and 286.6 MiB total.

Kevin Windrem avatar image
Kevin Windrem answered ·

Ignore AC input does a similar thing to switching to invert only, but it will also shut down the charger. Think if it as a virtual way to turn off the AC input breaker to the Multi.

The Multi's ignore ac input was originally set only from the assistant/virtial switch within the Multi. The recent addition of generator warm-up and cool-down added way to control the ignore externally. Further work continues so that you can set a Quattro to ignore AC input 1 or 2 independently.

dbus-spy shows a parameter for ignore state (/Ac/State/IgnoreAcIn1) and another for control (/Ac/Control/IgnoreAcIn1). The control is write only, the state is read only. /Ac/State/IgnoreAcIn1will reflect the combination of the external control and internal (assistant/virtual switch) but the control parameter is independent of the assistant/vritual switch.

If you intend to use the ignore control, keep in mind these will conflict with the generator warm-up and cool-down logic in the GX device. That is, when warm-up or cool-down periods end, the ignore AC input control will be set to false.


EDIT: Of course switching to invert mode also shuts down the charger. What I should have said is that ignore AC input will disable the charger if the inverter is in charger only mode.

The ignore AC input is useful in that it is independent of the inverter mode switch state. Therefore, it can be turned on and off without affecting the inverter mode so the inverter returns to it's previous state.

4 comments
2 |3000

Up to 8 attachments (including images) can be used with a maximum of 190.8 MiB each and 286.6 MiB total.

Ovidiu Stan avatar image Ovidiu Stan commented ·
Has anyone found a way to set this in Node-Red ? Because I have an ESS installation with very, very bad quality grid, and I want to disconnect it completely until my batteries reach a SoC of 20-30%, but I want to be able to do this dinamically in Node-Red, not with the assistants. But, so far, I couldn't find a parameter to control it, and the option described above, to shut down the charger doesn't wotk in my case, since I have a Fronius connected on AC OUT with 3 Quattros.
0 Likes 0 ·
Alexandra avatar image Alexandra ♦ Ovidiu Stan commented ·

@Ovidiu Stan

The simplest way is to change the switch position to inverter only. The reply from @philipl will work for you.

This option disconnects the input power only. It is the same as doing it manually through the switch position under the inverter on the GX of the system. So you can try it first that way to check if you have the desired results.

0 Likes 0 ·
Ovidiu Stan avatar image Ovidiu Stan Alexandra ♦ commented ·
But if I only set it to inverter only, obviously it won't charge anymore. And the power in this systems comes only from Fronius grid-tie inverters. How can I charge the batteries then ?
0 Likes 0 ·
daniel-feist avatar image daniel-feist Ovidiu Stan commented ·
I tried using "inverter-only" and by battery is still charging from AC-coupled PV on AC-OUT1.
1 Like 1 ·
monomatic avatar image
monomatic answered ·

Does altering the switch position to invert only (with node-red) still permit the virtual switch : ignore AC input load conditions to operate?

I think I have observed that it doesn't, but not certain. I'd like to confirm before trying to test it by overloading the thing again. (EasysolarII 24/3000 GX)

1712050153785.png


1712050153785.png (83.6 KiB)
2 |3000

Up to 8 attachments (including images) can be used with a maximum of 190.8 MiB each and 286.6 MiB total.