I have spent days upon days, pulling my hair out trying to figure out how to accomplish a method of integrating some platform that would allow me to setup triggers and such that would adjust the parameters of the VenusGX, or allow it to communicate status updates that would fire home automation triggers. Eventually, after a lot of trial and error, and many a late night staring at my computer screen to get this working, I got a working implementation which functions beautifully.. I do hope someone else will find this helpful.
*This guide will show screenshots, and discuss functionality that is from my own flavor of Home Automation Controller, for which I use HomeSeer 4, however should work in a very similar fashion with any other platform that has support or a plugin for MQTT; a quick Google search reveals Home Assistant and SmartThings appear to have support for MQTT as well*
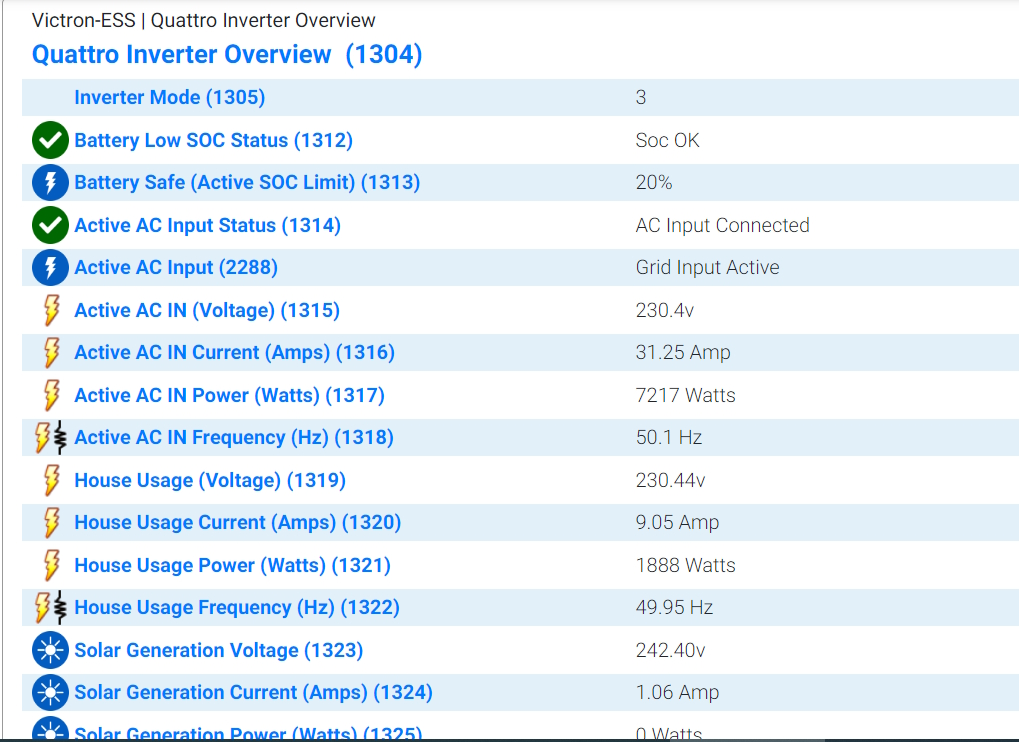
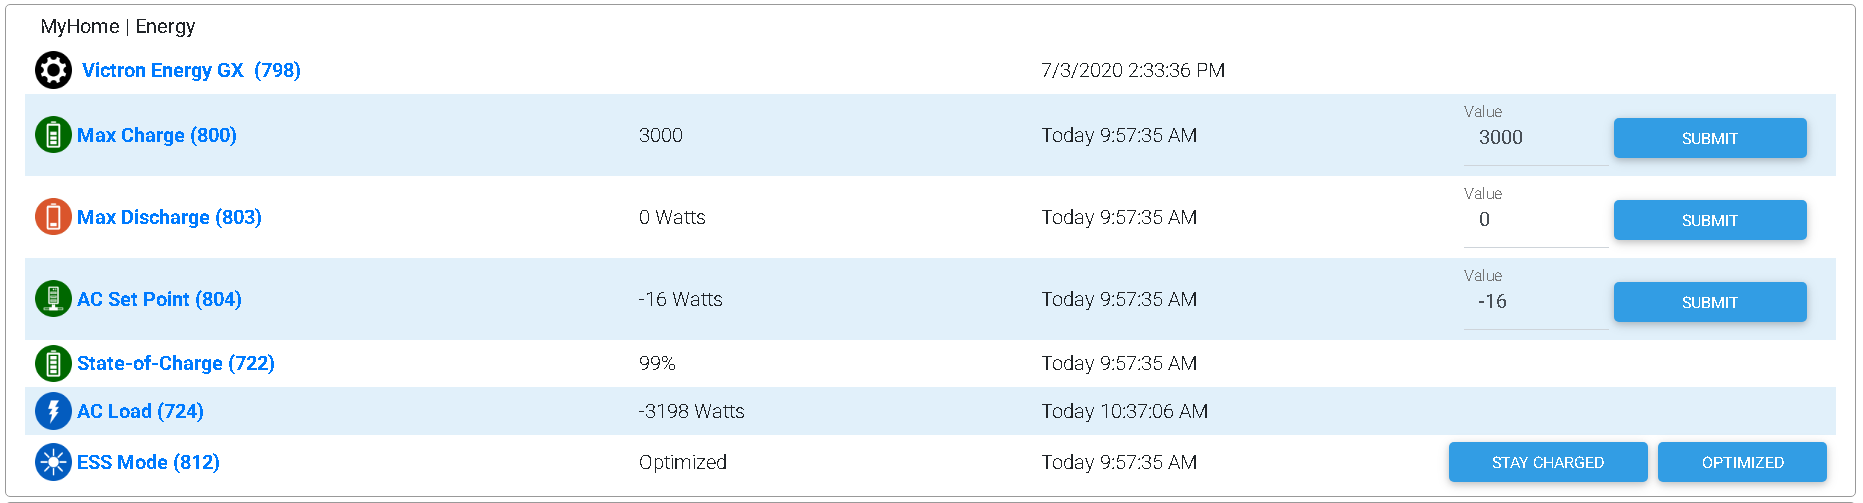
I will begin this guide with a screenshot here which gives you an idea what you can accomplish:
Having access to this functionality opens up a world of possibilities inside a Home Automation Controller, henceforth referred to as an "HAC".
A few examples of what I have done with automations:
- Visual queues when the grid has failed, Smart Light bulbs pulse yellow, followed by a spoken alert
- Automated conservation of energy when the grid has failed, easily switch off smart appliances/plugs
- Reconfigure ESS settings when the utility company issues a "Demand Response" energy event; instead of just saving energy, am now able to sell it when most profitable
What you need:
- A Venus OS product
- A HAC which supports MQTT
- A platform to run an instance of Node-Red (this can be a Rasberry Pi or literally any always-on machine running Linux, Windows or possibly MacOS)*
- Some intermediary/entry-level IT skills, or ability to very closely follow directions
Phase 1 (VenusOS):
- Assign a static IP to your device, either in the network settings of the device itself, or on your DHCP server. This is detailed in chapter 3.6 of the VenusGX manual.
- Enable MQTT. Settings -> Services, flip on both options which mention MQTT, most importantly the plaintext option
- ESS Mode does not need to be in External Control mode, leave set to Optimized or whatever it was normally
- Note your VRM portal ID for use later in this guide. Save it to a text file somewhere you can easily copy paste from. This is found in Settings -> VRM online portal
- Note your Multiplus instance ID. From the very top level menu, select your Multiplus in the devices list, and click right. Go alllll the way down, and click right on Device, and look for "VRM Instance ID"
Phase 2 (Node-Red):
*Alternatively, as suggested by Marcus, you can follow these instructions to install Node-Red on the VenusOS device itself, if your HAC does not support this: https://www.victronenergy.com/live/venus-os:extended
- Select a machine that will always be on for this. I am running this on the same server as I run HomeSeer4 (My software based HAC) which isn't a problem.
- Install Node.js (prerequise for Node-Red) https://nodejs.org/en/download/
- Using the Node.js command prompt (newly installed app from step 2), install Node-Red https://nodered.org/docs/getting-started/local
- Unblock port 1880 and 1883 on the firewall of the machine running Node-Red
- Optional: Follow this guide here to make Node-Red start on boot, after downloading "nssm.exe": https://gist.github.com/dceejay/576b4847f0a17dc066db
- Start Node-Red, either by running the command "node-red" from the node.js command prompt, or using the service manager to start the service, if you followed step 5
- Assign a static IP on the server running Node-Red
- From a different computer, open a web browser and make sure you can get to "IPADDRESSYOUPICKED:1880" (without quotes), this should pull up the node-red GUI, if not make sure the process is running, and you unblocked 1880 on the firewall
Phase 3 (HAC):
1. Assign your HAC a static IP. I won't go into details here as there are too many variables.
2. If you are running your HAC as a software implementation on a Windows box, or other OS which has a software firewall, you will need to unblock port 1883
3. Install any required components to enable MQTT, in my implementation using HS4, I used the mcsMQTT plugin
4. Make sure the implementation of MQTT on your HAC is running a local broker, you may need to familiarize yourself with MQTT a little bit here, but this step is usually pretty easy, and think was configured as default in my instance
- Typically you will be looking for setting like this: "MQTT Broker name or IP address", which in my instance, I just filled in with 127.0.0.1 (local host IP address)
Phase 4 (Connecting VenusOS -> HAC):
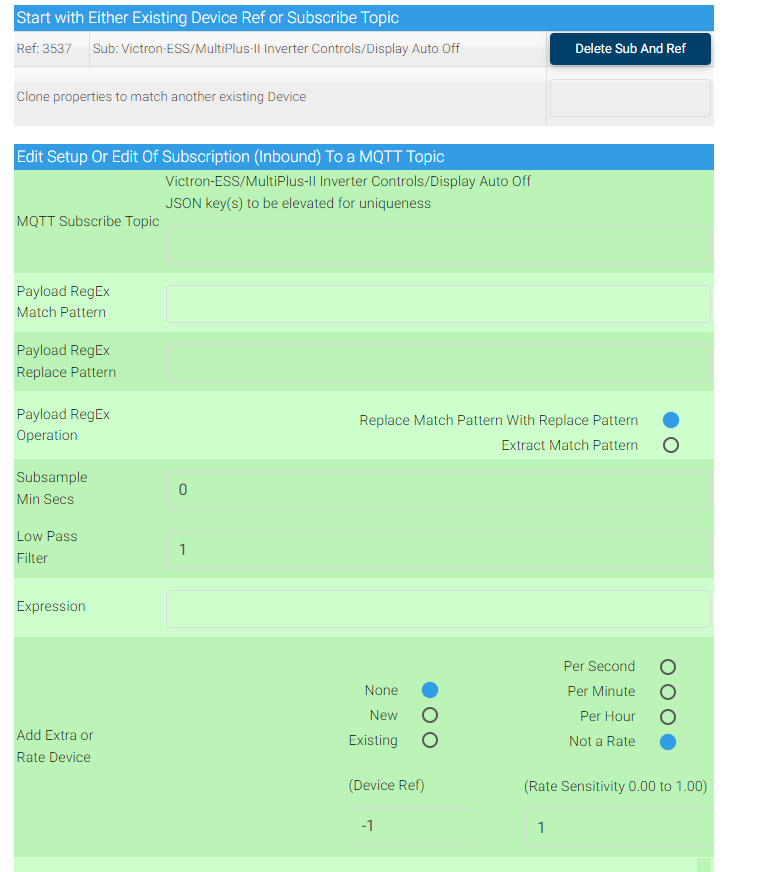
Now it's time to set up your "flows", these are sort of like little customized data paths in Node-Red, which I will do my best to explain without making it sound too intimidating I hope.
Basically the idea is this, you connect a "receive node" to the VenusOS device, which then grabs that bit of data every time VenusOS updates the value. You then implement some intermediary "nodes" which convert that bit of data into a more usable format. The reason for this being, is that "bit of data" is really a packet which contains a few pieces of information, only 1 of which we really care about.
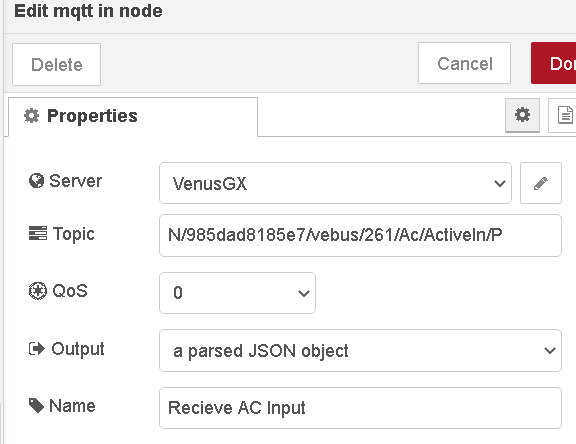
For example, the packet of data which contains my AC Input value (the number you see "Grid" listed as in the HUD of the VenusOS device) looks like this when it first comes in:
N/985dad8185e7/vebus/261/Ac/ActiveIn/P : msg.payload : Object
objectvalue: -3147
So we need to strip that away until a single string is left with a value "-3147"
The reason for this being that my HAC knows exactly what to do, "If AC_Input < 1000", but not so much if "AC_Input=objectvalue: -3147"
I will provide my exported flows in NodeRed so you can easily import and tweak them, but wanted to explain how it works so everyone can understand what is happening to the data.
Here are some screenshots for each phase from this flow, which I will try to explain as I go:

This one is fairly simple. The first node is the "MQTT in" node, which connects to the VenusGX, looks for a topic (I will provide a list of all topics toward the end), this topic is the "AC Input" value, as mentioned before, which is listed as "grid" in the HUD. It then stores the data in a parsed JSON object, this format breaks up the packet into different bits which can easily be grabbed.
To add your own VenusOS device here, all you need is to plug-in the IP address from Phase 1, by clicking the edit button
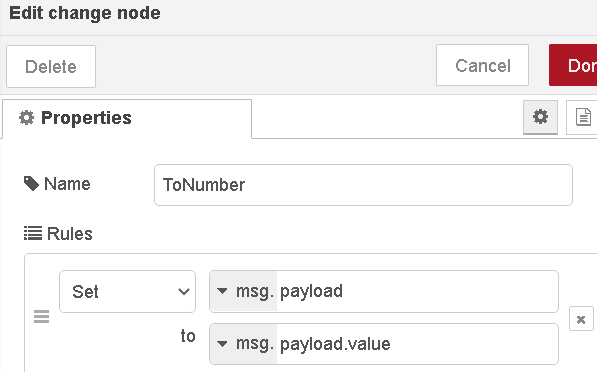
Next, we have a "change" node, which takes only msg.payload.value, and passes it on, if you recall here, the output from the first step looks like this:
N/985dad8185e7/vebus/261/Ac/ActiveIn/P : msg.payload : Object
objectvalue: -3147
So this node takes that whole packet, and only passes on what is to the right of "objectvalue:"
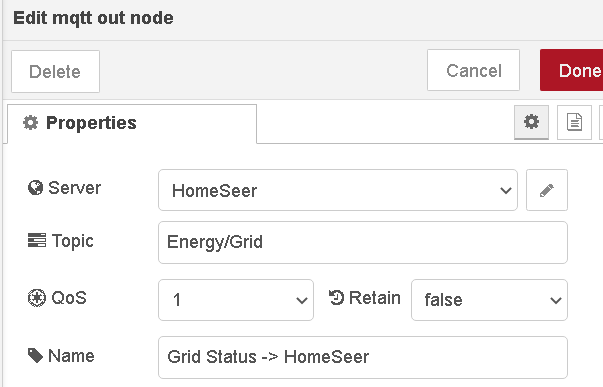
Finally, we have the MQTT out node. This takes the data we just stripped down, and sends to to my HAC, by publishing to a topic, Energy/Grid
That's it for this phase! We now have the data flowing to the HAC for Ac Input.
Phase 5 (HAC):
We now have data being sent to the HAC, but the HAC hasn't been told what to do with it yet. To get your HAC to process this data, we now need to "subscribe" to the topic. This will be very different for you, depending on your HAC and how it implements MQTT, but in general subscribing to a topic is one of the easiest functions and should be immediately obvious when you access the MQTT functions.
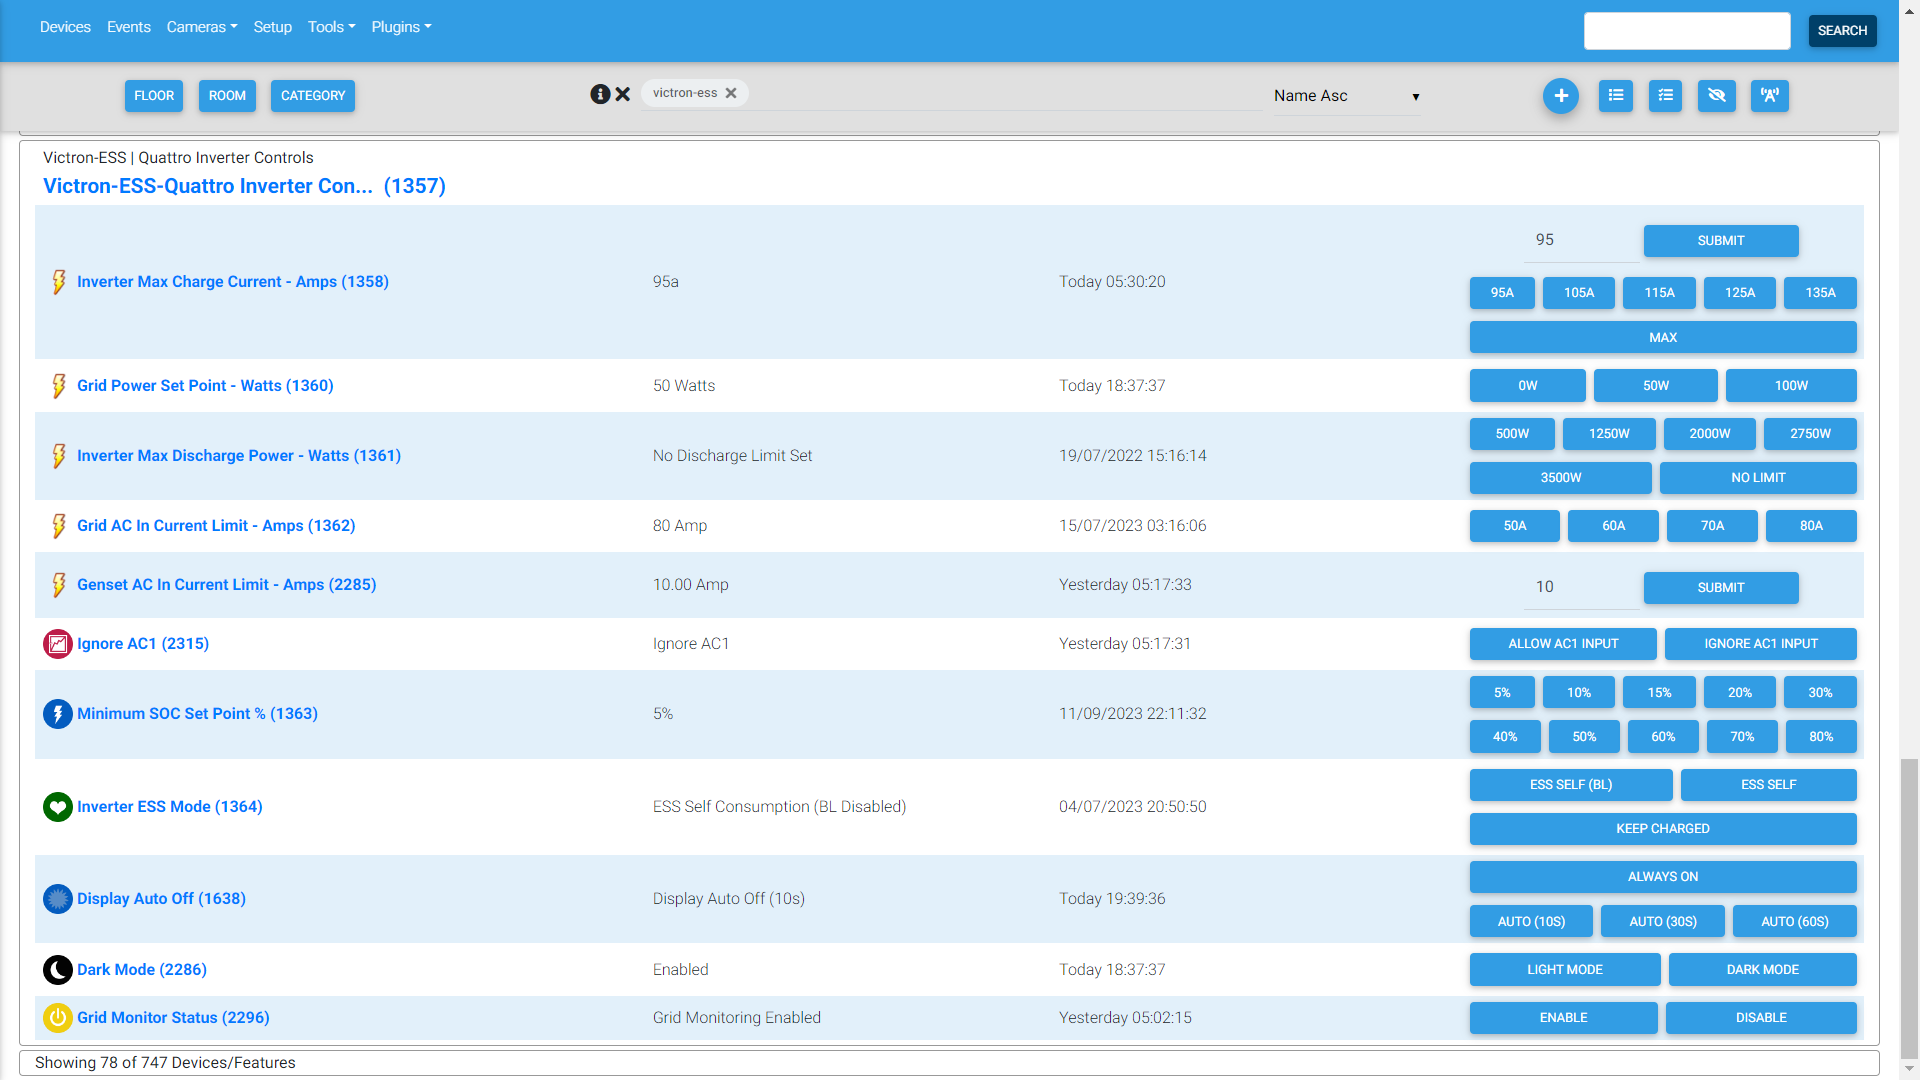
With my instance of MQTT, when you subscribe to a topic, a virtual device is created that allows you to fire a trigger, or just read the value. In my case, device #724 (seen in the very first screenshot at the top) was created, and I renamed and customized with some icons of my choosing, and then grouped it together with other such devices. This whole process again will vary greatly depending on your HAC. I can provide specific instructions for HomeSeer if anyone is interested however.
MQTT Topics (data channels):
I will cover the topics that the VenusOS MQTT broker publishes, and subscribes (listens) to. These can be used to read various bits of data, or write to them and thusly alter settings in VenusOS itself.
As far as connecting Node-Red to your HAC, you can pick and choose your own topics. I simply choose Energy/Grid in my example, because that seemed logical to me at the time.
- Structure of the MQTT topic
Let's look at my example: N/985dad8185e7/vebus/261/Ac/ActiveIn/P
The first segment, "N" signifies a "get" or a "read" command, if you will. If you setup Node-Red with a "MQTT in" node to read data from VenusOS, you are always going to start your topic with this part. I don't know why the programmers chose this, but there you go.
To write a value, alternatively, you begin a topic with "W/" which makes a little more sense I suppose.
Next we have this big, ugly alphanumeric string. This is your VRM Portal ID, which if you followed Phase 1 Step 4, you will have ready to copy paste.
Following this, we have the first path to the data you are looking to read or write. I think most useful bits of data are located under the vebus path, but there may be some stuff in system or settings as well. I would recommend this app to fully explore your VenusOS device: http://mqtt-explorer.com/
Going down the vebus path, you will next need to specify your vebus device ID, which you should have handy from Phase 1, step 5.
From there, there is lots of stuff to choose from depending on what you're looking for. I will outline a few key ones here that I use
Read-only:
N/985dad8185e7/vebus/261/Dc/0/Temperature - Multiplus Temperature
N/985dad8185e7/battery/258/Soc - Battery SOC*
N/985dad8185e7/vebus/261/Ac/ActiveIn/P - Reading on the AC Input side ("grid" value)
N/985dad8185e7/vebus/261/Ac/ActiveIn/Connected - Grid status, publishes a 0 or 1
N/985dad8185e7/pvinverter/21/Ac/Power - PV inverter power, "21" will be your inverter ID
*Not entirely sure how I obtained "258", I probably used MQTT explorer as linked above. It's definitely not the same as your vebus ID though.
*ESS Assistant Required* These can either be read, or written to with N or W
N/985dad8185e7/settings/0/Settings/CGwacs/MaxDischargePower - Self-explanatory, I hope
N/985dad8185e7/settings/0/Settings/CGwacs/MaxChargePower
N/985dad8185e7/settings/0/Settings/CGwacs/AcPowerSetPoint - "Grid set point"
N/985dad8185e7/settings/0/Settings/CGwacs/BatteryLife/State - ESS Mode, 9=Stay Charged, 10=Optimized w/o battery life, and I think 11= Optimized w/battery life
*I will continue updating and adding to this guide, I am just burnt out from typing all this out so far for now. To be added still is how to now get your HAC to talk back to the VenusOS device.*