question

PVTex avatar image
PVTex asked

BlueSmart IP22 Charger and ve.direct

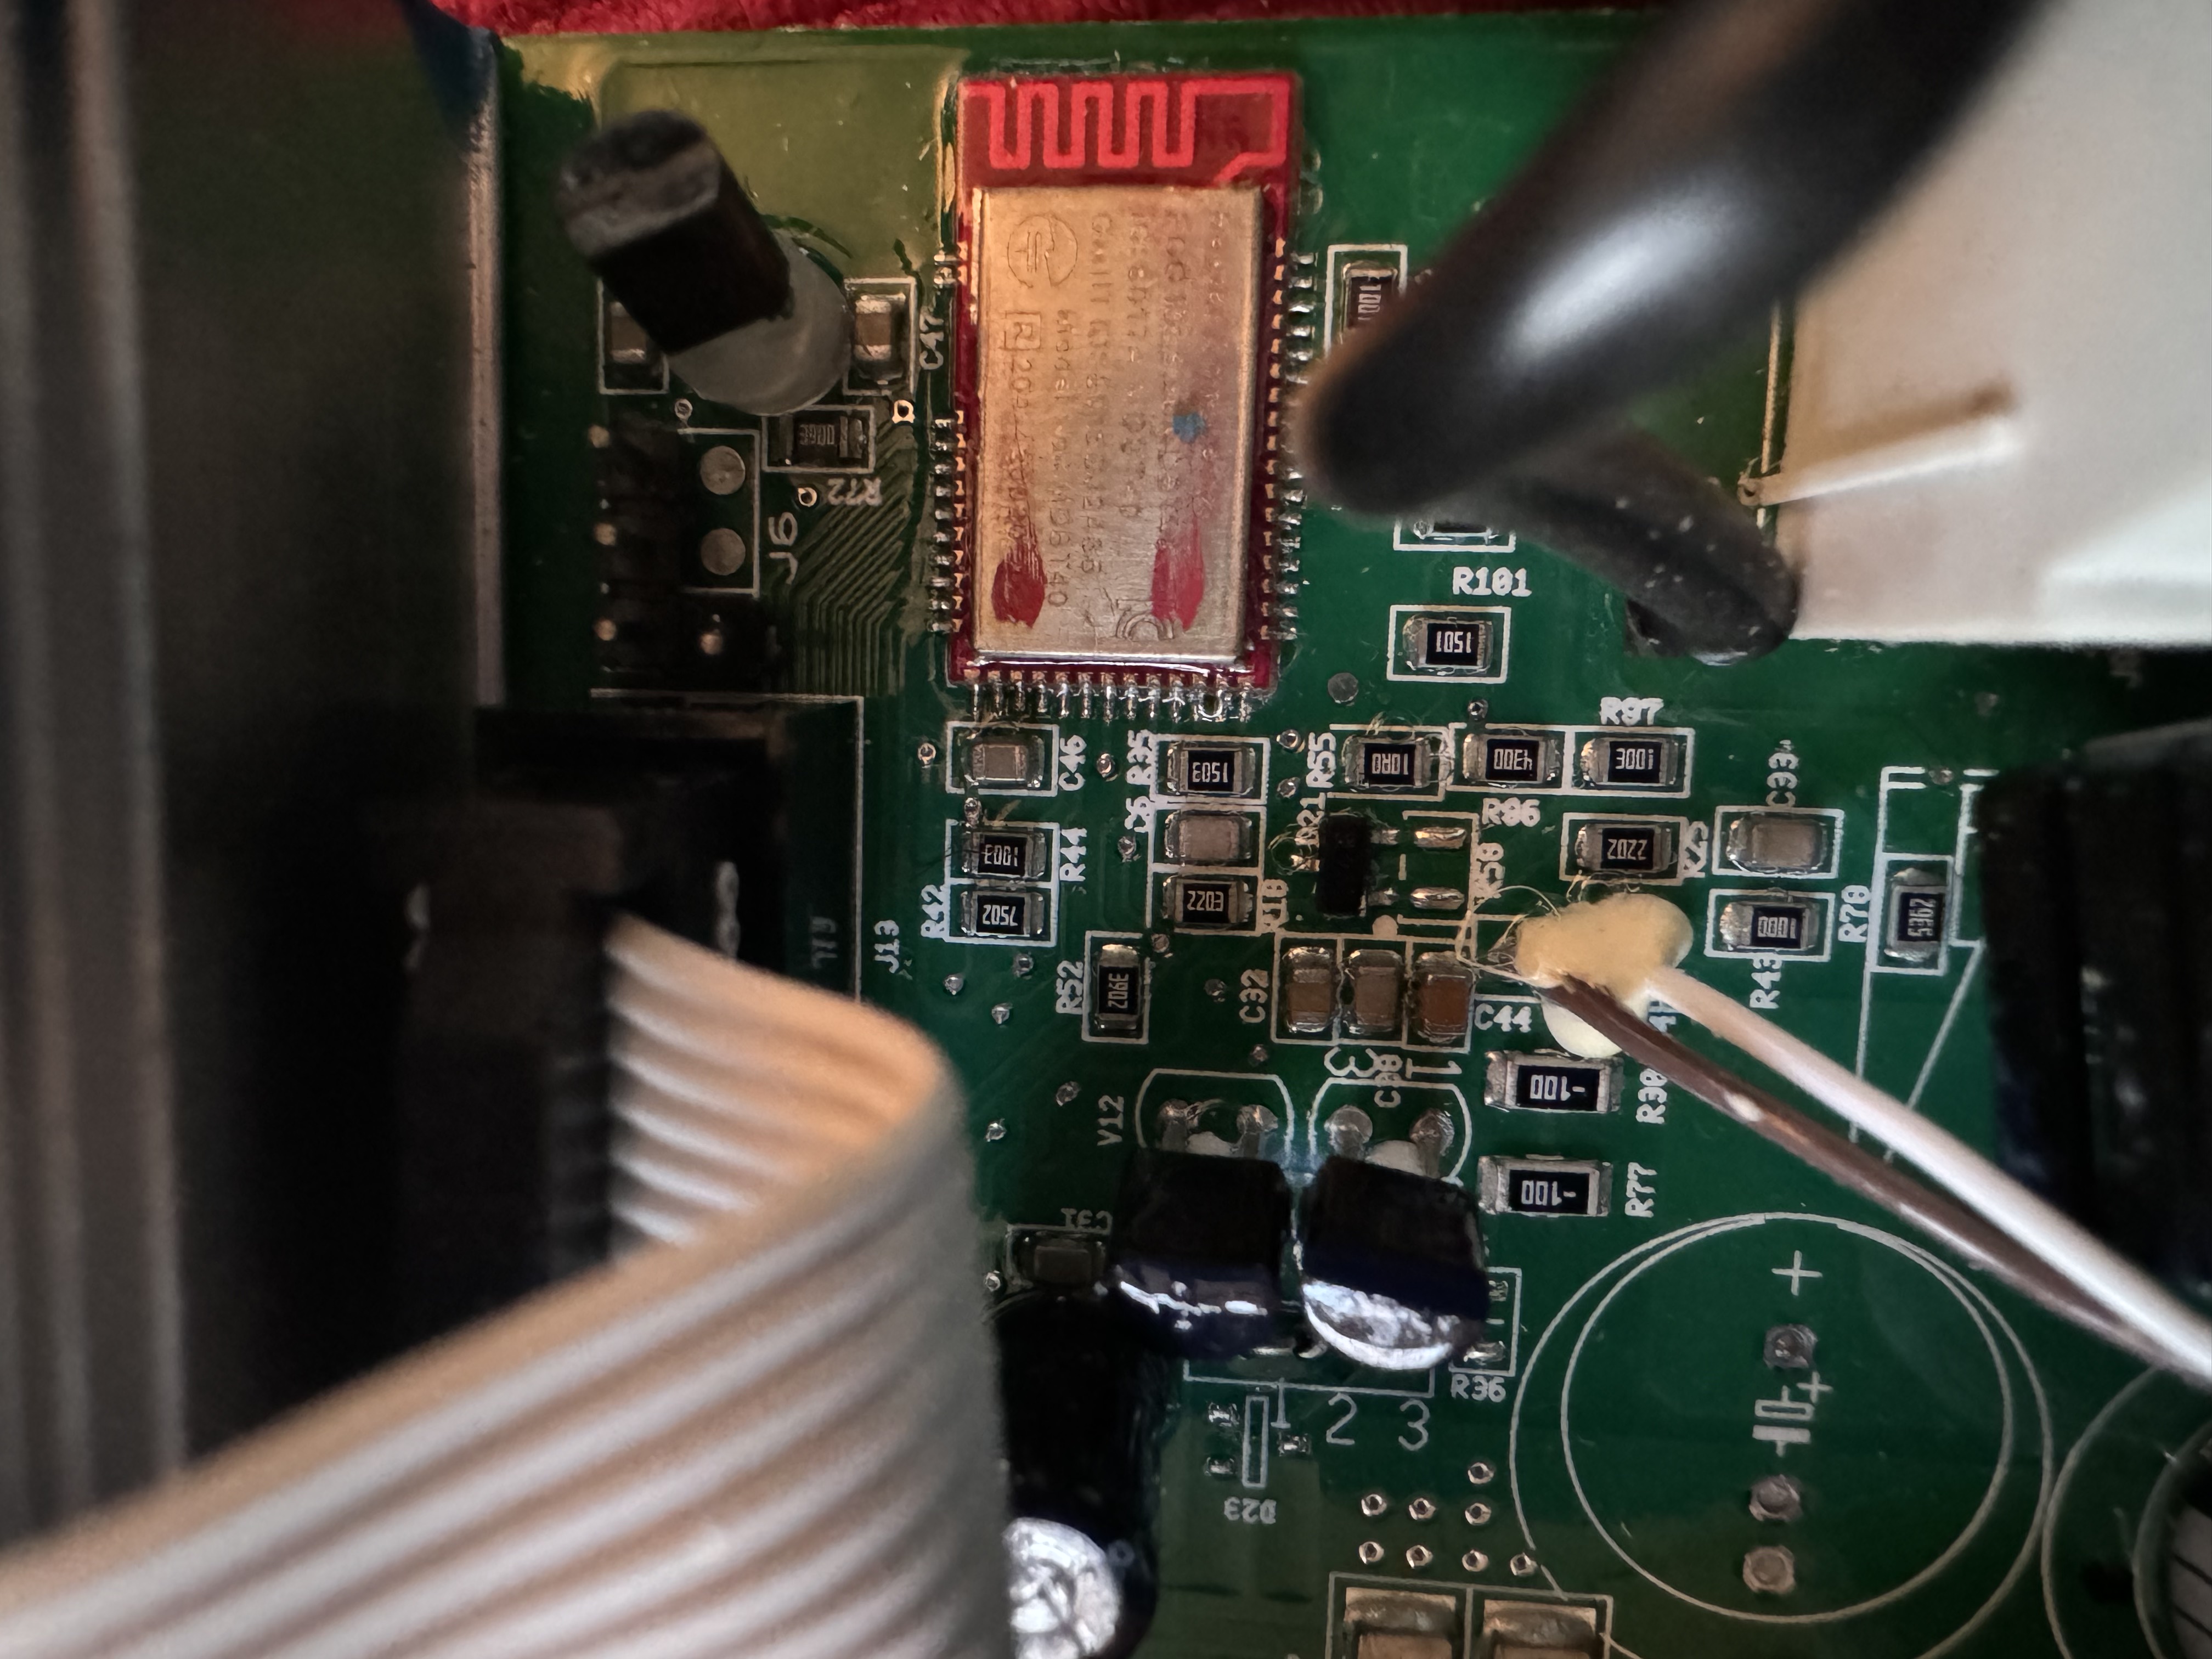
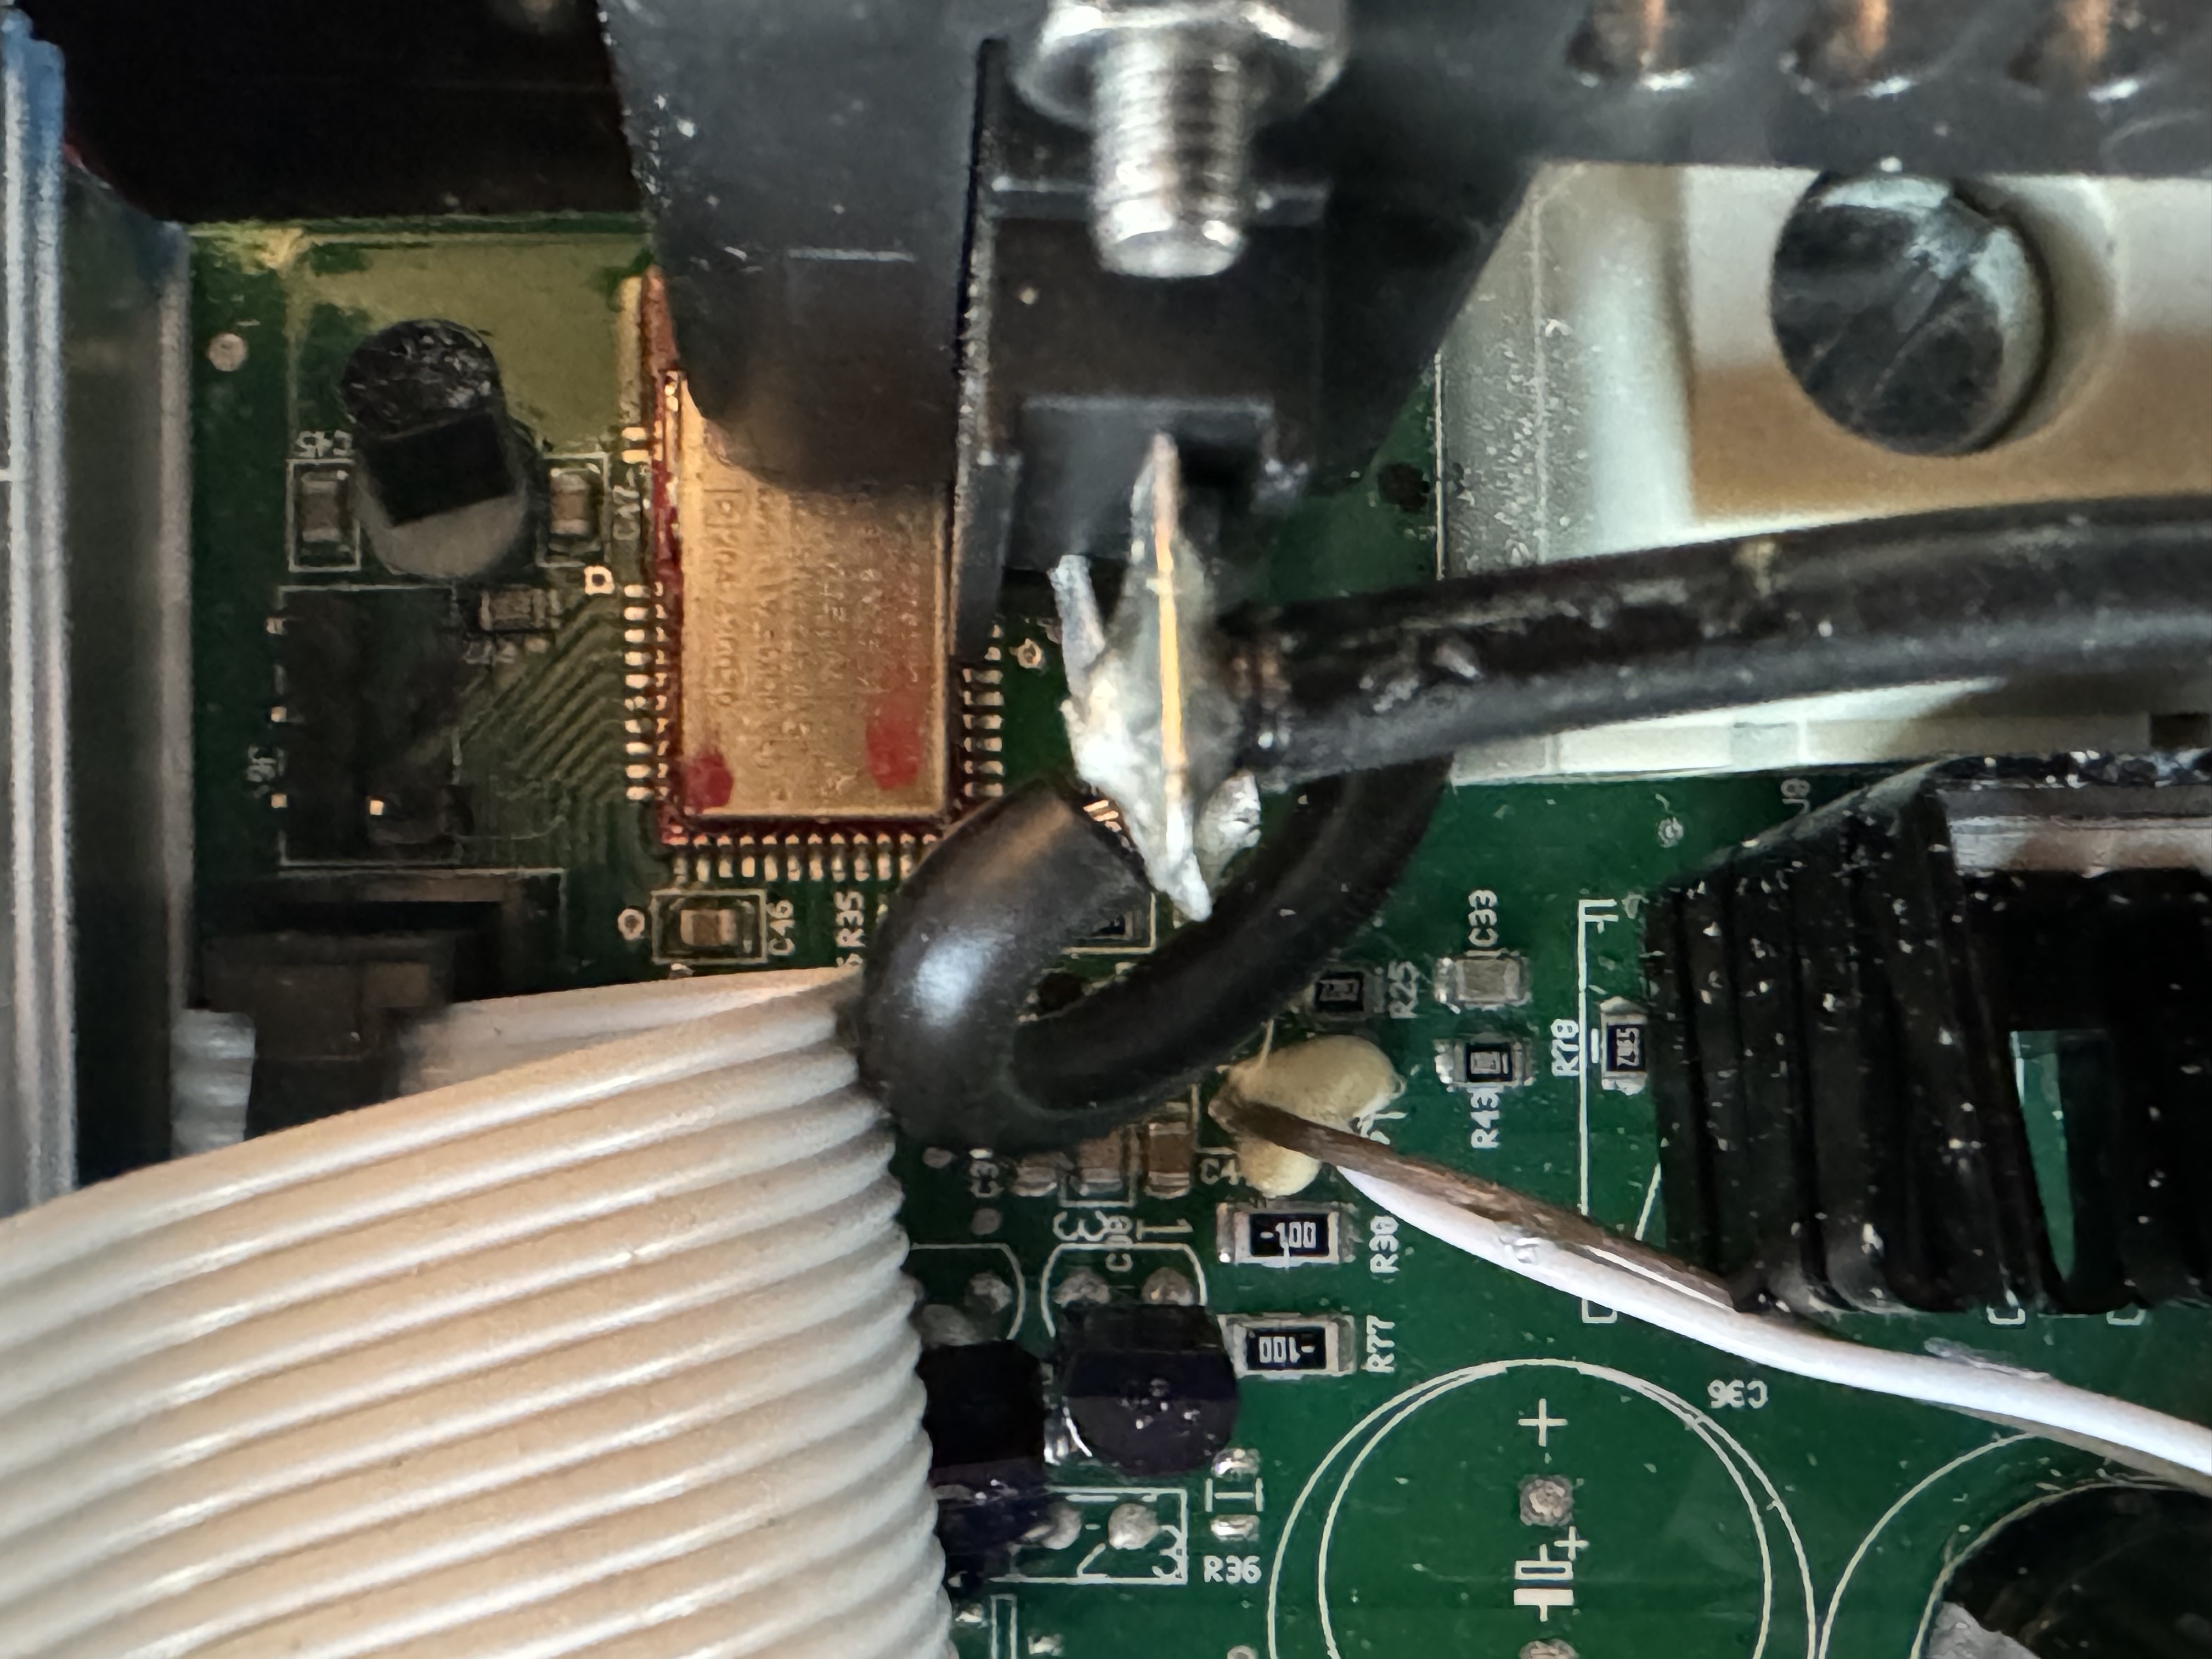
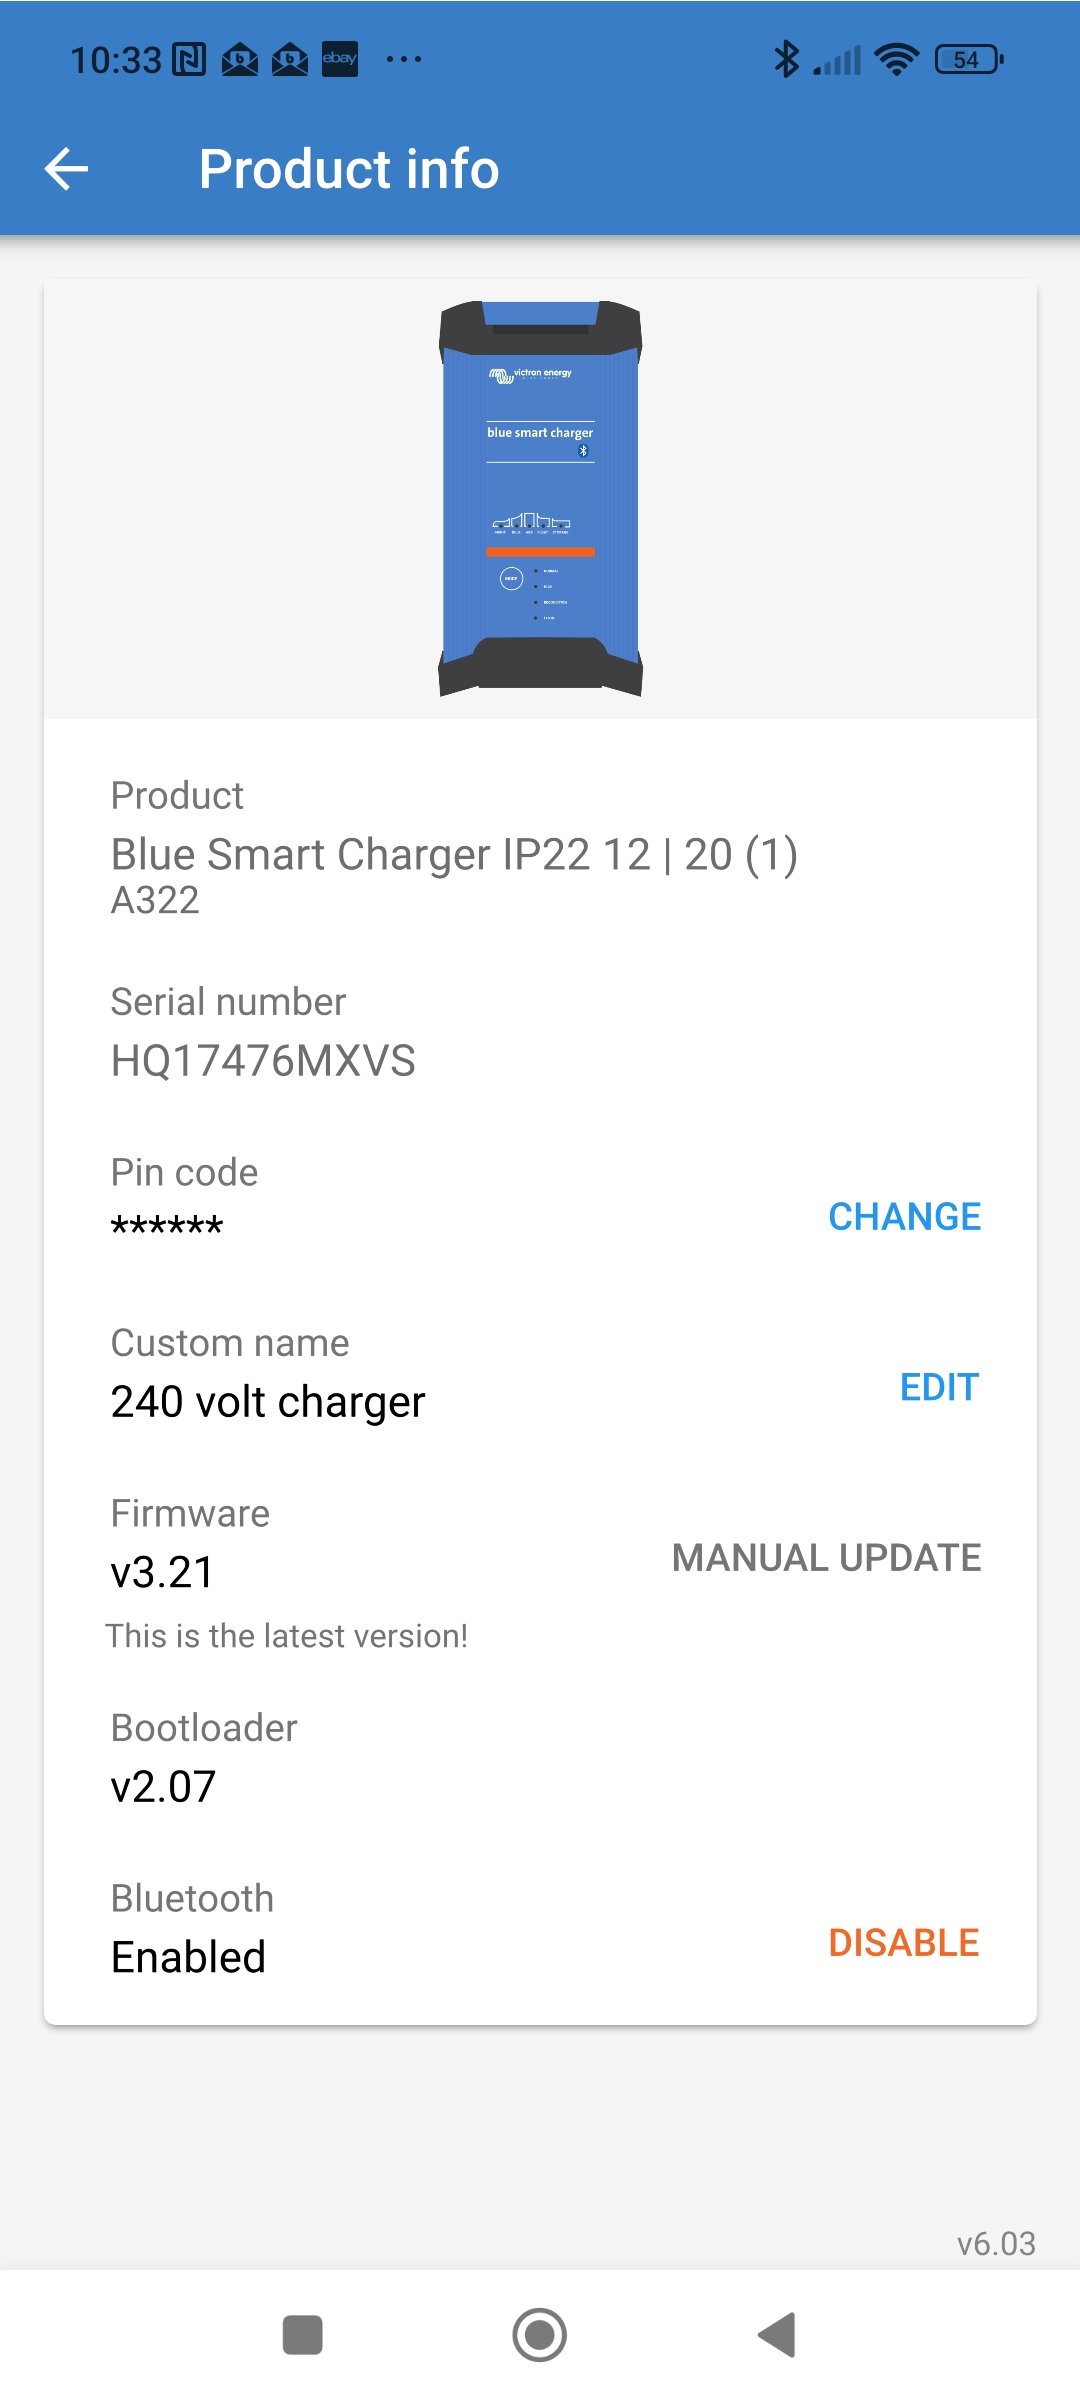
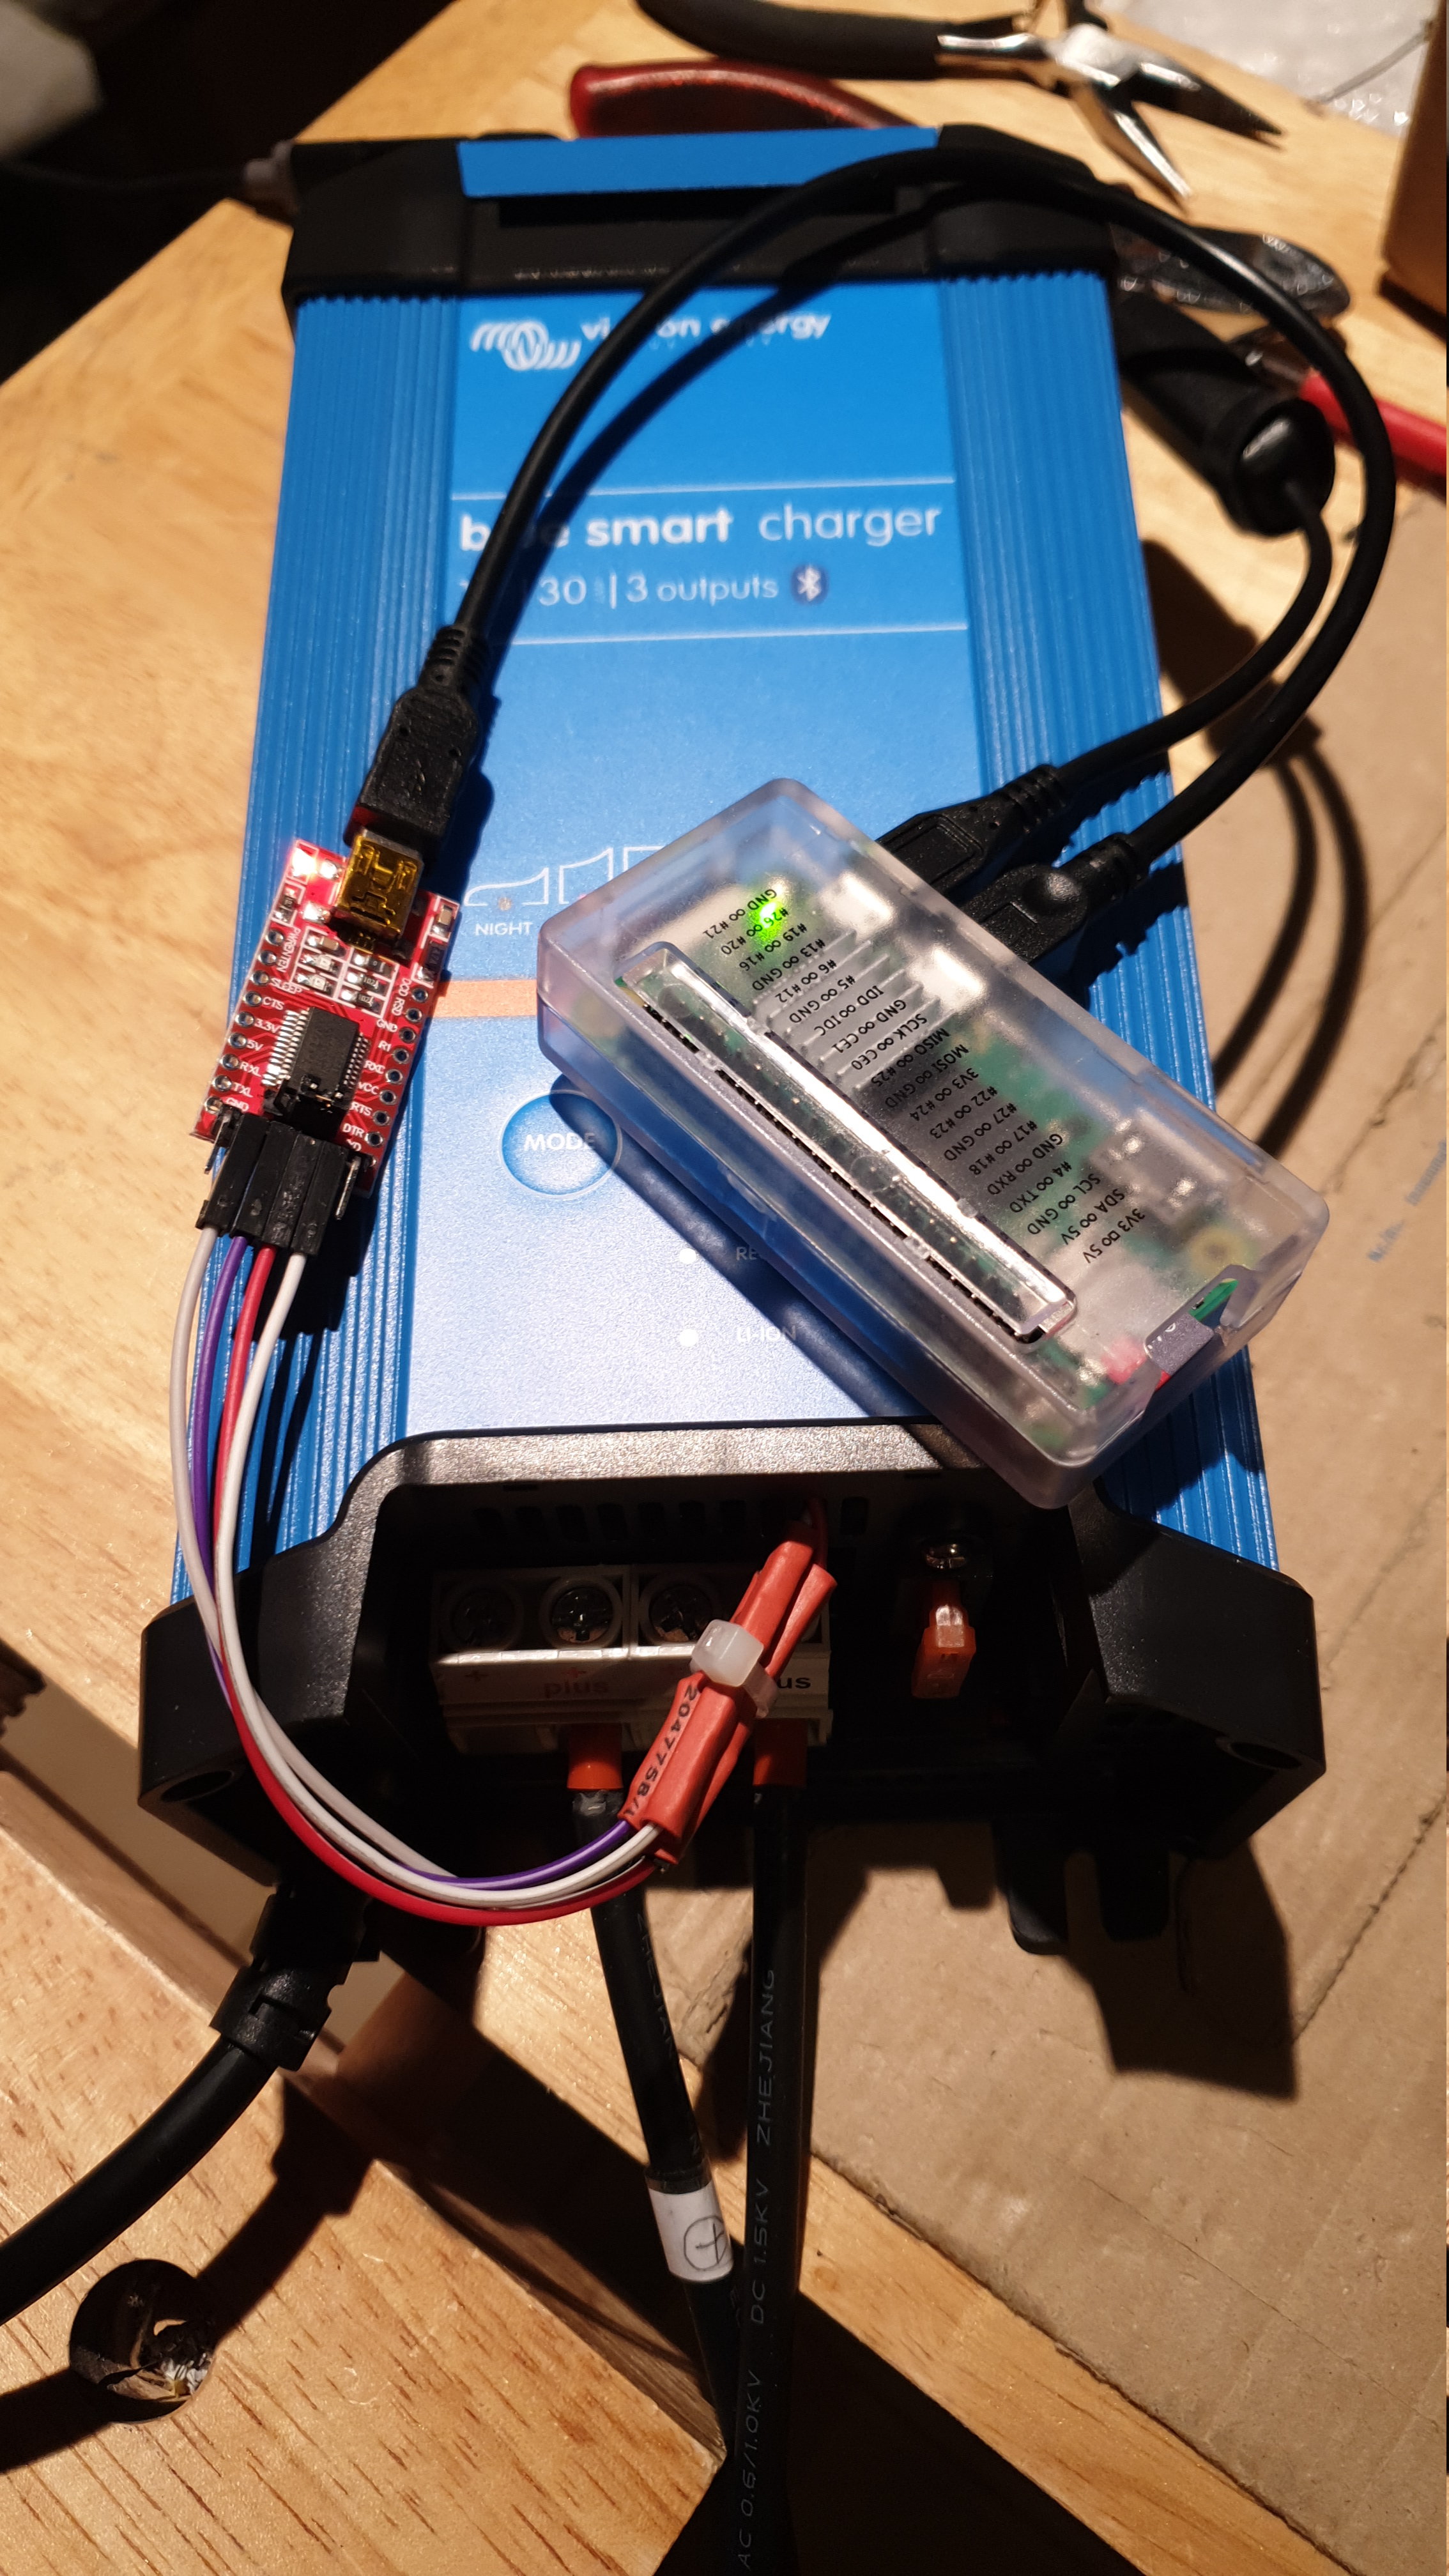
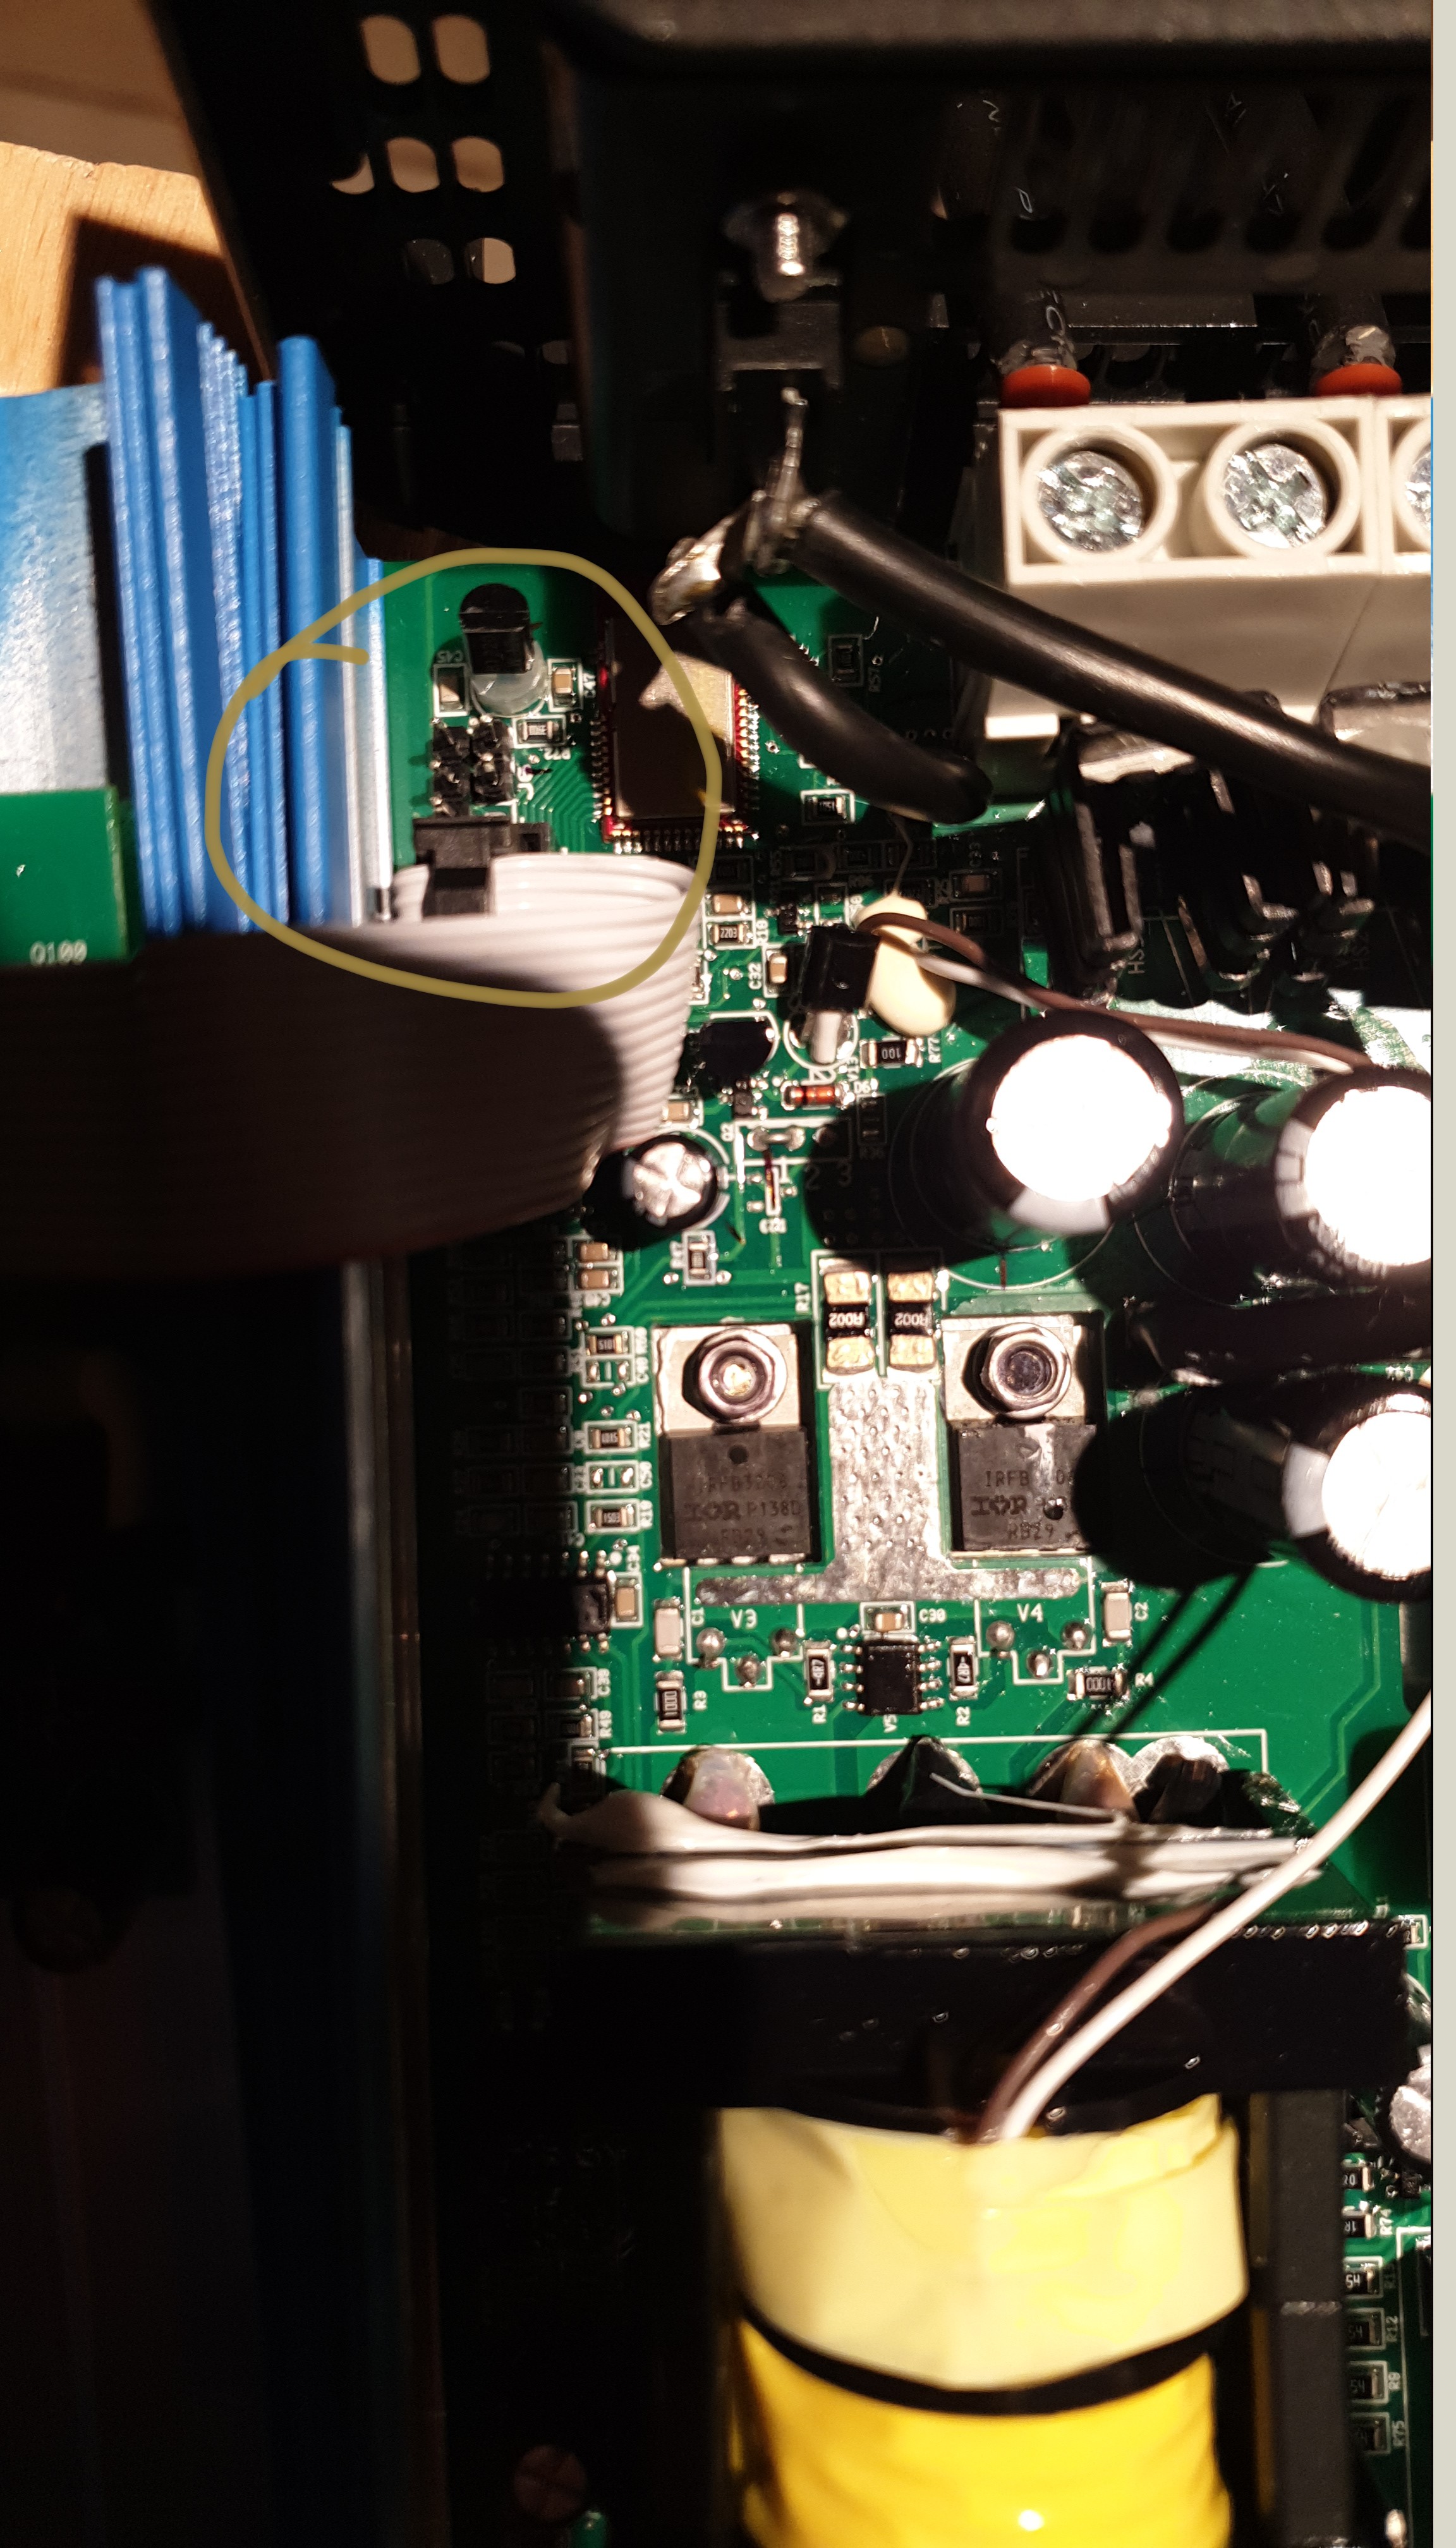
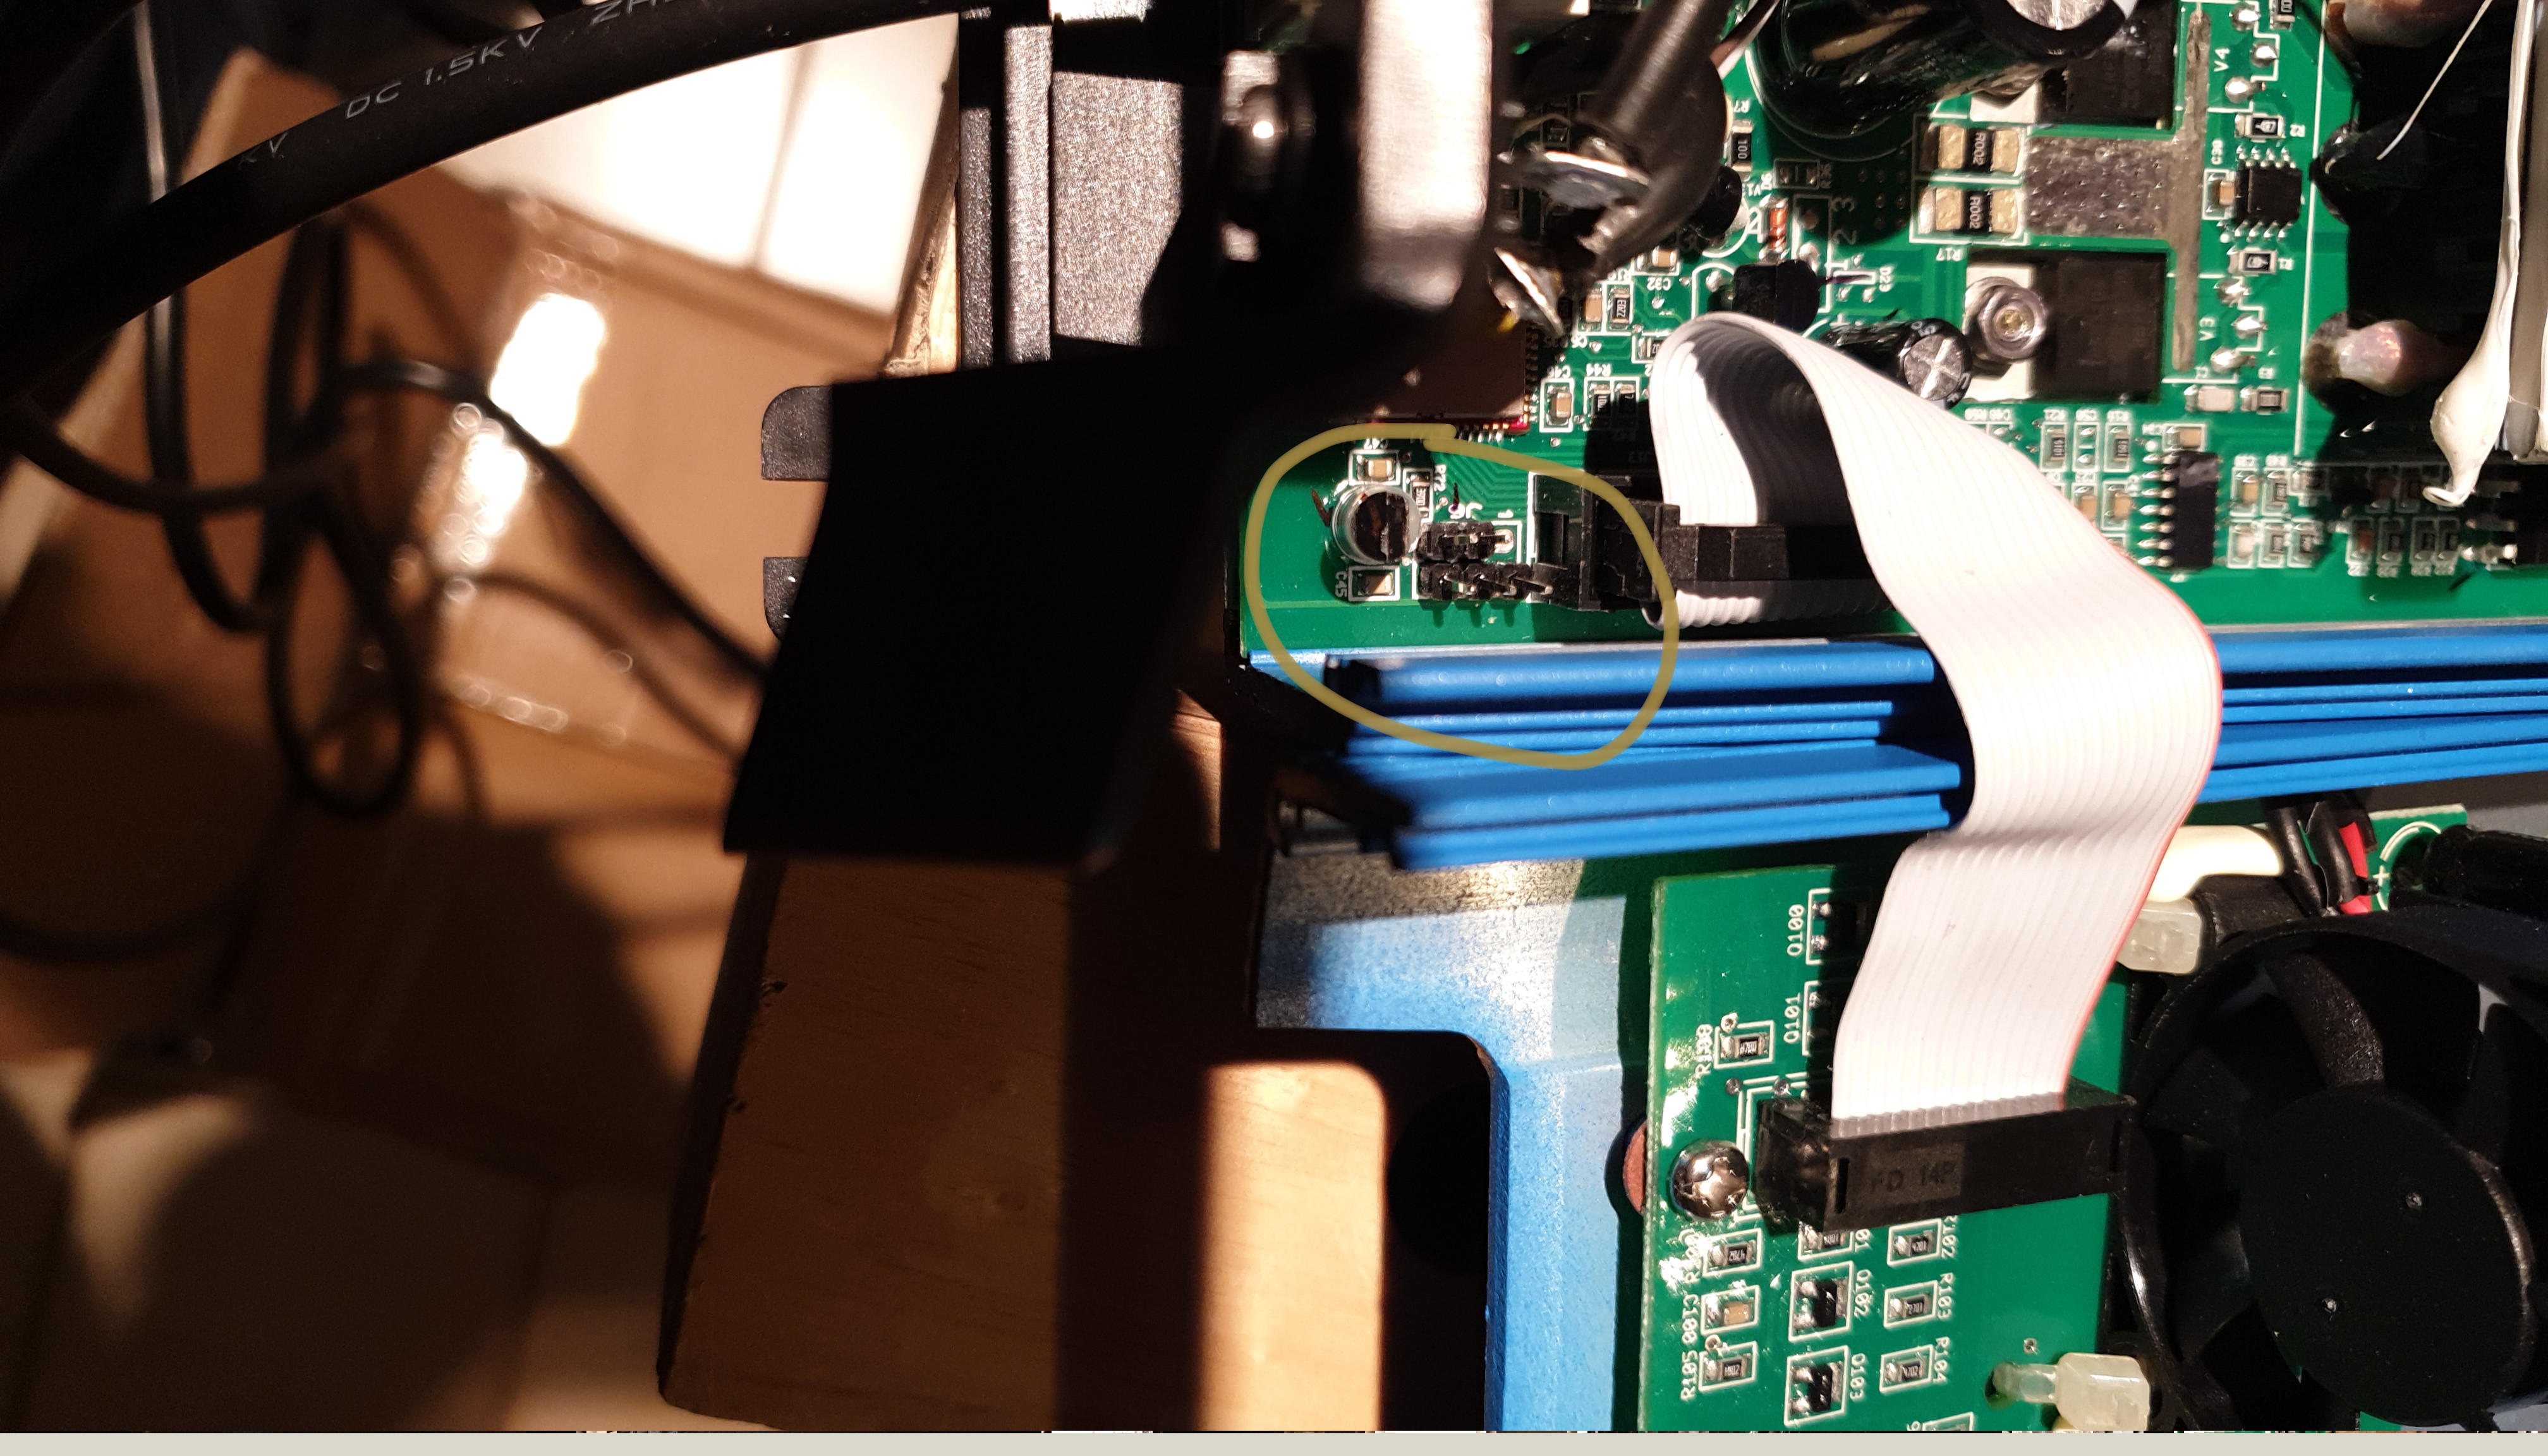
i have opened a bluesmart charger IP22 and found a 6 pin header.

victron-bluesmart-pinout.jpg

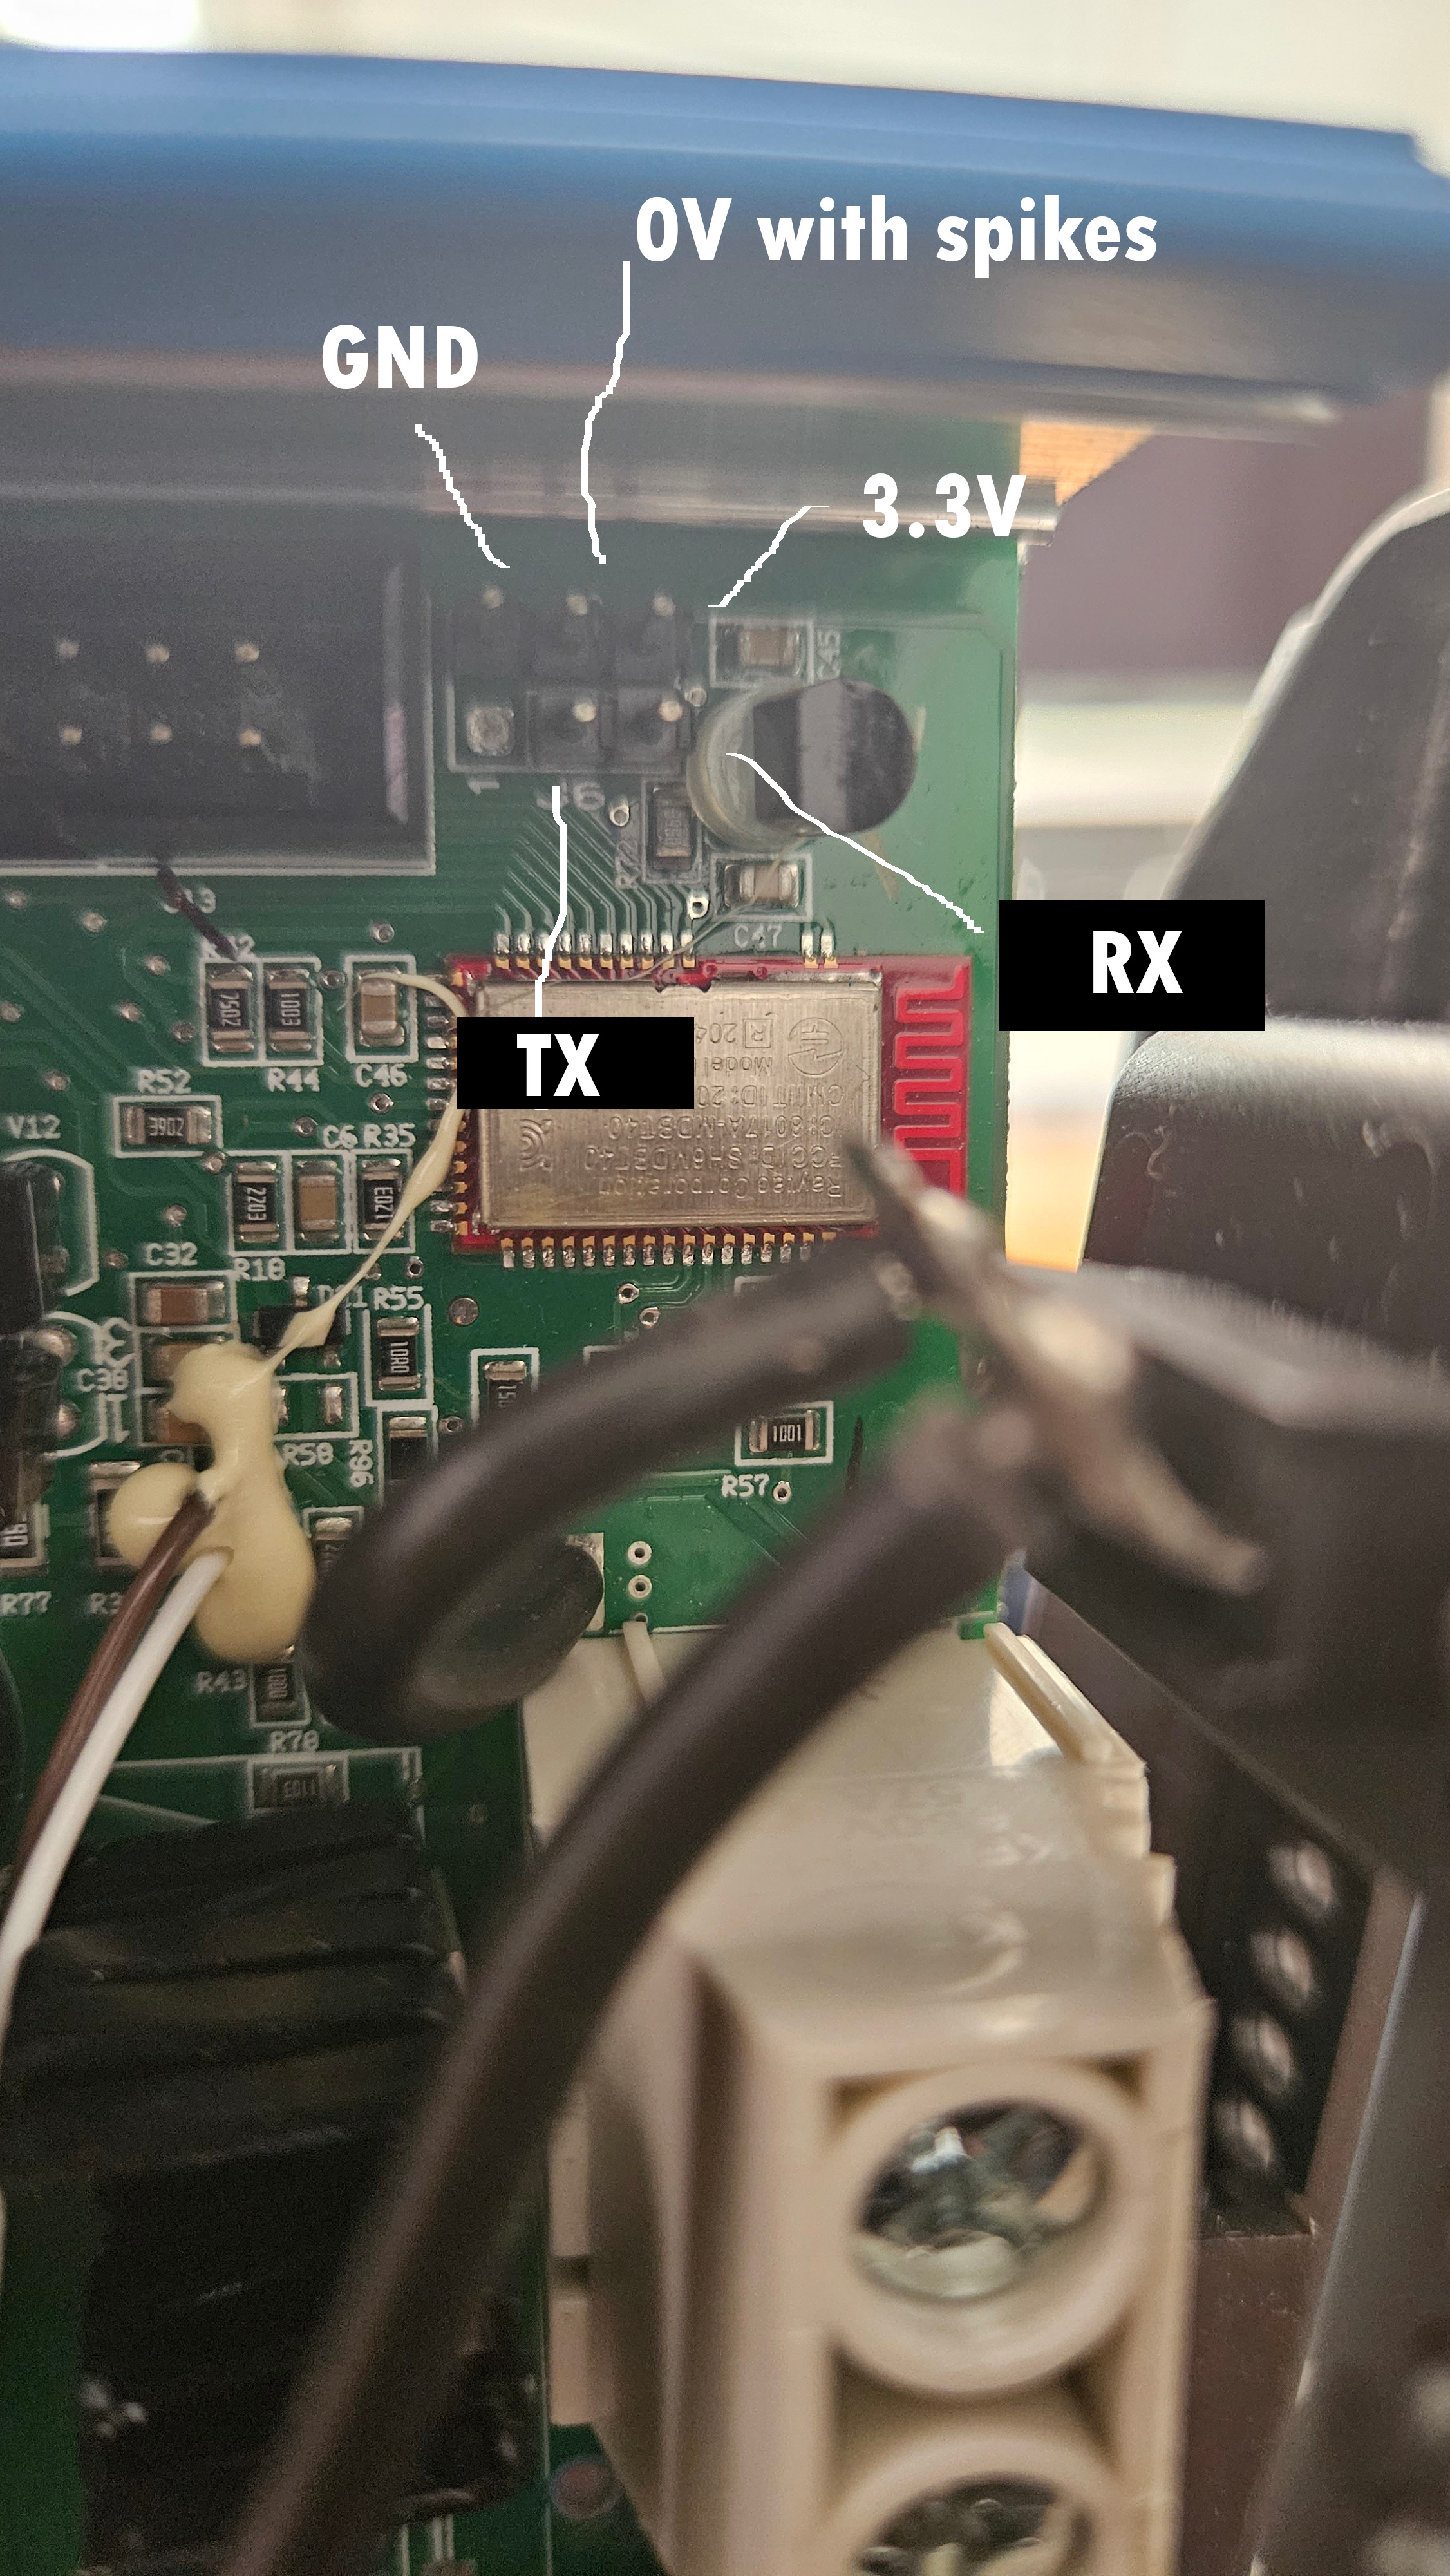
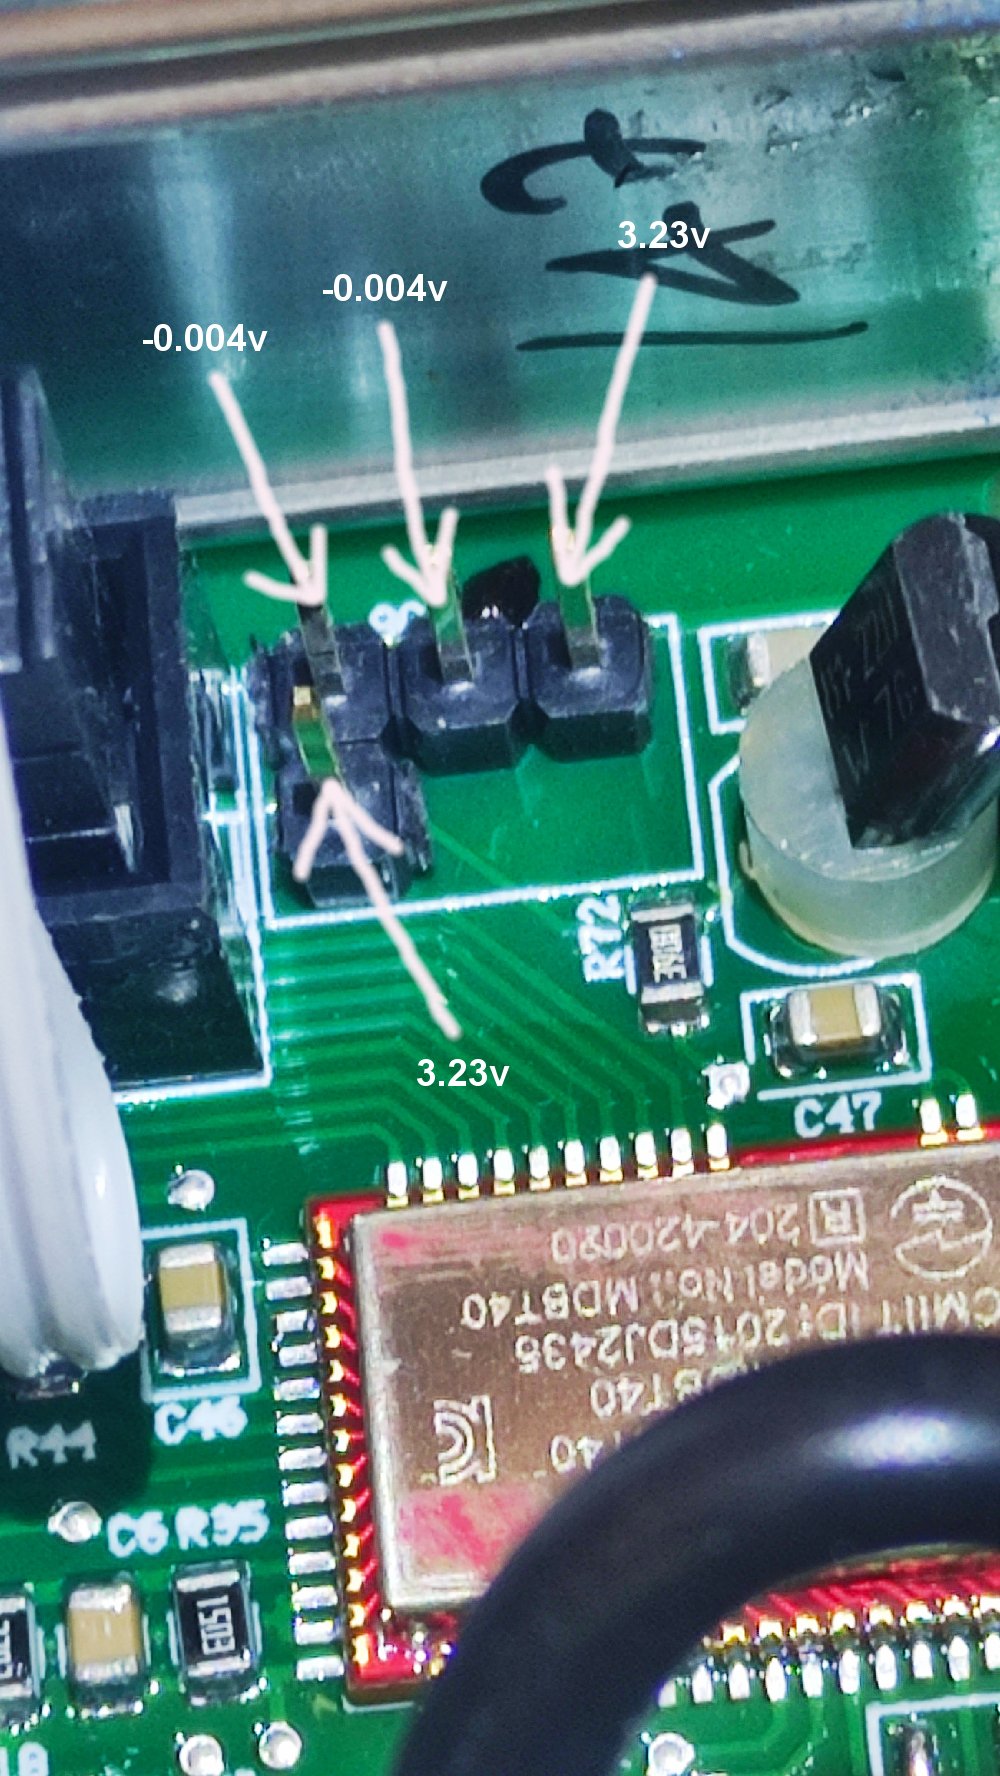
after finding out the GND and TX Pin i could sniff the data at 19200 baud.

it is plain ve.direct with the PID 0xA334

PID     0xA334
FWE     0342FF
SER#    HQ2230XY6XR
V       28680
I       9000
T       ---
ERR     0
CS      3
HC#     1105659
Checksum      .........

transmitting battery voltage and charging current.


All my findings are documented here:

github://wasn-eu/Victron_BlueSmart_IP22


thought i can attach a ve.direct cable to my venus os on a raspberry pi.

But you cant use the normal ve.direct cable because the ttl level is 3.3V and not 5V.

I used a cheap ftdi adapter for 3.3V.

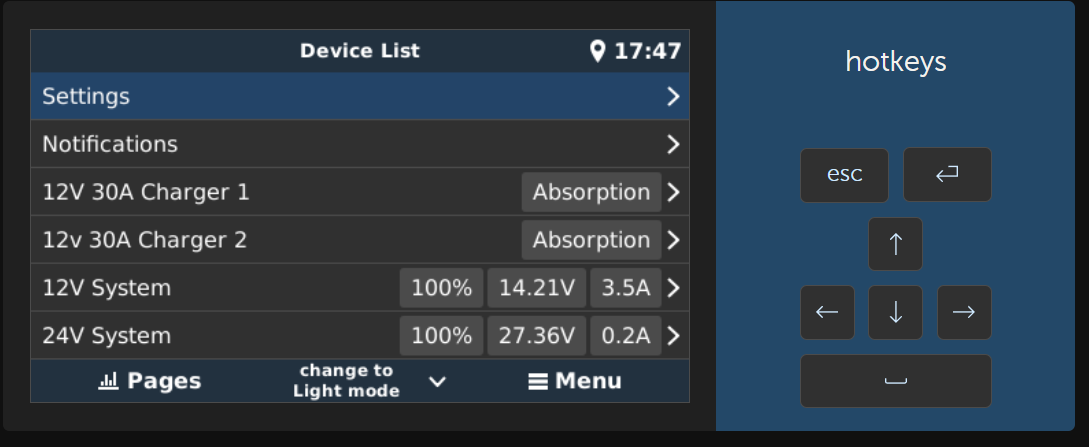
And it showed up with all its data

bluesmart ip22
1 comment
2 |3000

Up to 8 attachments (including images) can be used with a maximum of 190.8 MiB each and 286.6 MiB total.

eddimuc avatar image eddimuc commented ·

FYI - the connection works with the charger IP22 12/30 (3) connected to a Raspi Zero 2W as well. :-)

ladermitraspi.jpg

laderpins.jpg

laderoffen.jpg

0 Likes 0 ·
ladermitraspi.jpg (2.3 MiB)
laderpins.jpg (1.5 MiB)
laderoffen.jpg (1.6 MiB)
39 Answers
mike4nl avatar image
mike4nl answered ·

@wasn

Hi wasn.
I have an image from Raytec which shows the BT chip. That image is from the test board from Raytec. I hope it helps out. BTW: Seeedstudio is using the same chip for there DiY users.

There is a serial interface at:
- P0.22 = RX
- P0.21 = TXraytec.jpg


And here is the layout for that test board.
raytac2.jpg


There is also a serial interface for Software Debugging SWD but that needs the clock pin because of the nature of that interface.


raytec.jpg (300.5 KiB)
raytac2.jpg (171.5 KiB)
2 |3000

Up to 8 attachments (including images) can be used with a maximum of 190.8 MiB each and 286.6 MiB total.

PVTex avatar image
PVTex answered ·

@mike4nl

Thank you.

I know these shematics and will try to measure

2 |3000

Up to 8 attachments (including images) can be used with a maximum of 190.8 MiB each and 286.6 MiB total.

PVTex avatar image
PVTex answered ·

just connected it with a 3.3V ttl to usb to my venus os on raspberry and i can see my charger


2 |3000

Up to 8 attachments (including images) can be used with a maximum of 190.8 MiB each and 286.6 MiB total.

PVTex avatar image
PVTex answered ·

screenshot-2023-08-20-123543.jpgscreenshot-2023-08-20-123606.jpgscreenshot-2023-08-20-123628.jpgscreenshot-2023-08-20-123650.jpg
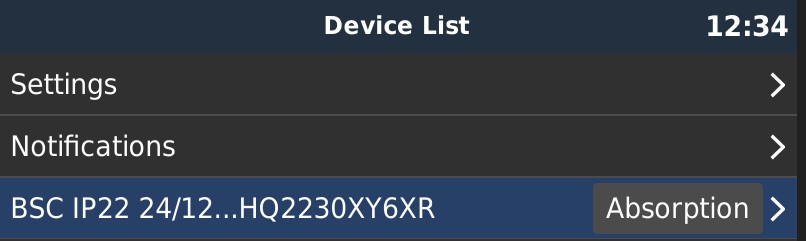
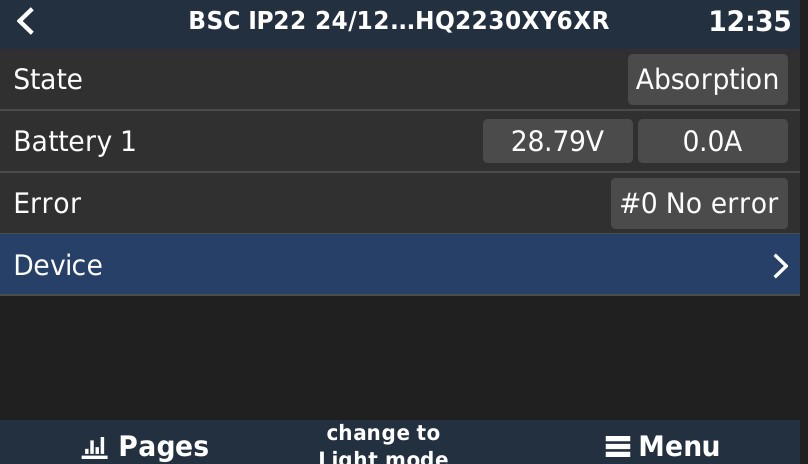
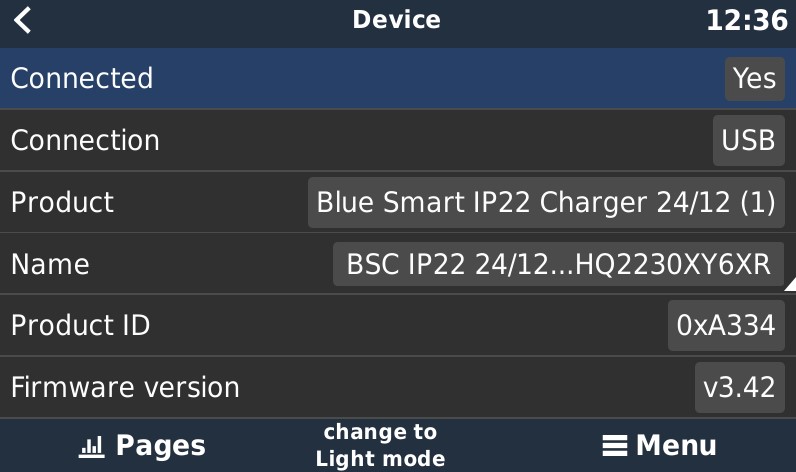
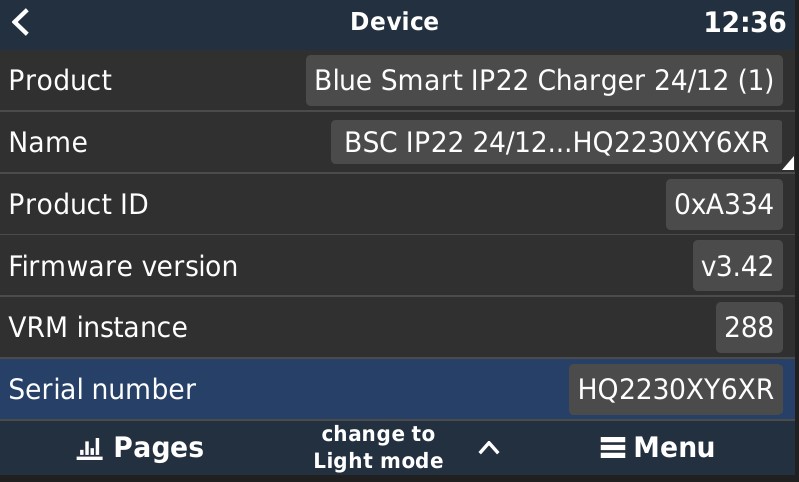
here are the screenshots of my venusOs


2 |3000

Up to 8 attachments (including images) can be used with a maximum of 190.8 MiB each and 286.6 MiB total.

PVTex avatar image
PVTex answered ·

now i have to find out how to control the charger.

specially adopting the charging current to the power getting injected back in the grid

2 |3000

Up to 8 attachments (including images) can be used with a maximum of 190.8 MiB each and 286.6 MiB total.

PVTex avatar image
PVTex answered ·

using victron connect on my windows system i can see the charger and control it.

I am right now sniffing data between charger and victron connect on Windows to find out the commands to change the charging current

2 |3000

Up to 8 attachments (including images) can be used with a maximum of 190.8 MiB each and 286.6 MiB total.

PVTex avatar image
PVTex answered ·

Just bought an isolated USB-C to 3.3V TTL adapter on aliexpress. This little pcb will be build in the charger.

Link to Aliexpress

2 |3000

Up to 8 attachments (including images) can be used with a maximum of 190.8 MiB each and 286.6 MiB total.

PVTex avatar image
PVTex answered ·

Can anybody lead me in the direction how to adjust charging current over the ve.direct protocol?

2 |3000

Up to 8 attachments (including images) can be used with a maximum of 190.8 MiB each and 286.6 MiB total.

PVTex avatar image
PVTex answered ·

just created a little pcb with level shifters.

now you can use the normal ve.direct cable and connect the pcb with a 6pin to 6pin flat ribbon cable.


2 |3000

Up to 8 attachments (including images) can be used with a maximum of 190.8 MiB each and 286.6 MiB total.

johnny-brusevold avatar image
johnny-brusevold answered ·

2 chargers connected to Duppa's 4 portrt usb to TTL isolated hub

This works well for reading the status, and as you request, some information is needed on how to send commands to the chargers.

I myself am looking to turn them off or on.


charger.png


charger.png (72.8 KiB)
1 comment
2 |3000

Up to 8 attachments (including images) can be used with a maximum of 190.8 MiB each and 286.6 MiB total.

PVTex avatar image PVTex commented ·
Turning on and off will be a Start.

Great would be to control the charging current

0 Likes 0 ·
burtmobile avatar image
burtmobile answered ·

Any pictures or video how to do the setup

in the charger?

2 |3000

Up to 8 attachments (including images) can be used with a maximum of 190.8 MiB each and 286.6 MiB total.

PVTex avatar image
PVTex answered ·

You can find the pinout in the first post.

Just connect a 3.3v ttl to usb adapter to the pins

2 |3000

Up to 8 attachments (including images) can be used with a maximum of 190.8 MiB each and 286.6 MiB total.

PVTex avatar image
PVTex answered ·

if you use a 3.3V adapter (for example duppa) you have to connect the GND Pin to GND and cross TX and RX. If you use an isolating type of adapter (like duppa) you have to connect 3.3V too.

2 |3000

Up to 8 attachments (including images) can be used with a maximum of 190.8 MiB each and 286.6 MiB total.

diskmemo avatar image
diskmemo answered ·

HI,

thanks for sharing this information. I looking since month for a way to control the current over bluetooth (esp32-ble) - your way is the best solution up to now

1 comment
2 |3000

Up to 8 attachments (including images) can be used with a maximum of 190.8 MiB each and 286.6 MiB total.

PVTex avatar image PVTex commented ·

@diskmemo

Thank you

I am still trying to figure out how to control the charging current.

I would like to let it depend on the power i am feeding back into the net.

I am trying to to have zero export.


If you find out how to control the current or switch the charging on and off please let me know

0 Likes 0 ·
PVTex avatar image
PVTex answered ·

just updated the github page:

github://wasn-eu/Victron_BlueSmart_IP22

2 |3000

Up to 8 attachments (including images) can be used with a maximum of 190.8 MiB each and 286.6 MiB total.

PVTex avatar image
PVTex answered ·

tried to set the on/off state and max power over the modbus tcp registers.

but these registers are always 0. they are not populated by the system with the real values of the charger.

2 |3000

Up to 8 attachments (including images) can be used with a maximum of 190.8 MiB each and 286.6 MiB total.

sean56688 avatar image
sean56688 answered ·
  int numP1 = (int)(chargeCurrent*10.0);
  int numP2 = (0x70 - numP1) & 0xFF;
  char hexP1[2];
  char hexP2[2];
  sprintf(hexP1, "%02X", numP1);
  sprintf(hexP2, "%02X", numP2);
  
  // Write to serial port
  unsigned char msg[] = { ':', '8', 'F', '0', 'E', 'D' , '0', '0', (unsigned char)hexP1[0], (unsigned char)hexP1[1] , '0', '0' ,(unsigned char)hexP2[0] , (unsigned char)hexP2[1], '\n'};
  write(serial_port, msg, sizeof(msg));
2 |3000

Up to 8 attachments (including images) can be used with a maximum of 190.8 MiB each and 286.6 MiB total.

PVTex avatar image
PVTex answered ·

thank you for that code, now i try to use it inside of venus os

2 |3000

Up to 8 attachments (including images) can be used with a maximum of 190.8 MiB each and 286.6 MiB total.

PVTex avatar image
PVTex answered ·

just wrote it for pyhton to use the script directly on the venus os raspberry:

name it charge_current.py

import sys
import serial
ser = serial.Serial("/dev/ttyUSB1", 19200)
chargeCurrent = int(sys.argv[1])

def sprintf(buf, fmt, *args):
   buf.write(fmt % args)

numP1 = (int)(chargeCurrent * 10)
numP2 = (0x70 - numP1) & 0xFF
hexP1 = "%X" % (numP1)
hexP2 = "%X" % (numP2)

# Write to serial port
msg =  ':8F0ED00' + hexP1[0] + hexP1[1] + '00' + hexP2[0] + hexP2[1] + '\n'
print(msg)
ser.write(msg.encode())


you have to change the serial device for your setup.

just run it with:

python charge_current.py X

where X is the needed charging current in A

2 |3000

Up to 8 attachments (including images) can be used with a maximum of 190.8 MiB each and 286.6 MiB total.

PVTex avatar image
PVTex answered ·

thank you @sean56688 for the script.

i have added the python version to github:

github://wasn-eu/Victron_BlueSmart_IP22


2 |3000

Up to 8 attachments (including images) can be used with a maximum of 190.8 MiB each and 286.6 MiB total.

PVTex avatar image
PVTex answered ·

Automatic Change Charge Current

This Script will read the Grid Power with modbus from your venus device.
When the read power is negativ (feeding to grid) it calculates the needed charge current to compensate and send it to your charger.
If you are not feeding to grid it will send a charging current of 0A.

The script will read the Grid Power and sent the charge current every 10 seconds. If you would like another interval change the sleep value in seconds in the last line of the script.

just create the file change_charge_current.py in /home/root

#!/usr/bin/python
import serial
import time
from pymodbus.constants import Defaults
from pymodbus.constants import Endian
from pymodbus.client.sync import ModbusTcpClient as ModbusClient
from pymodbus.payload import BinaryPayloadDecoder

ser = serial.Serial("/dev/ttyUSB1", 19200)

while(True):
  current = 0.0
  Defaults.Timeout = 5
  Defaults.Retries = 5

  client = ModbusClient('192.168.88.173', port=502, timeout=3, unit_id=100)
  result = client.read_input_registers(822, 1)
  if not result.isError():
    decoder = BinaryPayloadDecoder.fromRegisters(result.registers, byteorder=Endian.Big)
    power=decoder.decode_16bit_int()
    if power < 0:
      current = power / 24 * (-1)
    print("Grid Power:    {0:.0f}W".format(power))
    print("Grid Current:  {0:.2f}A".format(current))

    numP1 = (int)(current * 10)
    numP2 = (0x70 - numP1) & 0xFF
    hexP1 = "%X" % (numP1)
    hexP2 = "%X" % (numP2)
    if len(hexP1) < 2:
      hexP1 += "0"
    msg =  ':8F0ED00' + hexP1[0] + hexP1[1] + '00' + hexP2[0] + hexP2[1] + '\n'
    print("VE.direct out: " + msg)
    ser.write(msg.encode())
  else:
    print("Error:", result)

  time.sleep(10)


You need to to adjust the line:

result = client.read_input_registers(822, 1)
                                     ---

to fit your system.

Here it a little list what to write for the value 822 in your setup:

L1  820
L2  821
L3  822


Now you need to run this script on startup of venus os.

Make the script executable:

chmod a+x change_charge_current.py


Add the script to crontab.
Executes this command:

crontab -e


Add this:

@reboot python /home/root/change_charge_current.py > /var/log/change_charge_current.log


2 |3000

Up to 8 attachments (including images) can be used with a maximum of 190.8 MiB each and 286.6 MiB total.

PVTex avatar image
PVTex answered ·

just added the automatic version to github:

github://wasn-eu/Victron_BlueSmart_IP22

2 |3000

Up to 8 attachments (including images) can be used with a maximum of 190.8 MiB each and 286.6 MiB total.

PVTex avatar image
PVTex answered ·

just found a problem that the charger does not accept a current value of 0.

the minimum value is 3A

Now i need to find out how to turn the charging on and off.

2 |3000

Up to 8 attachments (including images) can be used with a maximum of 190.8 MiB each and 286.6 MiB total.

PVTex avatar image
PVTex answered ·

changed the script that the charging current is only set when the grid power is negative (feed in to grid) and set the repeat time to 30 seconds, because i read that this value is non-volatile memory that can wear out if continuosly written.

#!/usr/bin/python
import serial
import time
from pymodbus.constants import Defaults
from pymodbus.constants import Endian
from pymodbus.client.sync import ModbusTcpClient as ModbusClient
from pymodbus.payload import BinaryPayloadDecoder

ser = serial.Serial("/dev/ttyUSB1", 19200)

while(True):
  current = 0.0
  Defaults.Timeout = 5
  Defaults.Retries = 5

  client = ModbusClient('192.168.88.173', port=502, timeout=3, unit_id=100)
  result = client.read_input_registers(822, 1)
  if not result.isError():
    decoder = BinaryPayloadDecoder.fromRegisters(result.registers, byteorder=Endian.Big)
    power=decoder.decode_16bit_int()
    if power < 0:
      current = power / 24 * (-1)
      print("Grid Power:    {0:.0f}W".format(power))
      print("Grid Current:  {0:.2f}A".format(current))

      numP1 = (int)(current * 10)
      numP2 = (0x70 - numP1) & 0xFF
      hexP1 = "%X" % (numP1)
      hexP2 = "%X" % (numP2)
      if len(hexP1) < 2:
        hexP1 += "0"
      msg =  ':8F0ED00' + hexP1[0] + hexP1[1] + '00' + hexP2[0] + hexP2[1] + '\n'
      print("VE.direct out: " + msg)
      ser.write(msg.encode())
    else:
      print("Charging off")
  else:
    print("Error:", result)

  time.sleep(30)


2 |3000

Up to 8 attachments (including images) can be used with a maximum of 190.8 MiB each and 286.6 MiB total.

PVTex avatar image
PVTex answered ·

i tried this script for first utrning the remote control on and than send the command to power on/off the charger.

But the charger does not turn on or off.

#!/usr/bin/python
import serial
import time
from pymodbus.constants import Defaults
from pymodbus.constants import Endian
from pymodbus.client.sync import ModbusTcpClient as ModbusClient
from pymodbus.payload import BinaryPayloadDecoder

ser = serial.Serial("/dev/ttyUSB1", 19200)

# Set Remote control used bit-mask (register 0x0202) to 1 (Enable remote ON/OFF control)
numP1 = int(1)
numP2 = (0x70 - numP1) & 0xFF
hexP1 = "%X" % (numP1)
hexP2 = "%X" % (numP2)
if len(hexP1) < 2:
  hexP1 += "0"
msg =  ':8020200' + hexP1[0] + hexP1[1] + '00' + hexP2[0] + hexP2[1] + '\n'
print("VE.direct out: " + msg)
ser.write(msg.encode())

# Set Device mode values (register 0x0200)
#OFF
numP1 = int(0)
#ON
#numP1 = int(1)

numP2 = (0x70 - numP1) & 0xFF
hexP1 = "%X" % (numP1)
hexP2 = "%X" % (numP2)
if len(hexP1) < 2:
  hexP1 += "0"
msg =  ':8000200' + hexP1[0] + hexP1[1] + '00' + hexP2[0] + hexP2[1] + '\n'
print("VE.direct out: " + msg)
ser.write(msg.encode())

can anyone see my failure?

3 comments
2 |3000

Up to 8 attachments (including images) can be used with a maximum of 190.8 MiB each and 286.6 MiB total.

eddimuc avatar image eddimuc commented ·

Hi PVTex, inspired by your pics and descriptions I managed to get my IP22 12/30 (3) AC charger connected to my Raspi Zero 2W running VenusOS (thx a lot btw!). I'm using Node Red and the predefined Victron connectors instead of python which works fine for adjusting the current as well in a range from 7.5A to 30A. Unfortunatelly I could not manage to turn off the charger via software either. Have you managed to stop the charging process meanwhile? I would prefer avoiding an additional Shelly switch just to turn on and off. Thx for a short hint!

0 Likes 0 ·
PVTex avatar image PVTex eddimuc commented ·
still havent found out how to turn charging charging on and off.

but never give up.

1 Like 1 ·
diskmemo avatar image diskmemo PVTex commented ·

Thank you for your work - I use all the information and could perfectly control the current
Are there any news about turn charging off ?

I found the registry in the victron documentation and I test the script here. Also include the charger over mbus in HomeAssistant. There is also a switch for charging on/off.
But the charge off flag did not work

0 Likes 0 ·
PVTex avatar image
PVTex answered ·

just added all files with install script to run the automatic charging current adjustment as a service in venus os.

github://wasn-eu/Victron_BlueSmart_IP22

2 |3000

Up to 8 attachments (including images) can be used with a maximum of 190.8 MiB each and 286.6 MiB total.

PVTex avatar image
PVTex answered ·

all updates are now in an other github account:


github://pvtex/Victron_BlueSmart_IP22

2 |3000

Up to 8 attachments (including images) can be used with a maximum of 190.8 MiB each and 286.6 MiB total.

chris-smith avatar image
chris-smith answered ·

I opened my charger and it doesn't seem to have the pin header available. There is a ribbon cable connected in the same place. Also my charger looks different. It has a fuse next to the battery connection terminals. Also the case seems to be in a single piece. It's not possible to slide the cover off without major disassembly. Maybe it's a newer ( or older ) model?

2 |3000

Up to 8 attachments (including images) can be used with a maximum of 190.8 MiB each and 286.6 MiB total.

PVTex avatar image
PVTex answered ·

can you post a photo of the connector place and your charger?

1 comment
2 |3000

Up to 8 attachments (including images) can be used with a maximum of 190.8 MiB each and 286.6 MiB total.

tigrecito avatar image tigrecito commented ·

would be interesting which revision you are using... I know there are different revisions because only newer IP22 are capable of using ve.smart networking feature. (looks like mine isn´t)

according to ve.smart networking documentation it works with those ip22 and newer:

Serial-number "HQ2024nnnnn" and newer also there should be printed „hw rev 02“ or newer on the label

so maybe the ve.direct pins are also only available with newer revisions?


0 Likes 0 ·
PVTex avatar image
PVTex answered ·

you need v2 that is ve.smart ready

2 |3000

Up to 8 attachments (including images) can be used with a maximum of 190.8 MiB each and 286.6 MiB total.

dominic-miglar avatar image
dominic-miglar answered ·

@PVTex Thanks for the pinout description, as the device also follows also the VE.Direct protocol contract, it also works nicely with my ve-direct-reader-service (https://github.com/logreposit/ve-direct-reader-service).

Does anybody know what the "HC#" field means? I cannot find a description regarding this field in the protocol documentation ...

@PVTex I've seen you're getting back a bigger number (1105659) there ...

PID     0xA32C
FWE     0342FF
SER#    HQ2308......
V       13860
I       0
T       ---
ERR     0
CS      5
HC#     9232
Checksum   ......

Kind regards from Austria :)

2 |3000

Up to 8 attachments (including images) can be used with a maximum of 190.8 MiB each and 286.6 MiB total.

PVTex avatar image
PVTex answered ·

@Dominic Miglar i think it is the Hardware revision

2 |3000

Up to 8 attachments (including images) can be used with a maximum of 190.8 MiB each and 286.6 MiB total.

oooliver avatar image
oooliver answered ·

Hi @PVTex, thank you very much for this description and also your public repository. Do you know, if it is possible, to connect the BlueSmart Charger to the Cerbo GX like connecting with RaspberryPi?

2 |3000

Up to 8 attachments (including images) can be used with a maximum of 190.8 MiB each and 286.6 MiB total.

PVTex avatar image
PVTex answered ·

That should be no problem.

The charger is seen as a normal ve.direct device

2 |3000

Up to 8 attachments (including images) can be used with a maximum of 190.8 MiB each and 286.6 MiB total.

oooliver avatar image
oooliver answered ·

For Blue Smart Charger IP22 12 | 15 with serial number HQ1849*** (no rev number printed on label) or HQ1921*** (hw rev 01) the layout looks different. There are only 4 pins. So it would be interesting, which revision does have the 5 pin connector.

hq1849.jpeghq1921.jpeg


hq1849.jpeg (1.4 MiB)
hq1921.jpeg (1.3 MiB)
2 |3000

Up to 8 attachments (including images) can be used with a maximum of 190.8 MiB each and 286.6 MiB total.

PVTex avatar image
PVTex answered ·

4 pins are ok because you need 4 signals.

Just measure connection from a ground point to the connector

and than measure where the 3.3V pin is.

the other two are RX and TX


Would be great if you could post your findings.

2 |3000

Up to 8 attachments (including images) can be used with a maximum of 190.8 MiB each and 286.6 MiB total.

aitono avatar image
aitono answered ·

Hi, I Have a ip22 30A, 3 outputs, , series hq19 (can't check now exact number), and my installation is very complicated as it's in a smallest boat with very limited space, so uninstall the charger in order to make the trial it's a real challenge!

So I have bought the adapter in AliExpress to usb C, the USB cable, and have a Raspi running Venus Os with connected devices Mppt 100/30 and Bmv712, so close to heaven! :)

I am eager and brave to open the charger, but before taking the challenge to uninstall it, I just want to be clear on how to do it and if it'll be feasible.

In our old chargers with versions hq18/19, with 4 pins, you say we have to check ground (what can be ground?) with the pins to find the 3,3 volts. Is there any risk to shortcircuit the charger doing this? My electronic knowledge is very limited, so sorry if it sounds as a silly question, hehe.

And how we identify the other 3 pins? I guess we miss the 0 V with spikes, and will have GND, TX, rx. But how to know which is which?

The other question is if the adapter referred from AliExpress is isolated to all the known issues affecting DIY ve direct to usb ttl cables, any idea?

Thanks for the patience and support! I'll post my findings with your kind help for the good sake of the Community.


2 |3000

Up to 8 attachments (including images) can be used with a maximum of 190.8 MiB each and 286.6 MiB total.

paul-w avatar image
paul-w answered ·

I'm interested in getting the data from my Blue Smart IP22 12/20 via my VRM.

Mine is a 4 pin and these are the voltage reading I got. #

PVTex, what are your opinions on the voltages as there appears not to be a 0v pin?

Would I just pickup a ground from the output neg?

ip22-charger-pin-voltages.jpg


ip22-info.jpg


2 |3000

Up to 8 attachments (including images) can be used with a maximum of 190.8 MiB each and 286.6 MiB total.

paul-w avatar image
paul-w answered ·

Well, no joy, tried what I hoped where the data pins both ways around and got no response in the device list on my Pi.

As a note, I connect my Victron devices via a couple of Isolated 4 port USB to TTL UART boards.

isolated-4-port-usb-to-ttl-uart-board.jpg


2 |3000

Up to 8 attachments (including images) can be used with a maximum of 190.8 MiB each and 286.6 MiB total.