question

fguiot avatar image
fguiot asked

Solution: Adding external Relays to Cerbo GX using one USB port

** Edit **

This version is replaced by the new repo RemoteGPIO, now much easier to install with SetpHelper Package Manager.

All the details of this new version is here:

https://community.victronenergy.com/questions/245584/remotegpio-ex-venus-rgpio-now-available-with-setup.html


Well, this is not a question here, but a solution I built for having additional Relays and Digital Inputs on the Cerbo GX, using the a USB port.

As I wanted the relays to not rely on an external Ethernet network, I went with a Modbus/RTU based relai from Dingtian.

This box provide 8x relays, that can be controlled with Modbus Serial, but also over IP and with various additional protocols: https://fr.aliexpress.com/item/4000999069820.html They have variants of 4 or 8 relays.

A USB to RS 485 adapter will be required. I selected this one as this is coming with a USB cable and can fit nicely on the Cerbo GX: https://fr.aliexpress.com/item/1005004778767986.html


Now we need to do few tweaks so the 4x first relays are completely managed by the Cerbo GX GUI.

Only 4x relays can be added at bus level so the Victron’s Node-Red flow and Cerbo GX Gui can control it.

The remaining relays will be managed directly from Node-Red Modbus flow

I tried to make something as reliable as possible and so far I'm quite happy with the stability. But any suggestions and improvements are welcome!


The below steps requires to ssh to the Cerbo GX with root access.

I suggest you download the configuration files in /data/rgpio so it remains there even after SW upgrades.

Any suggestion to execute the below steps in a better appropriate way (may be also adding automatic adding it from /etc/rcS.d) are welcome.

Repository is here:

https://github.com/Lucifer06/Venus_rgpio


cd /data/

wget github.com/Lucifer06/Venus_rgpio/releases/download/Latest/rgpio.tar.gz

tar -xvzf rgpio.tar.gz

rm rgpio.tar.gz


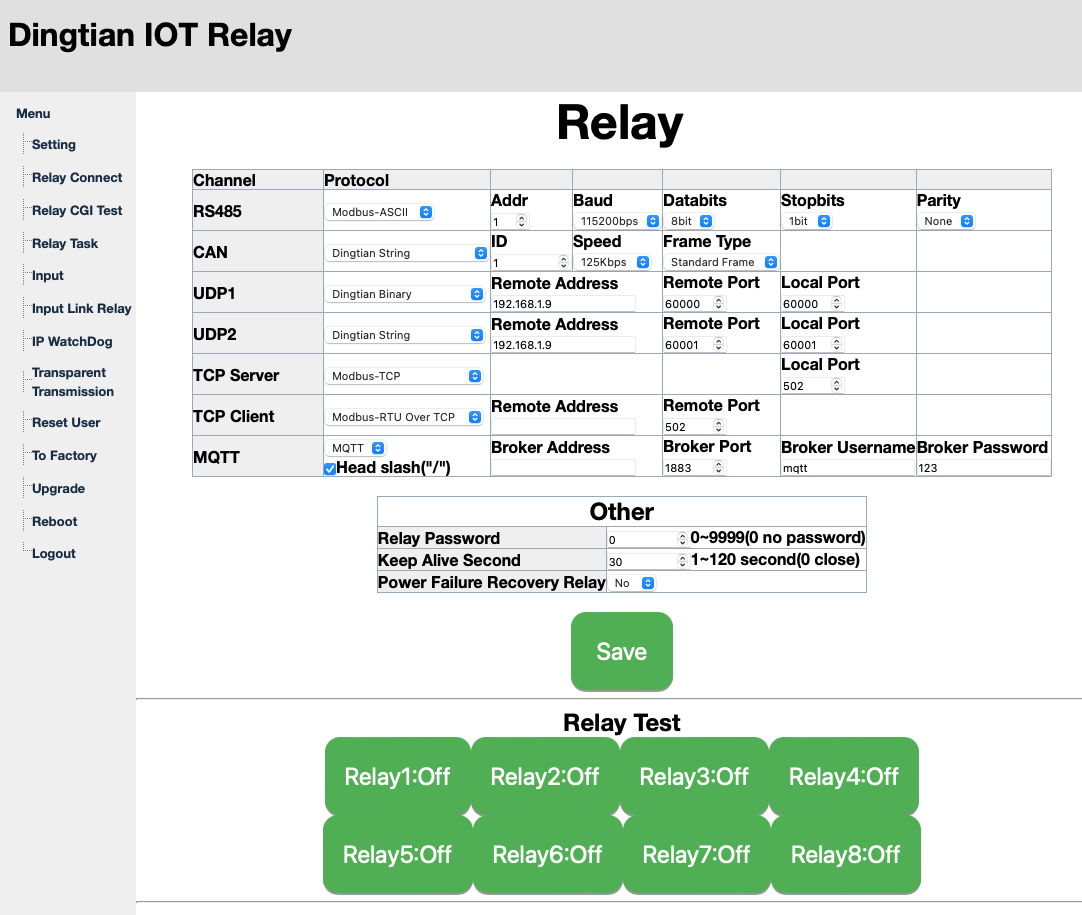
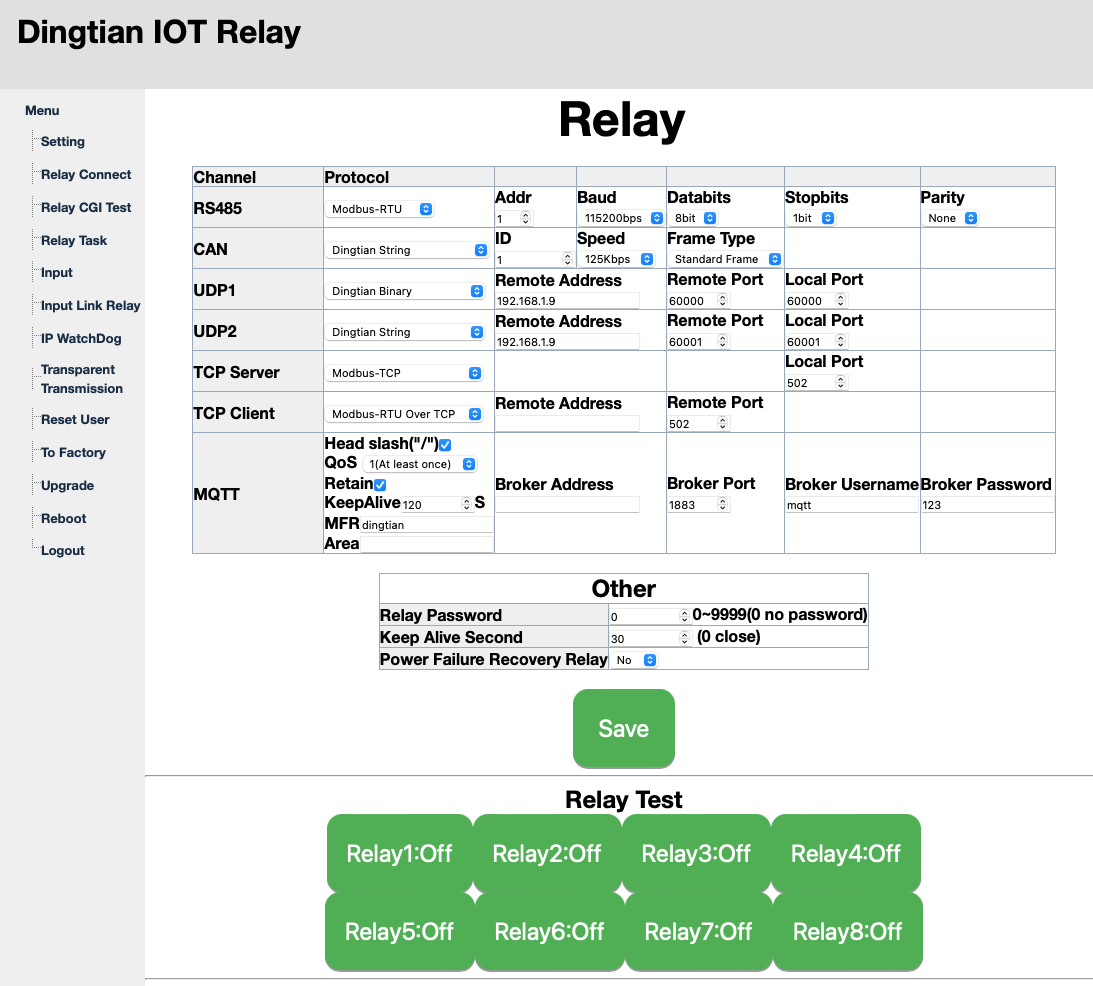
0/ Configuration of the Dingtian IOT Relay module

Connect the ethernet interface of the module and access to its configuration page (192.168.1.100 and admin/admin by default).

Configure the RS485 with Protocol Modbus-RTU and set address to 1 (for the first unit).

dingtian-modbus-configuration.png


1/ Creating /dev/gpio links at boot so the bus services are automatically created

ln -s /data/rgpio/conf/S90rgpio_pins.sh /etc/rcS.d/S90rgpio_pins.sh


2/ Modify Relaystate Python script

mv /opt/victronenergy/dbus-systemcalc-py/delegates/relaystate.py /opt/victronenergy/dbus-systemcalc-py/delegates/relaystate.py.ori

cp /data/rgpio/conf/relaystate.py /opt/victronenergy/dbus-systemcalc-py/delegates/relaystate.py


3/ Need to add Relays 3, 4, 5 and 6 in /etc/venus/gpio_list so they can be configured on the GUI

mv /etc/venus/gpio_list /etc/venus/gpio_list.ori

cp /data/rgpio/conf/gpio_list /etc/venus/gpio_list


4/ Need to update Node-Red service for adding the 4x relays

mv /usr/lib/node_modules/@victronenergy/node-red-contrib-victron/src/services/services.json /usr/lib/node_modules/@victronenergy/node-red-contrib-victron/src/services/services.json.ori

cp /data/rgpio/conf/services.json /usr/lib/node_modules/@victronenergy/node-red-contrib-victron/src/services/services.json


5/ Reboot or restart the services

svc -d /service/dbus-systemcalc-py/ ; svc -u /service/dbus-systemcalc-py/

svc -d /service/gui ; svc -u /service/gui

svc -d /service/node-red-venus


6/ Make serial-starter to ignore the USB-RS485 interface

identify ID_MODEL of the interface

udevadm info --query=property --name=/dev/ttyUSB0

With CH341 chipset, ID_VENDOR is USB_Serial

As they don’t put any unique serial number there is an issue when multiple Serial interfaces are using the same CH341 chipset.

This is the case for example with the USB interface to connect the DALI BMS.

Unfortunately I haven’t found a way to program a serial number, so the solution is to track the position of the RGPIO interface:

Always connect the USB-RS485 interface to the first USB interface.


Add the following lines to /etc/udev/rules.d/serial-starter.rules

#Serial-starter to ignore the USB-RS485 (ID_MODEL=USB_Serial) so USB interface for RGPIO works

#ACTION=="add", ENV{ID_BUS}=="usb", ENV{ID_MODEL}=="USB_Serial", ENV{VE_SERVICE}="ignore"

#Serial-starter to ignore the USB-RS485 converter attached to the first USB port so USB interface for RGPIO works

ACTION=="add", ENV{ID_BUS}=="usb", ENV{ID_PATH_TAG}=="platform-1c14400_usb-usb-0_1_1_0", ENV{VE_SERVICE}="ignore"

#


Alternatively, run

/opt/victronenergy/serial-starter/stop-tty.sh ttyUSB0


7 Reboot the RGPIO device and start Node-Red

svc -u /service/node-red-venus


8/ Display and configure the additional 4x relais in the Venus GUI

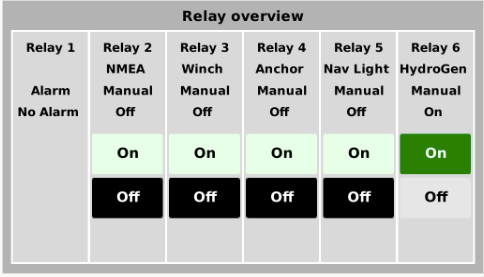
Name and display the additional relays from Settings / Relays in the GUI.

You can swipe to a specific page with the 6x relays, but I believe this is provided by the excellent GuiMods add-on from Kwinderm.


1667580671876.png


9/ Test with command lines

List of all dbus relays and their status:

dbus -y com.victronenergy.system /Relay GetValue


For some reasons I can’t control the relays. If someone knows the correct command line?

Here is what I tried:

dbus -y com.victronenergy.system /Relay/3/State SetValue 1


Lecture registre nombre de Relais:

/data/rgpio/modpoll/arm-linux-gnueabihf/modpoll -m rtu -b 115200 -p none -d 8 -1 -r 1 -s 1 -c 1 /dev/ttyUSB0


Lecture en continu Digital Inputs:

/data/rgpio/modpoll/arm-linux-gnueabihf/modpoll -m rtu -b 115200 -p none -d 8 -r 11 -s 1 -c 1 /dev/ttyUSB0


Lecture en continu Relais:

/data/rgpio/modpoll/arm-linux-gnueabihf/modpoll -m rtu -b 115200 -p none -d 8 -r 2 -s 1 -c 1 /dev/ttyUSB0


Ecriture registre Relai1 = On:

/data/rgpio/modpoll/arm-linux-gnueabihf/modpoll -m rtu -b 115200 -p none -d 8 -1 -r 3 -s 1 -c 1 /dev/ttyUSB0 257


Ecriture registre Relai1 = Off:

/data/rgpio/modpoll/arm-linux-gnueabihf/modpoll -m rtu -b 115200 -p none -d 8 -1 -r 3 -s 1 -c 1 /dev/ttyUSB0 256


10/ Using Node-Red for controlling the 8x additional relays

The Relays 3, 4, 5 and 6 are normally controlled with Victron’s Relay Nodes, and their status are correctly reported on the Victron GUI

Use flow "Remote Relays 1-8 (RTU).json" as example


The additional 4x relais 7, 8, 9 and 10 are exposed only through Node-Red Dashboard.

They all require the flow Dingtian_Relays.json for sensing the status and controlling the remote Relay from the Dingtian box, attached via RS422 (ModBus RTU protocol).


11/ Additional Digital Inputs

The Dingtian relay box also offer additional Digital inputs.

Here is the flow for sensing the values of the Digital Inputs


**********************************************************************


cerbo gx
6 comments
2 |3000

Up to 8 attachments (including images) can be used with a maximum of 190.8 MiB each and 286.6 MiB total.

ricksa avatar image ricksa commented ·

@fguiot Thanks very much for sharing this great project of yours.

Could you please help with a quick question, when importing the input or relay flows into Node-red the "buffer-parser" and the "ui_switch" nodes are unknown. Which node palette did you use for them?

Cheers

Rickcapture.jpg


0 Likes 0 ·
capture.jpg (141.0 KiB)
fguiot avatar image fguiot ricksa commented ·

@RickSa Hi, sorry I realise that the exported flows are not complete. I could not figure that out as when importing them, I have all the dependencies already installed. I will try to provide a clean complete flow, but give me some time.

Meanwhile, here are what you are looking for:

The buffer parser requires you to install node-red-contrib-buffer-parser

The far right nodes marked ui_switch are in fact Node-red dashboard switch interface.

I believe you need to create them with the specific dashboard interface of Node-redcapture-decran-2023-01-30-a-100409.png

0 Likes 0 ·
derrick thomas avatar image derrick thomas commented ·
@fguiot I installed release candidate 3.00-32 and reinstalled the relay driver and node red etc according to the guide. Everything appears to be working correctly with the exception of only relays 1 to 4 are available through node red. So just the first 2 external relays are available via node red. There are some changes to the victron nodes in the beta version so I assume that has an effect on the handling of the external relays.
0 Likes 0 ·
fguiot avatar image fguiot derrick thomas commented ·

@derrick thomas I haven't yet tried 3.x

I would suggest you have a look at the venus OS long files I had to customise, the 3.x version may be a bit different. Have a look a the changes I made and try to reproduce the same changes in the new version.


Cheers

0 Likes 0 ·
marcel-van-ee avatar image marcel-van-ee commented ·

Ik heb via tcp and modbus geprobeerd maar helaas niet gelukt.

I tried tcp and modbus but failed.


Iemand die mij kan helpen, eventueel tegen betaling ? ->> marcel@van-ee.com

Anyone that can assist me is welcome, i can pay for it

0 Likes 0 ·
fguiot avatar image fguiot marcel-van-ee commented ·
Hello Marcel, no need to pay for some help.

Have you followed the steps?

Which version of Venus OS are you running?

Cheers

0 Likes 0 ·
20 Answers
llubi avatar image
llubi answered ·

Awesome! No idea how this works but already bought everything :) . Also bought the CAN version, will try to learn how to connect it, this way I can use a CAN port that I’m not using, and don’t need to buy and use a USB multiplier as all on my Cerbo are being used.

Any help on how and where to start…

@Kevin Windrem ?

https://github.com/kwindrem/VeCanSetup

3 comments
2 |3000

Up to 8 attachments (including images) can be used with a maximum of 190.8 MiB each and 286.6 MiB total.

Kevin Windrem avatar image Kevin Windrem commented ·
I haven't a clue how you'd get a CANbus relay adapter working.
0 Likes 0 ·
llubi avatar image llubi Kevin Windrem commented ·
Really ?? You made me, and a full bunch of people buy the Cerbo because of your work on it, I’m sure if anyone can make it work, this is you… :)


I have no idea in all of this, I just copy what you do, but VenusOS is a Linux, and the SO should mount the CAN ports as simple interfaces? Then we just need to talk to this interfaces?


And again, thank you for all your work!!

1 Like 1 ·
silverfox avatar image silverfox llubi commented ·

@llubi Have you made any progress with getting the CANbus in the Cerbo GX to control the Dingtian relay version with CAN? I also have that relay version, and I also want to do this! In the Dingtian manual, in 4.3 Relay Connect, I found this:

CAN:

CAN protocol, ID, Speed config

Protocol: Dingtian String

Dingtian Binary

Modbus-RTU(0x03,0x06),only support Read/Write single register once time

Speed: 5Kbps,10Kbps,20Kbps,25Kbps,50Kbps,100Kbps,125Kbps,200Kbps,250Kbps,500Kbps,800Kbps,888 Kbps,1Mbps

I have not yet connected my 4CH relay board to anything. I think the first step would be to access the board with Ethernet, address 192.168.1.100. Then in the Settings, Relay Connect page, I think I'd need to set it for CAN protocol, 500Kbp speed.

Then I think I'd need to use some wires to connect the two terminals to the left of the Ethernet port as H and L to a Cerbo CAN port.

After that, I don't know what. Will the Cerbo GX somehow recognize the relay board?

Maybe you have already done all this and have some hints for me!

Thanks!

0 Likes 0 ·
fguiot avatar image
fguiot answered ·

Me neither, but interested to see how/if possible as it would save a USB adapter with the pain associated with it...

2 |3000

Up to 8 attachments (including images) can be used with a maximum of 190.8 MiB each and 286.6 MiB total.

peterbuchlak avatar image
peterbuchlak answered ·

Hi @fguiot

thanks a lot for this! Just one quick question - where can I find the Relays3456.json? Thanks!

2 |3000

Up to 8 attachments (including images) can be used with a maximum of 190.8 MiB each and 286.6 MiB total.

fguiot avatar image
fguiot answered ·

Hi Peter, good catch, referenced previous json version. Please use "Remote Relays 1-8 (RTU).json" available on the GitHub repository. there is also the a json for reading the Digital Inputs.

I will soon update the repo as I made a new version that can now handle multiple units, all connected to the same RS485/Modbus_RTU bus.

1 comment
2 |3000

Up to 8 attachments (including images) can be used with a maximum of 190.8 MiB each and 286.6 MiB total.

peterbuchlak avatar image peterbuchlak commented ·

Thanks @fguiot ! One more thing - I'm getting "Lock file exists, exiting." error on the

/data/rgpio/mod_rgpio Read_Relay /dev/ttyUSB0

is there something I'm doing wrong? Thanks a lot!

0 Likes 0 ·
fguiot avatar image
fguiot answered ·

Try to delete the .run in /data/rgpio

2 |3000

Up to 8 attachments (including images) can be used with a maximum of 190.8 MiB each and 286.6 MiB total.

llubi avatar image
llubi answered ·

What file should I modify to connect the relays to the Ethernet port instead of the RS485?

And thanks for your work!

6 comments
2 |3000

Up to 8 attachments (including images) can be used with a maximum of 190.8 MiB each and 286.6 MiB total.

fguiot avatar image fguiot commented ·

@llubi Ignore the steps #1, #6, #9.

And for #10, use the dedicated Node-Red flow Remote Relays 1-8 (TCP).json

That should work.

1 Like 1 ·
llubi avatar image llubi fguiot commented ·
Thanks! Will try and told you
0 Likes 0 ·
fguiot avatar image fguiot fguiot commented ·

Also forgot to mention you need to configure the Dingtian box for supporting Modbus.

configure it by connecting to the console of the Dingtian (http://192.168.1.100 by default with admin/admin):

capture-decran-2022-10-18-a-170916.png

0 Likes 0 ·
llubi avatar image llubi fguiot commented ·
Hi!

Is it possible that step 4 is upside-down? I mean, If I try to move the services.json file it tells me that there is no file, but if I first copy it from /rgpio/conf then I can move it. Am I right?

Also, what kind of configuration I need to do in the relay website? Do I need to pu my Cerbo IP in the remote address TCP Client Dyngtian?


Thanks!!

0 Likes 0 ·
fguiot avatar image fguiot llubi commented ·

@llubi no, Step#4 is in correct order. The goal was to keep a copy of the original services.json file. And I'm surprised you have no file. Or may be you already executed this command, and then you have now already renamed it to services.json.ori

The screenshot above shows the correct configuration to make the Dyngtian remote relay working via RS485 / Modbus.


0 Likes 0 ·
llubi avatar image llubi fguiot commented ·
Thanks! Will format the Cerbo, install everything again and test it, because maybe I did something wrong...
0 Likes 0 ·
derrick thomas avatar image
derrick thomas answered ·

@fguiot I cant seem to get this working. I'm stuck at step 6 ignore the USB-RS485 interface, i keep getting -sh: ENV{ID_BUS}==usb,: command not found

I have tried the alternative method as well. I have a usb hub installed with a mppt connected through a ve.direct to usb adapter. At first the rs485 adapter was appearing on ttyusb1, then after reboot it started appearing on ttyusb0. I tried the alternative method with usb0 and usb 1 and I cannot get the additional relays to work. they are showing up in the settings and I have enabled them. When I click "on" or "off" the relay does not change state.


I am running a cerbo with 2.92 os large and guimods. help?

16 comments
2 |3000

Up to 8 attachments (including images) can be used with a maximum of 190.8 MiB each and 286.6 MiB total.

derrick thomas avatar image derrick thomas commented ·

@fguiot I finally figured out I was supposed to actually "add lines to the file" and not just copy/paste the lines into the terminal, what a noob mistake, duh.


Anyway, I did finally add the lines to the correct file. I then opened the file again to make sure the changes were actually saved, which they are. I reboot the relay box and the cerbo, but still not able to switch the added relays. I did verify the model "USB_Serial" was the same as in the instructions but no joy. I'm lost at this point.

0 Likes 0 ·
fguiot avatar image fguiot derrick thomas commented ·

When you confirm you have /dev/ttyUSB0 try this command:

/data/rgpio/modpoll/arm-linux-gnueabihf/modpoll -m rtu -b 115200 -p none -d 8 -1 -r 1 -s 1 -c 1 /dev/ttyUSB0

This should report 8 if you bought the 8x relai version.

You also may connect to the console of the Dingtian (http://192.168.1.100 by default with admin/admin) and make sure the settings for the RS485 is Modbus-RTU, adresse=1 Baud=115200bps databits=8 stopbits=1and parity=none

0 Likes 0 ·
derrick thomas avatar image derrick thomas fguiot commented ·
I bought the 4x relay board from the same link you provided above.


I connected to the console of the Dingtian and can confirm the settings are as you specified. When I run the command from step 6 to discover the model the adapter does come up, except for like I said above that it sometimes appears on tty/usb0 and sometimes on tty/usb1


Model id comes up as USB_Serial.

I notice that you made some changes to step 6 so when I get some time later in the day I will try again with your suggestions. Are there any additional steps I need to take before running the commands again since I already did before? I'm assuming that the relay 1-8 json is only for node red?

0 Likes 0 ·
fguiot avatar image fguiot commented ·

@derrick thomas I'm also working with Cerbo v2.92 and latest Guimods.

So if you are stuck at stop #6, we first need to confirm you have the USB-RS485 adapter correctly detected. Can you try removing the USB hub and all VE.direct usb adapters, and connect the the USB-RS485 to the first USB port?

Then confirm you have /dev/ttyUSB0

I made a change for a much better way I prevent VenusOS to pre-empt our RS485 interface, by looking at the USB address instead of the USB name. this new method works perfectly even with other USB interfaces and USB hubs. you just need to make sure you always plus the USB-RS485 adapter always in the same USB port. I'm away from my dev computer, but when I'm back I will post here the new way I configure /etc/udev/rules.d/serial-starter.rules

0 Likes 0 ·
fguiot avatar image fguiot fguiot commented ·
I have updated the Step #6 so the it prevent VenusOS to use our RS485 interface, based on the USB port it is attached to instead of relaying on the USB name.
0 Likes 0 ·
derrick thomas avatar image derrick thomas fguiot commented ·
@fguiot by first USB port I assume you mean the one farthest from the HDMI?


One more question...are the digital inputs accessible from the gui or only in node red? What do I do with the digital inputs json? Import it into node red?

0 Likes 0 ·
fguiot avatar image fguiot derrick thomas commented ·
Yes the farest one from the hdmi port.

The digital inputs are not exposed through the GUI, only with Node-Red. But I'm pretty sure it would.m be possible to add it to the GUI.

You simply need to import the Json your node-red.

Personally I use the digital inputs to sense the position of the switchs in the electrical panel of my boat so I make those smart. For example I can use the existing switch to turn on/off the anchor light, but It can also be turned on/off automatically when on Anchorage at sun set. And I can still keep the control manually (overwrite mode) with the physical switch.

I will probably publish this as an entire separate project...

0 Likes 0 ·
derrick thomas avatar image derrick thomas fguiot commented ·

@fguiot still no luck. I even tried starting over and ran all the steps exactly as directed. I ran the above mentioned command and here is the result:

root@einstein:~# /data/rgpio/modpoll/arm-linux-gnueabihf/modpoll -m rtu -b 115200 -p none -d 8 -1 -r 1 -s 1 -c 1 /dev/ttyUSB0
modpoll 3.10 - FieldTalk(tm) Modbus(R) Master Simulator
Copyright (c) 2002-2021 proconX Pty Ltd
Visit https://www.modbusdriver.com for Modbus libraries and tools.

Protocol configuration: Modbus RTU, FC3
Slave configuration...: address = 1, start reference = 1, count = 1
Communication.........: /dev/ttyUSB0, 115200, 8, 1, none, t/o 1.00 s, poll rate 1000 ms
Data type.............: 16-bit register, output (holding) register table

-- Polling slave...
[1]: 4
root@einstein:~#

identifying the model of interface the following comes up:

root@einstein:~# udevadm info --query=property --name=/dev/ttyUSB0
DEVLINKS=/dev/serial-starter/ttyUSB0 /dev/serial/by-id/usb-1a86_USB_Serial-if00-port0 /dev/serial/by-path/platform-1c14400.usb-usb-0:1:1.0-port0
DEVNAME=/dev/ttyUSB0
DEVPATH=/devices/platform/soc/1c14400.usb/usb3/3-1/3-1:1.0/ttyUSB0/tty/ttyUSB0
ID_BUS=usb
ID_MODEL=USB_Serial
ID_MODEL_ENC=USB\x20Serial
ID_MODEL_FROM_DATABASE=HL-340 USB-Serial adapter
ID_MODEL_ID=7523
ID_PATH=platform-1c14400.usb-usb-0:1:1.0
ID_PATH_TAG=platform-1c14400_usb-usb-0_1_1_0
ID_REVISION=0264
ID_SERIAL=1a86_USB_Serial
ID_TYPE=generic
ID_USB_CLASS_FROM_DATABASE=Vendor Specific Class
ID_USB_DRIVER=ch341
ID_USB_INTERFACES=:ff0102:
ID_USB_INTERFACE_NUM=00
ID_VENDOR=1a86
ID_VENDOR_ENC=1a86
ID_VENDOR_FROM_DATABASE=QinHeng Electronics
ID_VENDOR_ID=1a86
MAJOR=188
MINOR=0
SUBSYSTEM=tty
USEC_INITIALIZED=157315537
VE_SERVICE=ignore
root@einstein:~#


0 Likes 0 ·
derrick thomas avatar image derrick thomas derrick thomas commented ·

and here is the file with lines added to ignore the interface. I'm wondering if there is something else in the file that is causing a conflict? there are other entries for serial interfaces.


ACTION=="add", SUBSYSTEM=="tty", SUBSYSTEMS=="platform|usb-serial", SYMLINK+="serial-starter/%k"
ACTION=="remove", SUBSYSTEM=="tty", SUBSYSTEMS=="platform|usb-serial", RUN+="/opt/victronenergy/serial-starter/cleanup.sh %k"

# The VE USB RS485 has a FT232R, but that chip can also rs232 etc, so also check default
ACTION=="add", ENV{ID_BUS}=="usb", ENV{ID_MODEL}=="FT232R_USB_UART",            ENV{VE_SERVICE}="rs485:default"
# Older versions have specific id_model so that is rs485 for sure
ACTION=="add", ENV{ID_BUS}=="usb", ENV{ID_MODEL}=="USB-RS485_Cable",            ENV{VE_SERVICE}="rs485"
# Isolated rs485
ACTION=="add", ENV{ID_BUS}=="usb", ENV{ID_MODEL}=="USB485_Iso_stick",           ENV{VE_SERVICE}="rs485"
# The Zigbee USB to rs485 show up as Serial_Controller_D, so check cgwacs as well
ACTION=="add", ENV{ID_BUS}=="usb", ENV{ID_MODEL}=="USB-Serial_Controller_D",    ENV{VE_SERVICE}="cgwacs:default"
# 2nd generation Zigbee converter - DRF2658C (USB)
ACTION=="add", ENV{ID_BUS}=="usb", ENV{ID_MODEL}=="CP2102_USB_to_UART_Bridge_Controller", ENV{VE_SERVICE}="cgwacs:default"
# DRF2658C Zigbee converter with CH340 chip
ACTION=="add", ENV{ID_BUS}=="usb", ENV{ID_MODEL}=="USB2.0-Serial", ENV{VE_SERVICE}="cgwacs:default"

# VE.Direct cable should have a specific model-id, if not set it is a FT232EX.
ACTION=="add", ENV{ID_BUS}=="usb", ENV{ID_MODEL}=="VE_Direct_cable",            ENV{VE_SERVICE}="vedirect"
ACTION=="add", ENV{ID_BUS}=="usb", ENV{ID_MODEL}=="FT232EX",                    ENV{VE_SERVICE}="vedirect:default"

ACTION=="add", ENV{ID_BUS}=="usb", ENV{ID_MODEL}=="MK3-USB_Interface",          ENV{VE_SERVICE}="mkx"

#Serial-starter to ignore the USB-RS485 (ID_MODEL=USB_Serial) so USB interface for RGPIO works

#ACTION=="add", ENV{ID_BUS}=="usb", ENV{ID_MODEL}=="USB_Serial", ENV{VE_SERVICE}="ignore"

#Serial-starter to ignore the USB-RS485 converter attached to the first USB port so USB interface for RGPIO works

ACTION=="add", ENV{ID_BUS}=="usb", ENV{ID_PATH_TAG}=="platform-1c14400_usb-usb-0_1_1_0", ENV{VE_SERVICE}="ignore"
~
~
~
~
~
~
~
~
0 Likes 0 ·
fguiot avatar image fguiot derrick thomas commented ·

@derrick thomas it works!

The command line reported your relay module,has 4x relays!

Try the following commands:

Close Relay1:

/data/rgpio/modpoll/arm-linux-gnueabihf/modpoll -m rtu -b 115200 -p none -d 8 -1 -r 3 -s 1 -c 1 /dev/ttyUSB0 257


Open Relay1:

/data/rgpio/modpoll/arm-linux-gnueabihf/modpoll -m rtu -b 115200 -p none -d 8 -1 -r 3 -s 1 -c 1 /dev/ttyUSB0 256


0 Likes 0 ·
derrick thomas avatar image derrick thomas fguiot commented ·

@fguiot the above commands do work to set the remote relay on or off, but I still cannot control them from the gui, and when I set them on/off with the above commands the changes do not reflect on the gui either. also setting relays to on/off in the settings/relay menu do nothing. in the relay flow in node red I am getting the following error from debug 42 from the write relay node


{"code":1,"message":"Command failed: /data/rgpio/mod_rgpio NaN Write_Relay /dev/ttyUSB0\nmodpoll: Illegal write data value! Try -h for help.\n"}


0 Likes 0 ·
fguiot avatar image fguiot derrick thomas commented ·
@derrick thomas I'm afraid it will have to wait I'm back from holidays to look at my setup for helping you.

may be you can try to capture what command is executed by modifying the bash script mod_rgpio. For ex adding something like :

echo $1 $2 $3

0 Likes 0 ·
derrick thomas avatar image derrick thomas fguiot commented ·
@fguiot no problem. Thanks for all your help, it is greatly appreciated. When you get back from holiday I would be happy to grant you remote access if you want to look under the hood and see what's going on.
0 Likes 0 ·
derrick thomas avatar image derrick thomas fguiot commented ·

@fguiot I attempted to edit mod_rgpio and it is empty...the file opens but there is nothing there.


edit: I copied mod_rgpio from the github to /data/rgpio. don't know why it was empty, but it's there now. still same problem. I don't know whats going on with this system but something is going on. I rolled back to the normal os 2.92 and installed from scratch but I was still not successful in being able to control the relays from the gui. After this failed I went back to the previous firmware large os 2.92 with node red enabled. I wait your help when you are back and have the time. enjoy your holiday.

0 Likes 0 ·
fguiot avatar image fguiot derrick thomas commented ·
@derrick thomas Hi Thomas, I'm back from vac.

How do you want to proceed for the remote access? What is your email?

0 Likes 0 ·
derrick thomas avatar image derrick thomas fguiot commented ·
derrick.t at mail.com (mail, NOT gmail lol)
0 Likes 0 ·
fguiot avatar image
fguiot answered ·

@derrick thomas have sent you an email

1 comment
2 |3000

Up to 8 attachments (including images) can be used with a maximum of 190.8 MiB each and 286.6 MiB total.

derrick thomas avatar image derrick thomas commented ·
I replied to your email. If you didn't get it please check your spam/junk folder.


Fyi, I have done a factory reset on the cerbo and reinstalled everything step by step with one acception. I used the first method you wrote to ignore the adapter instead of the second because sometimes on reboot I would find the adapter on USB1 instead of USB0. Current firmware 2.92 large and guimods. Rs485 adapter is connected to the first USB on the cerbo. I have loaded the relay flow and digital input flow into node red but they are disabled.

0 Likes 0 ·
fguiot avatar image
fguiot answered ·

I realise I provided wrong screenshot for the Dingtian IOT Relay configuration page. The RS485 must be configured in Modbus-RTU, not in Modbus-ASCII.

I have updated the instructions, adding step #0 with correct screenshot.

2 |3000

Up to 8 attachments (including images) can be used with a maximum of 190.8 MiB each and 286.6 MiB total.

derrick thomas avatar image
derrick thomas answered ·

Just want to give a big shout out to @fguiot really a stand up guy. Went above and beyond to help me figure out why I couldn't get the external relays working in my system. Took a little extra tweaking in node red and serial starter file but all is working great now. Thanks a bunch fguiot.

54 comments
2 |3000

Up to 8 attachments (including images) can be used with a maximum of 190.8 MiB each and 286.6 MiB total.

Ed Jones avatar image Ed Jones commented ·
Could you please write up the solution? I plan to try this and I'm sure many others will. If we run into the same issue, it would be helpful to know how you solved it. Thanks in advance.
1 Like 1 ·
fguiot avatar image fguiot Ed Jones commented ·
@Ed Jones the issue came from the USB port preempted by some Venus OS processes. I have updated step#6 to help making sure the USB-RS485 adapter, when connected on first USB port (the one close to the edge os the Cerbo), will be always ignored by Venus OS so our "driver" can access to it reliably.

The second issue that was affecting Thomas setup was related with incomplete Node-Red flow. I have updated the correct flow on Github.

0 Likes 0 ·
usernamepasswordbs avatar image usernamepasswordbs fguiot commented ·
@derrick thomas I am stuck around the same place that you seemed to be at one point, where adding lines to the serial-starter.rules file didn't get the expected results. Would you be able to share your knowledge of how to get through this part of the installation?
0 Likes 0 ·
derrick thomas avatar image derrick thomas usernamepasswordbs commented ·

I haven't used rs485 for a few months now. I have been using modbustcp over wifi since I have expanded to 3 remote relay modules, 2 of which would be very difficult to run additional wiring to. If memory serves me correctly, after making the changes to serial starter a full reboot was required. For some reason rebooting from terminal didn't work, it had to be a reboot from the cerbo gui settings/general/reboot.


Be advised that this package does not currently work as is with Venus os v3.00. there are a few files that have changed from v2.94 to v3.00. the author of this package is currently working on an update but has not yet posted it to GitHub. You can download the correct files from my GitHub (if you want to use rs485 you will need to follow fguiot's GitHub instructions and use the 4 changed files from my package. If you want to use modbus over wifi or Ethernet you can use my package. I have included a few scripts to automate the install/uninstall process)

https://github.com/thomasinaz41213/Venus_rgpio

0 Likes 0 ·
usernamepasswordbs avatar image usernamepasswordbs derrick thomas commented ·
Thanks for the reply, I am dragging myself from not even knowing in any way what I was looking at to starting to learn Linux but I have a long way to go.

It is interesting to learn that the 3.00 OS differences may be why I am not getting things to work. I will follow your repo and let you know how I get on.

0 Likes 0 ·
fguiot avatar image fguiot usernamepasswordbs commented ·

Hi sorry for not checking the comments here for a while.

I finished the support of V3.00

Before publishing, I would like to automate the setup. thinking about adding distribution package to kwindrem's SetupHelper

I also found that I had a conflict with Louisvdw's dbus-serialbattery, preventing the serial-starter.rules to work as expected. My short term solution was to remove dbus-serialbattery. @usernamepasswordbs That's may be also the problem you have with serial-starter.rules...

0 Likes 0 ·
usernamepasswordbs avatar image usernamepasswordbs fguiot commented ·
Thanks for the reply, I will try that option but what will removing dbus-serialbattery do?
0 Likes 0 ·
fguiot avatar image fguiot usernamepasswordbs commented ·
You have bus-serialbattery only if you manually installed it. This driver connects your DIY battery / BMS to the victron ecosystem.


0 Likes 0 ·
usernamepasswordbs avatar image usernamepasswordbs fguiot commented ·

Ok right. No, I haven't got that then.

0 Likes 0 ·
derrick thomas avatar image derrick thomas fguiot commented ·
@fguiot I was successfully able to use dbus-serialbattery and the rs485 relay module together without any issues with serial starter rules. I use the uart adapter for the Daly which I believe is rs232 and not the rs485. You might try that route.


@usernamepasswordbs if you are using tcp over Ethernet or wifi you have no need of modifying or adding anything to serial starter rules.

0 Likes 0 ·
fguiot avatar image fguiot derrick thomas commented ·
@derrick thomas interesting. Could you share here your starter rules file? I'm also using the standard Daly's RS232 USB adapter.
0 Likes 0 ·
derrick thomas avatar image derrick thomas fguiot commented ·
I'm not using a modified serial starter rules anymore since I'm using modbustcp over wifi. When I was using rs485 for the relays I just added the line according to your GitHub.

ACTION=="add", ENV{ID_BUS}=="usb", ENV{ID_PATH_TAG}=="platform-1c14400_usb-usb-0_1_1_0", ENV{VE_SERVICE}="ignore"

Have you tried plugging in the uart adapter for the Daly and starting the battery driver AFTER the rs485 adapter is already running?

Also make sure the uart adapter is enabled in starter rules. I think I also disabled all other mentions of adapters that are not being used in my system.

0 Likes 0 ·
adrianalltech avatar image adrianalltech fguiot commented ·
Hi @fguiot! My brother and I have been trying for a week with no success with this. We are both new to this kind of process, but have followed all of the directions and advice given in the comments! Having said that, we still cannot get relays 3 to 6 to show up on the GUI. Just wondering if you did manage to add this to setuphelper in the end? Thanks for all of your work!
0 Likes 0 ·
derrick thomas avatar image derrick thomas adrianalltech commented ·
What version of Venus are you on? This mod only works up to 2.92 it will not work on v3.00 without manually altering some files, or alternatively use my GitHub as it has the files modded for version 3.00 and above.
0 Likes 0 ·
adrianalltech avatar image adrianalltech derrick thomas commented ·

Thank you both for your help! I have reverted to v2.89 and I am going to try everything again.

If not, I will definitely use the files on your GitHub, thankyou! Do you have a link to it?

I also ran that command to see if it can tell how many relays I have, but it came up with no communication from slave (if I recall correctly) or something to that effect. I am going to try it all again now! Thanks again

Edit: I found your link above! Giving it a go asap

0 Likes 0 ·
adrianalltech avatar image adrianalltech derrick thomas commented ·

Hi @derrick thomas thanks again for your help. I actually have decided to use an Ethernet connection between the Cerbo and the Dingtian Relay box, so I have followed your steps on version 3.01 of the software. When I do though I get this error on node red when I try to deploy...

Flows stopped due to missing node types.

modbus-client

modbus-flex-getter

buffer-parser

modbus-flex-write

Sorry I am new to this, so again my brother and I just trying to work through.

Attached is a copy and paste of what we did. Any help at all is appreciated, and thank you so much again!! Also sorry we did not know how else to copy and paste the history in...

Cerbo GX Failed Relay Attempt.pdf


0 Likes 0 ·
derrick thomas avatar image derrick thomas adrianalltech commented ·
You will need to open the pallet tools in node red and load the missing nodes. Once you load the missing pallets it should work.
0 Likes 0 ·
adrianalltech avatar image adrianalltech derrick thomas commented ·

Thankyou! Will try that asap. And just to clarify, I have the dingtian unit connected directly via ethernet to the cerbo gx.


Just making sure it doesn't need to be connected to a router with internet access or anything. Thank you so much again @derrick thomas for all of your help!

0 Likes 0 ·
derrick thomas avatar image derrick thomas adrianalltech commented ·
Yes you will need internet access because the pallets are downloaded from github
0 Likes 0 ·
peterbuchlak avatar image peterbuchlak derrick thomas commented ·
Hi! can I get some details about how to make it work on 3.x and higher? Link to github would be great, thanks!
0 Likes 0 ·
fguiot avatar image fguiot adrianalltech commented ·

@AdrianAllTech hi, I'm just back today from vac.

I haven't really started working on making a setuphelper package, but it's high in my todo list.

The relays 3-6 will show up on the GUI, only after installing GUImod with setuphelper.

As Thomas already asked, what is your Venus version?

0 Likes 0 ·
peterbuchlak avatar image peterbuchlak fguiot commented ·
yes! please do the automation using setup helper! that would help a lot!!!
0 Likes 0 ·
usernamepasswordbs avatar image usernamepasswordbs derrick thomas commented ·
@derrick thomas Before I ditch the RS485 plan can I just ask if I run an ethernet cable between my router and the relay module would I be able to use ethernet communication between cerbo and relay? Or am I missing something?


The wi-fi is not good enough and the cerbo is already connected via ethernet.


Thanks in advance.

0 Likes 0 ·
derrick thomas avatar image derrick thomas usernamepasswordbs commented ·
Yes that should work. Make sure you set a static IP address for the relay module.
0 Likes 0 ·
usernamepasswordbs avatar image usernamepasswordbs derrick thomas commented ·

Hi again, I've installed the files into the Cerbo, it said it was installed ok. Then I imported/deployed the relays and digital input flows in node-red.

I've checked there are 6 relays appearing in "remote console/settings/relay" but the relay states don't show correctly also can't switch them via Guimods or remote console. Have you any ideas where I might have gone wrong ?

I can access the relay and switch on/off via the Dingtian IP address ethernet or wifi but the Gui doesn't follow suit.

0 Likes 0 ·
fguiot avatar image fguiot usernamepasswordbs commented ·

@usernamepasswordbs the your next step is to play with Node-Red, trying to trig it and add debug nodes so it helps troubleshooting.

0 Likes 0 ·
usernamepasswordbs avatar image usernamepasswordbs fguiot commented ·

Thanks for the reply. I've got this address already in use error when starting node-red:

26 Jun 11:07:19 - [info]


Welcome to Node-RED

===================


26 Jun 11:07:19 - [info] Node-RED version: v3.0.2

26 Jun 11:07:19 - [info] Node.js version: v14.17.6

26 Jun 11:07:19 - [info] Linux 5.10.109-venus-10 arm LE

26 Jun 11:07:22 - [info] Loading palette nodes

26 Jun 11:07:31 - [info] Settings file : /home/root/.node-red/settings.js

26 Jun 11:07:31 - [info] Context store : 'default' [module=memory]

26 Jun 11:07:31 - [info] User directory : /home/root/.node-red

26 Jun 11:07:31 - [warn] Projects disabled : editorTheme.projects.enabled=false

26 Jun 11:07:31 - [info] Flows file : /home/root/.node-red/flows.json

26 Jun 11:07:32 - [warn]


---------------------------------------------------------------------

Your flow credentials file is encrypted using a system-generated key.


If the system-generated key is lost for any reason, your credentials

file will not be recoverable, you will have to delete it and re-enter

your credentials.


You should set your own key using the 'credentialSecret' option in

your settings file. Node-RED will then re-encrypt your credentials

file using your chosen key the next time you deploy a change.

---------------------------------------------------------------------


26 Jun 11:07:32 - [error] Uncaught Exception:

26 Jun 11:07:32 - [error] Error: listen EADDRINUSE: address already in use 0.0.0.0:1880

at Server.setupListenHandle [as _listen2] (net.js:1320:16)

at listenInCluster (net.js:1368:12)

at doListen (net.js:1505:7)

at processTicksAndRejections (internal/process/task_queues.js:83:21)

root@einstein:~#

0 Likes 0 ·
fguiot avatar image fguiot usernamepasswordbs commented ·

0.0.0.0:1880 ???

Check your Ethernet or Wi-Fi configuration, either manual IP or DHCP, but definitively, you need to have an IP address assigned to the Cerbo (or is it Raspberry Pi?)


0 Likes 0 ·
usernamepasswordbs avatar image usernamepasswordbs fguiot commented ·
The Cerbo is connected via ethernet to the router and has IP address of 192.168.1.41. The relay module is connected to the router via ethernet and has IP address of 192.168.1.100.
0 Likes 0 ·
derrick thomas avatar image derrick thomas usernamepasswordbs commented ·

@usernamepasswordbs did you load the tcp flows and not the rtu flows? Did you edit the server in the getter node to match the IP of the relay module?

Also, are you able to access the relay module from a browser through your local network? (Accessing thru your router and not thru the module AP)

0 Likes 0 ·
Show more comments
fguiot avatar image fguiot usernamepasswordbs commented ·

Do you mean you can't access Node-Red GUI?

Have you tried https:// 192.168.1.41:1881 ?

or alternatively https://venus.local:1881

0 Likes 0 ·
Show more comments
hebs avatar image
hebs answered ·

@fguiot , this is great work. Thank you for contributing. I am trying to do something almost similar (but less awesome) with my Multiplus 2 GX USB port. Are you able to assist me with a small steer please? Apologies for the stupid questions but I do learn pretty quickly.


BACKGROUND

I am trying to get my Multiplus 2 GX to recognise a MODBUS RTU 8 relay module (MODBUS RTU 8 Relay Module) through the lone USB port on the built in GX device via a RS485 adapter. I just want to be able to control the relays from node-red (I do not need to control them from Venus GUI - but I do love what you have done).


QUESTIONS

I don't believe that steps 1-5 and 7-9 are needed in my case because I do not need Venus GUI functionality. I believe that most of my solution sits around step 10 and the use of node-red-contrib-modbus to communicate with the module. Sorry for the stupid question but I haven't quite worked out what step 6 does and if I need it - I think that it forces the ignore of one USB port so that the RGPIO is recognised? I don't think I need this or does the VE.Direct port interfere?


PROGRESS SO FAR

- I have successfully gained full control of all relay functionality through USB->RS485 on my PC and I am happy with all of the registers/commands using MODBUS RTU.

- I have managed to get the RS485 adapter recognised by the on-board GX (confirmed through ssh terminal). plug & play!

- I think that the USB port has been recognised in node-red (/dev/ttyUSB0).

I have not been able to get node-red-contrib-modbus to communicate with the relay.

Would step 1 & 6 help?


1 comment
2 |3000

Up to 8 attachments (including images) can be used with a maximum of 190.8 MiB each and 286.6 MiB total.

fguiot avatar image fguiot commented ·
@Hebs you are correct, steps 0-5 and 7-9 can be ignored.

The challenge is to make the USB-RS485 working reliably.

I made some updates on step 6 to prevent Venus OS to preempt access to any USB-serial converter attached to the first USB port (the one close to the edge of the Cerbo).

You would also have to adapt the mod_rgpio script so it can correctly talk with your Modbus relay box. I would first test manually to communicate using modpoll.

Then you simply need to call you custom mod_poll script from Node-Red.

Should not be a bid deal. Easy.

1 Like 1 ·
tharbarn avatar image
tharbarn answered ·

Hello, is there anyone based in the UK that wants to get these additional relays configured for me. I will of course pay them for there time. I have the relay board and the 485 USB adapter and my Cerbo has Node Red installed. I'm working my way through node red ok, with trial and error, but I only understand about a third of what's needed to get the relay board working on my Cerbo and in node red. my email is bennettweb@googlemail.com.


2 |3000

Up to 8 attachments (including images) can be used with a maximum of 190.8 MiB each and 286.6 MiB total.

Robert avatar image
Robert answered ·

Hello, is there a chance to get this functions for guys without an special educational background?

(Like me)

I pay for function like this as well.

Best regards Robert

1 comment
2 |3000

Up to 8 attachments (including images) can be used with a maximum of 190.8 MiB each and 286.6 MiB total.

fguiot avatar image fguiot commented ·
In a recent Victron Webinar, I asked the question if Victron was willing to release I/O extension to the Cerbo GX, and they answer was rather positive. So I would advice you wait for a fully supported product by Victron. My proposal here is for the DIY guys ;-)


0 Likes 0 ·
derrick thomas avatar image
derrick thomas answered ·

@fguiot I have been running the additional relays for a few months now. All works great. I am however about to add 2 diy lifepo4 banks with Daly bms's and would like to connect them to the system using the serial battery mod. I will have the Daly uart USB adapters. In looking at step 6 of your installation instructions here I am wondering if this will be possible?

3 comments
2 |3000

Up to 8 attachments (including images) can be used with a maximum of 190.8 MiB each and 286.6 MiB total.

fguiot avatar image fguiot commented ·
I will also soon connect 3x Daly BMS to the Cerbo. Will let you know if I can figure out something.
0 Likes 0 ·
fguiot avatar image fguiot fguiot commented ·
@derrick thomas I connected the 3x Daly BMS via a USB hub, and all seems working fine for both BMS details and Relay control. Are you facing an issue?

On my setup, the first USB port is used for connecting the USB-> serial interface. The second port is were I have attached the HUB that connects to the Daly BMS (Serial) and a ve.Direct USB adapter.

0 Likes 0 ·
derrick thomas avatar image derrick thomas fguiot commented ·
I have basically the same setup. I am on 3.00~32 so I had to manually modify the files for the relay box to work again. I have had no issues with the Daly bms other than a cerbo reboot occasionally causes the bms to get assigned to a different instance but I think that's something to do with how Venus assigns it's peripherals at boot.
0 Likes 0 ·
regan avatar image
regan answered ·

First up:

For some reasons I can’t control the relays. If someone knows the correct command line?

Here is what I tried:

dbus -y com.victronenergy.system /Relay/3/State SetValue 1

Use: dbus -y com.victronenergy.system /Relay/3/State SetValue %1

It has something do with the value typing of it being boolean and not integer from what I remember. Can't seem to find documentation on where I found it but I found it in some random non-victron related example.
I was controlling load shedding (for time-of-day power rates) via dbus in cron on the cerbo before I dipped into node-red.


Anyway, the real reason I'm replying is that I'm trying to get a Waveshare rtu relay box to work (https://www.waveshare.com/wiki/Modbus_RTU_Relay#Overview).
I spent a lot of time crash-course figuring out how to get modpoll to give the commands I wanted and can now toggle relays using a modified mod_rgpio file.
I didn't make much headway until I compiled a newer mbpoll that has the verbose debug output, then a whole lot of trial and error finally got me what I needed.

I can't seem to figure out how the gpio stuff works. Basically steps 1-3, how does that interface with the relay board? Is it a wrapper for modbus somehow or is the Waveshare unit not having some sort of gpio support where the issue is?
I assumed it was a modbus wrapper but I'm getting no-where in understanding how that part works in the sea of soft links in rgpio/sys/.

If anyone else is looking for the start of interfacing with the waveshare relay board here is so far what I've started to do:

Read relay 1 state: (the \[1\] is reading the bit for each relay 1-8, you can use '^\['"$1"'\]... in the mod_rgpio file to individually select each relay
./modpoll -m rtu -b 9600 -p none -t 0 -r 1 -c 8 -1 /dev/ttyUSB0 | egrep '^\[1\]: (.+)' | cut -d\ -f2

Set relay 1 on: (-r is the relay number from 1-8)
./modpoll -m rtu -b 9600 -p none -t 0 -r 1 -c 1 /dev/ttyUSB0 1

Set relay 1 off:
./modpoll -m rtu -b 9600 -p none -t 0 -r 1 -c 1 /dev/ttyUSB0 0

2 |3000

Up to 8 attachments (including images) can be used with a maximum of 190.8 MiB each and 286.6 MiB total.

fguiot avatar image
fguiot answered ·

@regan nice alternative.

2 |3000

Up to 8 attachments (including images) can be used with a maximum of 190.8 MiB each and 286.6 MiB total.

tschini avatar image
tschini answered ·

Hello I was able to do the installation and connect the external relay successfully by Modbus. I'm able to control the relay by the shell commands in the instructions and I see the 4 additional relais in the Cerbo GX gui. I can also trigger the relais by Node-RED and they change their state in the Cerbo GX gui. Only the connection between GUI and the relay box is not working. If I change the relay in the GUI it triggers the on/off in the GUI but the box doesn't change state of the box ("click").

Any ideas? Did a reset and re installation two times already.

2 comments
2 |3000

Up to 8 attachments (including images) can be used with a maximum of 190.8 MiB each and 286.6 MiB total.

derrick thomas avatar image derrick thomas commented ·
There were some changes between Venus 2.xx and 3.xx which resulted in a few files either needing to be manually altered or use the files from my GitHub (unless @fguiot has already updated the files for 3.xx but I don't think so unless I just missed that post). You will want to restore the original files first and then go thru the install steps using the new files. https://github.com/thomasinaz41213/Venus_rgpio
0 Likes 0 ·
fguiot avatar image fguiot derrick thomas commented ·
You are right, and I haven't yet released the new version that will support 3.xx I'm busy with other priorities, but it's still in my radar, so stay tuned...
0 Likes 0 ·
usernamepasswordbs avatar image
usernamepasswordbs answered ·

Here's the flow that @fguiot altered to get me up and running with firmware 3.00

2 |3000

Up to 8 attachments (including images) can be used with a maximum of 190.8 MiB each and 286.6 MiB total.

usernamepasswordbs avatar image
usernamepasswordbs answered ·

Maybe better:


[{"id":"a74334d56276c4c0","type":"tab","label":"Remote Relays 1-8 (TCP)","disabled":false,"info":""},{"id":"6373ccd45ce44a1c","type":"modbus-flex-write","z":"a74334d56276c4c0","name":"external relay 1","showStatusActivities":true,"showErrors":true,"showWarnings":true,"server":"6484270ebf4ccfed","emptyMsgOnFail":false,"keepMsgProperties":false,"delayOnStart":false,"startDelayTime":"","x":540,"y":620,"wires":[["38908bb08b3aaac8"],[]]},{"id":"38908bb08b3aaac8","type":"debug","z":"a74334d56276c4c0","name":"","active":false,"tosidebar":true,"console":true,"tostatus":true,"complete":"payload","targetType":"msg","statusVal":"payload","statusType":"auto","x":760,"y":620,"wires":[]},{"id":"2a9e5d4a05f704b2","type":"comment","z":"a74334d56276c4c0","name":"Read Remote Relays position","info":"","x":200,"y":40,"wires":[]},{"id":"3543c1e82747d7d2","type":"comment","z":"a74334d56276c4c0","name":"Write Remote Relays position","info":"","x":200,"y":540,"wires":[]},{"id":"4e230674b11c2cf6","type":"inject","z":"a74334d56276c4c0","name":"Read Register 1","props":[{"p":"payload"},{"p":"topic","vt":"str"}],"repeat":"1","crontab":"","once":false,"onceDelay":"1","topic":"","payload":"","payloadType":"date","x":130,"y":160,"wires":[["ee2629cc6788a504"]]},{"id":"ee2629cc6788a504","type":"function","z":"a74334d56276c4c0","name":"Read_Val","func":"msg.payload = {\n    'fc' : 3,\n    'unitid' : 1,\n    'address' : 1,\n    'quantity' : 1\n};\nreturn msg;","outputs":1,"noerr":0,"initialize":"","finalize":"","libs":[],"x":320,"y":160,"wires":[["c445a74656fbdac8"]]},{"id":"c445a74656fbdac8","type":"modbus-flex-getter","z":"a74334d56276c4c0","name":"Relay Status (bin)","showStatusActivities":true,"showErrors":true,"logIOActivities":false,"server":"6484270ebf4ccfed","useIOFile":false,"ioFile":"","useIOForPayload":false,"emptyMsgOnFail":false,"keepMsgProperties":false,"x":550,"y":160,"wires":[[],["57b82bb48959a8b0","75aab2deb715ec69"]]},{"id":"cc0c788469fda7dc","type":"modbus-flex-write","z":"a74334d56276c4c0","name":"external relay 2","showStatusActivities":true,"showErrors":true,"showWarnings":true,"server":"6484270ebf4ccfed","emptyMsgOnFail":false,"keepMsgProperties":false,"delayOnStart":false,"startDelayTime":"","x":540,"y":680,"wires":[["2c4d59a2d50f0ee6"],[]]},{"id":"2c4d59a2d50f0ee6","type":"debug","z":"a74334d56276c4c0","name":"","active":false,"tosidebar":true,"console":true,"tostatus":true,"complete":"payload","targetType":"msg","statusVal":"payload","statusType":"auto","x":760,"y":680,"wires":[]},{"id":"f94985cdcdfe46db","type":"modbus-flex-write","z":"a74334d56276c4c0","name":"external relay 3","showStatusActivities":true,"showErrors":true,"showWarnings":true,"server":"6484270ebf4ccfed","emptyMsgOnFail":false,"keepMsgProperties":false,"delayOnStart":false,"startDelayTime":"","x":540,"y":740,"wires":[["3ac9aced51f32b9c"],[]]},{"id":"3ac9aced51f32b9c","type":"debug","z":"a74334d56276c4c0","name":"","active":false,"tosidebar":true,"console":true,"tostatus":true,"complete":"payload","targetType":"msg","statusVal":"payload","statusType":"auto","x":760,"y":740,"wires":[]},{"id":"cf4bee0ae440afe4","type":"modbus-flex-write","z":"a74334d56276c4c0","name":"external relay 4","showStatusActivities":true,"showErrors":true,"showWarnings":true,"server":"6484270ebf4ccfed","emptyMsgOnFail":false,"keepMsgProperties":false,"delayOnStart":false,"startDelayTime":"","x":540,"y":800,"wires":[["4a0dd9c23fd4e945"],[]]},{"id":"4a0dd9c23fd4e945","type":"debug","z":"a74334d56276c4c0","name":"","active":false,"tosidebar":true,"console":true,"tostatus":true,"complete":"payload","targetType":"msg","statusVal":"payload","statusType":"auto","x":760,"y":800,"wires":[]},{"id":"f867351ee7bdaa02","type":"victron-output-relay","z":"a74334d56276c4c0","service":"com.victronenergy.system/0","path":"/Relay/2/State","serviceObj":{"service":"com.victronenergy.system/0","name":"Venus device"},"pathObj":{"path":"/Relay/2/State","type":"enum","name":"Venus relay 3 state","enum":{"0":"Open","1":"Closed"},"writable":true},"initial":"0","name":"","onlyChanges":true,"x":840,"y":220,"wires":[]},{"id":"1fc354a6e8fa30ad","type":"victron-output-relay","z":"a74334d56276c4c0","service":"com.victronenergy.system/0","path":"/Relay/3/State","serviceObj":{"service":"com.victronenergy.system/0","name":"Venus device"},"pathObj":{"path":"/Relay/3/State","type":"enum","name":"Venus relay 4 state","enum":{"0":"Open","1":"Closed"},"writable":true},"initial":"0","name":"","onlyChanges":true,"x":840,"y":260,"wires":[]},{"id":"1683ee15a14bd142","type":"victron-output-relay","z":"a74334d56276c4c0","service":"com.victronenergy.system/0","path":"/Relay/4/State","serviceObj":{"service":"com.victronenergy.system/0","name":"Venus device"},"pathObj":{"path":"/Relay/4/State","type":"enum","name":"Venus relay 5 state","enum":{"0":"Open","1":"Closed"},"writable":true},"initial":"0","name":"","onlyChanges":true,"x":840,"y":300,"wires":[]},{"id":"afc7568d049abce2","type":"victron-output-relay","z":"a74334d56276c4c0","service":"com.victronenergy.system/0","path":"/Relay/5/State","serviceObj":{"service":"com.victronenergy.system/0","name":"Venus device"},"pathObj":{"path":"/Relay/5/State","type":"enum","name":"Venus relay 6 state","enum":{"0":"Open","1":"Closed"},"writable":true},"initial":"0","name":"","onlyChanges":true,"x":840,"y":340,"wires":[]},{"id":"57b82bb48959a8b0","type":"buffer-parser","z":"a74334d56276c4c0","name":"","data":"payload[\"data\"]","dataType":"msg","specification":"spec","specificationType":"ui","items":[{"type":"8bit","name":"0","offset":1,"length":1,"offsetbit":3,"scale":"1","mask":""}],"swap1":"","swap2":"","swap3":"","swap1Type":"swap","swap2Type":"swap","swap3Type":"swap","msgProperty":"payload","msgPropertyType":"str","resultType":"value","resultTypeType":"output","multipleResult":true,"fanOutMultipleResult":true,"setTopic":false,"outputs":1,"x":770,"y":160,"wires":[["327678866744553c"]]},{"id":"2ef473c57a27764a","type":"buffer-parser","z":"a74334d56276c4c0","name":"","data":"payload[\"0\"].bits","dataType":"msg","specification":"spec","specificationType":"ui","items":[{"type":"byte","name":"item1","offset":1,"length":1,"offsetbit":0,"scale":"1","mask":""},{"type":"byte","name":"item2","offset":3,"length":1,"offsetbit":1,"scale":"1","mask":""},{"type":"byte","name":"item3","offset":5,"length":1,"offsetbit":2,"scale":"1","mask":""},{"type":"byte","name":"item4","offset":7,"length":1,"offsetbit":3,"scale":"1","mask":""},{"type":"byte","name":"item5","offset":9,"length":1,"offsetbit":3,"scale":"1","mask":""},{"type":"byte","name":"item6","offset":11,"length":1,"offsetbit":3,"scale":"1","mask":""},{"type":"byte","name":"item7","offset":13,"length":1,"offsetbit":3,"scale":"1","mask":""},{"type":"byte","name":"item8","offset":15,"length":1,"offsetbit":3,"scale":"1","mask":""}],"swap1":"","swap2":"","swap3":"","swap1Type":"swap","swap2Type":"swap","swap3Type":"swap","msgProperty":"payload","msgPropertyType":"str","resultType":"value","resultTypeType":"output","multipleResult":true,"fanOutMultipleResult":true,"setTopic":true,"outputs":8,"x":390,"y":300,"wires":[["f867351ee7bdaa02","b814b2dc6a3b9878"],["1fc354a6e8fa30ad"],["1683ee15a14bd142"],["afc7568d049abce2"],["3c8f17a7e0e26f15"],["da5897c54bf0f817"],["639a11067225f165"],["facf340ce37a749e"]]},{"id":"eda1458f9e9be1dc","type":"link in","z":"a74334d56276c4c0","name":"link in Buffer","links":["327678866744553c"],"x":115,"y":300,"wires":[["60f9b48010a3dc8b"]]},{"id":"327678866744553c","type":"link out","z":"a74334d56276c4c0","name":"link out Buffer","mode":"link","links":["eda1458f9e9be1dc"],"x":875,"y":160,"wires":[]},{"id":"bf578235711ac614","type":"function","z":"a74334d56276c4c0","name":"On-Off","func":"if (msg.payload == 1) {\n    msg.payload = {\n        'value' : 257,\n        'fc' : 6,\n        'unitid' : 1,\n        'address' : 2,\n        'quantity' : 1\n    };\n} else {\n    msg.payload = {\n        'value' : 256,\n        'fc' : 6,\n        'unitid' : 1,\n        'address' : 2,\n        'quantity' : 1\n    };    \n}    \nreturn msg;","outputs":1,"noerr":0,"initialize":"","finalize":"","libs":[],"x":350,"y":620,"wires":[["6373ccd45ce44a1c"]]},{"id":"8790e476a15ec5f5","type":"link in","z":"a74334d56276c4c0","name":"external relay 1","links":["1937f0672ca45cb2","1fd5916cfb52a857","e318c430b076a70d"],"x":235,"y":620,"wires":[["bf578235711ac614"]]},{"id":"e1397b487a729bce","type":"link in","z":"a74334d56276c4c0","name":"external relay 2","links":["02afab2ac651f87c","f728b0f332495daf","8bb82496c3541e94","3417bb3701d12156"],"x":235,"y":680,"wires":[["1e66331d15a25f39"]]},{"id":"16b342adf23cd288","type":"link in","z":"a74334d56276c4c0","name":"external relay 3","links":["0ca33e060296835f","0e9553a477c41c6c","fee0c1fc2cb1f3dd","f0c6518b812df717"],"x":235,"y":740,"wires":[["e2b866b267b058ce"]]},{"id":"af5164fbd47a94bb","type":"link in","z":"a74334d56276c4c0","name":"external relay 4","links":["6dd86a18f98586e1","bfc6f66eeb806e9d","feb8cf664411d0bd"],"x":235,"y":800,"wires":[["6a13890416c13d33"]]},{"id":"1e66331d15a25f39","type":"function","z":"a74334d56276c4c0","name":"On-Off","func":"if (msg.payload == 1) {\n    msg.payload = {\n        'value' : 514,\n        'fc' : 6,\n        'unitid' : 1,\n        'address' : 2,\n        'quantity' : 1\n    };\n} else {\n    msg.payload = {\n        'value' : 512,\n        'fc' : 6,\n        'unitid' : 1,\n        'address' : 2,\n        'quantity' : 1\n    };    \n}    \nreturn msg;","outputs":1,"noerr":0,"initialize":"","finalize":"","libs":[],"x":350,"y":680,"wires":[["cc0c788469fda7dc"]]},{"id":"e2b866b267b058ce","type":"function","z":"a74334d56276c4c0","name":"On-Off","func":"if (msg.payload == 1) {\n    msg.payload = {\n        'value' : 1028,\n        'fc' : 6,\n        'unitid' : 1,\n        'address' : 2,\n        'quantity' : 1\n    };\n} else {\n    msg.payload = {\n        'value' : 1024,\n        'fc' : 6,\n        'unitid' : 1,\n        'address' : 2,\n        'quantity' : 1\n    };    \n}    \nreturn msg;","outputs":1,"noerr":0,"initialize":"","finalize":"","libs":[],"x":350,"y":740,"wires":[["f94985cdcdfe46db"]]},{"id":"6a13890416c13d33","type":"function","z":"a74334d56276c4c0","name":"On-Off","func":"if (msg.payload == 1) {\n    msg.payload = {\n        'value' : 2056,\n        'fc' : 6,\n        'unitid' : 1,\n        'address' : 2,\n        'quantity' : 1\n    };\n} else {\n    msg.payload = {\n        'value' : 2048,\n        'fc' : 6,\n        'unitid' : 1,\n        'address' : 2,\n        'quantity' : 1\n    };    \n}    \nreturn msg;","outputs":1,"noerr":0,"initialize":"","finalize":"","libs":[],"x":350,"y":800,"wires":[["cf4bee0ae440afe4"]]},{"id":"60f9b48010a3dc8b","type":"rbe","z":"a74334d56276c4c0","name":"","func":"rbe","gap":"","start":"","inout":"out","septopics":true,"property":"payload","topi":"topic","x":230,"y":300,"wires":[["2ef473c57a27764a"]]},{"id":"3c8f17a7e0e26f15","type":"link out","z":"a74334d56276c4c0","name":"external relay 5","mode":"link","links":[],"x":715,"y":380,"wires":[]},{"id":"da5897c54bf0f817","type":"link out","z":"a74334d56276c4c0","name":"external relay 6","mode":"link","links":[],"x":715,"y":420,"wires":[]},{"id":"639a11067225f165","type":"link out","z":"a74334d56276c4c0","name":"external relay 7","mode":"link","links":[],"x":715,"y":460,"wires":[]},{"id":"facf340ce37a749e","type":"link out","z":"a74334d56276c4c0","name":"external relay 8","mode":"link","links":[],"x":715,"y":500,"wires":[]},{"id":"75aab2deb715ec69","type":"debug","z":"a74334d56276c4c0","name":"debug 30","active":false,"tosidebar":true,"console":false,"tostatus":false,"complete":"false","statusVal":"","statusType":"auto","x":1100,"y":120,"wires":[]},{"id":"68f349157841781d","type":"inject","z":"a74334d56276c4c0","name":"Read Register 0","props":[{"p":"payload"},{"p":"topic","vt":"str"}],"repeat":"","crontab":"","once":false,"onceDelay":0.1,"topic":"","payload":"","payloadType":"date","x":120,"y":100,"wires":[["b4ed73c5f60a7043"]]},{"id":"b4ed73c5f60a7043","type":"function","z":"a74334d56276c4c0","name":"Read_Val","func":"msg.payload = {\n    'fc' : 3,\n    'unitid' : 1,\n    'address' : 0,\n    'quantity' : 1\n};\nreturn msg;","outputs":1,"noerr":0,"initialize":"","finalize":"","libs":[],"x":320,"y":100,"wires":[["ef0dfe9062a1d4a1"]]},{"id":"ef0dfe9062a1d4a1","type":"modbus-flex-getter","z":"a74334d56276c4c0","name":"Number of Relays","showStatusActivities":true,"showErrors":true,"showWarnings":true,"logIOActivities":false,"server":"6484270ebf4ccfed","useIOFile":false,"ioFile":"","useIOForPayload":false,"emptyMsgOnFail":false,"keepMsgProperties":false,"delayOnStart":false,"startDelayTime":"","x":550,"y":100,"wires":[["908450b03fec3ae9"],[]]},{"id":"908450b03fec3ae9","type":"debug","z":"a74334d56276c4c0","name":"","active":true,"tosidebar":false,"console":true,"tostatus":true,"complete":"payload","targetType":"msg","statusVal":"payload","statusType":"auto","x":780,"y":100,"wires":[]},{"id":"16c8d811de55c057","type":"modbus-flex-write","z":"a74334d56276c4c0","d":true,"name":"Victron Centaur","showStatusActivities":true,"showErrors":true,"showWarnings":true,"server":"6484270ebf4ccfed","emptyMsgOnFail":false,"keepMsgProperties":false,"delayOnStart":false,"startDelayTime":"","x":540,"y":860,"wires":[["b5bb84af70f91f48"],[]]},{"id":"b5bb84af70f91f48","type":"debug","z":"a74334d56276c4c0","d":true,"name":"","active":false,"tosidebar":true,"console":true,"tostatus":true,"complete":"payload","targetType":"msg","statusVal":"payload","statusType":"auto","x":760,"y":860,"wires":[]},{"id":"4ea150f5d90b9c58","type":"modbus-flex-write","z":"a74334d56276c4c0","d":true,"name":"Input 6 -> Relay 6","showStatusActivities":true,"showErrors":true,"showWarnings":true,"server":"6484270ebf4ccfed","emptyMsgOnFail":false,"keepMsgProperties":false,"delayOnStart":false,"startDelayTime":"","x":550,"y":920,"wires":[["eeaaf0f10b67e840"],[]]},{"id":"eeaaf0f10b67e840","type":"debug","z":"a74334d56276c4c0","d":true,"name":"","active":false,"tosidebar":true,"console":true,"tostatus":true,"complete":"payload","targetType":"msg","statusVal":"payload","statusType":"auto","x":760,"y":920,"wires":[]},{"id":"cda7fbfae3eed06b","type":"modbus-flex-write","z":"a74334d56276c4c0","d":true,"name":"Input 7 -> Relay 7","showStatusActivities":true,"showErrors":true,"showWarnings":true,"server":"6484270ebf4ccfed","emptyMsgOnFail":false,"keepMsgProperties":false,"delayOnStart":false,"startDelayTime":"","x":550,"y":980,"wires":[["d0f0d09f6b1486f9"],[]]},{"id":"d0f0d09f6b1486f9","type":"debug","z":"a74334d56276c4c0","d":true,"name":"","active":false,"tosidebar":true,"console":true,"tostatus":true,"complete":"payload","targetType":"msg","statusVal":"payload","statusType":"auto","x":760,"y":980,"wires":[]},{"id":"2f073891c9a1f440","type":"modbus-flex-write","z":"a74334d56276c4c0","d":true,"name":"Input 8 -> Relay 8","showStatusActivities":true,"showErrors":true,"showWarnings":true,"server":"6484270ebf4ccfed","emptyMsgOnFail":false,"keepMsgProperties":false,"delayOnStart":false,"startDelayTime":"","x":550,"y":1040,"wires":[["c2ce173937c36dd9"],[]]},{"id":"c2ce173937c36dd9","type":"debug","z":"a74334d56276c4c0","d":true,"name":"","active":false,"tosidebar":true,"console":true,"tostatus":true,"complete":"payload","targetType":"msg","statusVal":"payload","statusType":"auto","x":760,"y":1040,"wires":[]},{"id":"3290999dee2ec9b1","type":"link in","z":"a74334d56276c4c0","d":true,"name":"external relay 5","links":[],"x":235,"y":860,"wires":[["43e1c52084e4c9e3"]]},{"id":"bb726adc6b19665d","type":"link in","z":"a74334d56276c4c0","d":true,"name":"external relay 6","links":["6dd86a18f98586e1"],"x":235,"y":920,"wires":[["72dd619f5cf66768"]]},{"id":"e1db240862ff85b4","type":"link in","z":"a74334d56276c4c0","d":true,"name":"external relay 7","links":[],"x":235,"y":980,"wires":[["17b86ba8e4570b34"]]},{"id":"caeeedefa9ecacb1","type":"link in","z":"a74334d56276c4c0","d":true,"name":"external relay 8","links":[],"x":235,"y":1040,"wires":[["744903f2acb6e586"]]},{"id":"43e1c52084e4c9e3","type":"function","z":"a74334d56276c4c0","d":true,"name":"On-Off","func":"if (msg.payload == 1) {\n    msg.payload = {\n        'value' : 4112,\n        'fc' : 6,\n        'unitid' : 1,\n        'address' : 2,\n        'quantity' : 1\n    };\n} else {\n    msg.payload = {\n        'value' : 4096,\n        'fc' : 6,\n        'unitid' : 1,\n        'address' : 2,\n        'quantity' : 1\n    };    \n}    \nreturn msg;","outputs":1,"noerr":0,"initialize":"","finalize":"","libs":[],"x":350,"y":860,"wires":[["16c8d811de55c057"]]},{"id":"72dd619f5cf66768","type":"function","z":"a74334d56276c4c0","d":true,"name":"On-Off","func":"if (msg.payload == 1) {\n    msg.payload = {\n        'value' : 8224,\n        'fc' : 6,\n        'unitid' : 1,\n        'address' : 2,\n        'quantity' : 1\n    };\n} else {\n    msg.payload = {\n        'value' : 8192,\n        'fc' : 6,\n        'unitid' : 1,\n        'address' : 2,\n        'quantity' : 1\n    };    \n}    \nreturn msg;","outputs":1,"noerr":0,"initialize":"","finalize":"","libs":[],"x":350,"y":920,"wires":[["4ea150f5d90b9c58"]]},{"id":"17b86ba8e4570b34","type":"function","z":"a74334d56276c4c0","d":true,"name":"On-Off","func":"if (msg.payload == 1) {\n    msg.payload = {\n        'value' : 16448,\n        'fc' : 6,\n        'unitid' : 1,\n        'address' : 2,\n        'quantity' : 1\n    };\n} else {\n    msg.payload = {\n        'value' : 16384,\n        'fc' : 6,\n        'unitid' : 1,\n        'address' : 2,\n        'quantity' : 1\n    };    \n}    \nreturn msg;","outputs":1,"noerr":0,"initialize":"","finalize":"","libs":[],"x":350,"y":980,"wires":[["cda7fbfae3eed06b"]]},{"id":"744903f2acb6e586","type":"function","z":"a74334d56276c4c0","d":true,"name":"On-Off","func":"if (msg.payload == 1) {\n    msg.payload = {\n        'value' : 32896,\n        'fc' : 6,\n        'unitid' : 1,\n        'address' : 2,\n        'quantity' : 1\n    };\n} else {\n    msg.payload = {\n        'value' : 32768,\n        'fc' : 6,\n        'unitid' : 1,\n        'address' : 2,\n        'quantity' : 1\n    };    \n}    \nreturn msg;","outputs":1,"noerr":0,"initialize":"","finalize":"","libs":[],"x":350,"y":1040,"wires":[["2f073891c9a1f440"]]},{"id":"b814b2dc6a3b9878","type":"debug","z":"a74334d56276c4c0","name":"debug 66","active":false,"tosidebar":true,"console":false,"tostatus":false,"complete":"false","statusVal":"","statusType":"auto","x":560,"y":220,"wires":[]},{"id":"1937f0672ca45cb2","type":"link out","z":"a74334d56276c4c0","name":"venus gui relay 3","mode":"link","links":["8790e476a15ec5f5"],"x":535,"y":1160,"wires":[]},{"id":"02afab2ac651f87c","type":"link out","z":"a74334d56276c4c0","name":"venus gui relay 4","mode":"link","links":["e1397b487a729bce"],"x":535,"y":1220,"wires":[]},{"id":"0e9553a477c41c6c","type":"link out","z":"a74334d56276c4c0","name":"venus gui relay 5","mode":"link","links":["16b342adf23cd288"],"x":535,"y":1280,"wires":[]},{"id":"bfc6f66eeb806e9d","type":"link out","z":"a74334d56276c4c0","name":"venus gui relay 6","mode":"link","links":["af5164fbd47a94bb"],"x":535,"y":1340,"wires":[]},{"id":"3acb3897909d4060","type":"debug","z":"a74334d56276c4c0","name":"debug 67","active":true,"tosidebar":true,"console":false,"tostatus":false,"complete":"false","statusVal":"","statusType":"auto","x":720,"y":1100,"wires":[]},{"id":"bb682a1dcfcc75f7","type":"victron-input-relay","z":"a74334d56276c4c0","service":"com.victronenergy.system/0","path":"/Relay/2/State","serviceObj":{"service":"com.victronenergy.system/0","name":"Venus system"},"pathObj":{"path":"/Relay/2/State","type":"enum","name":"Venus relay 3 state","enum":{"0":"Open","1":"Closed"}},"initial":"","name":"","onlyChanges":false,"x":280,"y":1160,"wires":[["1937f0672ca45cb2"]]},{"id":"75a308189d1ad247","type":"victron-input-relay","z":"a74334d56276c4c0","service":"com.victronenergy.system/0","path":"/Relay/3/State","serviceObj":{"service":"com.victronenergy.system/0","name":"Venus system"},"pathObj":{"path":"/Relay/3/State","type":"enum","name":"Venus relay 4 state","enum":{"0":"Open","1":"Closed"}},"initial":"","name":"","onlyChanges":false,"x":280,"y":1220,"wires":[["02afab2ac651f87c"]]},{"id":"3f3d6c142e24e55e","type":"victron-input-relay","z":"a74334d56276c4c0","service":"com.victronenergy.system/0","path":"/Relay/4/State","serviceObj":{"service":"com.victronenergy.system/0","name":"Venus system"},"pathObj":{"path":"/Relay/4/State","type":"enum","name":"Venus relay 5 state","enum":{"0":"Open","1":"Closed"}},"initial":"","name":"","onlyChanges":false,"x":280,"y":1280,"wires":[["0e9553a477c41c6c"]]},{"id":"fbc85b26070b1967","type":"victron-input-relay","z":"a74334d56276c4c0","service":"com.victronenergy.system/0","path":"/Relay/5/State","serviceObj":{"service":"com.victronenergy.system/0","name":"Venus system"},"pathObj":{"path":"/Relay/5/State","type":"enum","name":"Venus relay 6 state","enum":{"0":"Open","1":"Closed"}},"initial":"","name":"","onlyChanges":false,"x":280,"y":1340,"wires":[["bfc6f66eeb806e9d"]]},{"id":"6484270ebf4ccfed","type":"modbus-client","name":"Dingtian IOT Relay","clienttype":"tcp","bufferCommands":true,"stateLogEnabled":false,"queueLogEnabled":false,"failureLogEnabled":false,"tcpHost":"192.168.1.100","tcpPort":"502","tcpType":"DEFAULT","serialPort":"/dev/ttyUSB","serialType":"RTU-BUFFERD","serialBaudrate":"9600","serialDatabits":"8","serialStopbits":"1","serialParity":"none","serialConnectionDelay":"100","serialAsciiResponseStartDelimiter":"0x3A","unit_id":"1","commandDelay":"1","clientTimeout":"1000","reconnectOnTimeout":true,"reconnectTimeout":"2000","parallelUnitIdsAllowed":true}]
2 |3000

Up to 8 attachments (including images) can be used with a maximum of 190.8 MiB each and 286.6 MiB total.

fguiot avatar image
fguiot answered ·

@derrick thomas @usernamepasswordbs @Ed Jones @Hebs @RickSa @Tharbarn @Robert @regan @AdrianAllTech @Marcel van Ee @tschini @PeterBuchlak @llubi @

I have finally done it: This version is replaced by the new repo RemoteGPIO, now much easier to install with SetpHelper Package Manager.

All the details of this new version is here:

https://community.victronenergy.com/questions/245584/remotegpio-ex-venus-rgpio-now-available-with-setup.html


Enjoy!

2 comments
2 |3000

Up to 8 attachments (including images) can be used with a maximum of 190.8 MiB each and 286.6 MiB total.

tschini avatar image tschini commented ·

Works like a charm now and so easy to install and use. Absolut legend thanks.

Only thing I have to see now is how to connect my RS485 BMS to Cerbo since now one USB is used for relay the other one with for a Bluetooth Dongle. Probably USB Hub or addressing multiple devices on the RS485 Bus.

0 Likes 0 ·
fguiot avatar image fguiot tschini commented ·

I propose we discuss this point on the new RemoteGPIO thread as this one will not be developed more.

I have 2xRelaygateways attached through a HUB. this is working as long as you tweak /etc/udev/rules.d/serial-starter.rules against the new physical USB path.

0 Likes 0 ·