question

dougle03 avatar image
dougle03 asked

Shelly EM1 integration into a Cerbo GX

Good morning all,

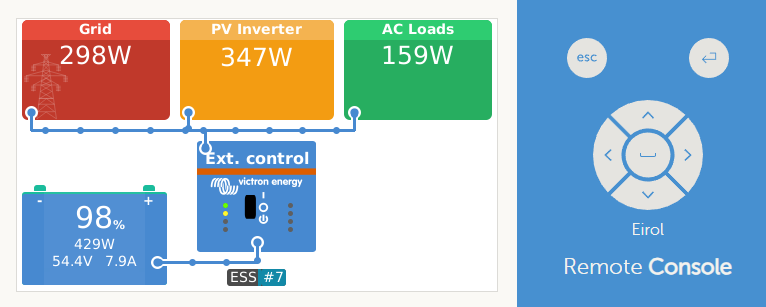
Just in the process of setting up my system and I'm looking for a simple to follow tutorial to integrate my Shelly EM1 to my Multiplus II via my Cerbo GX.

I have an EM1 with two CT clamps, one is on the single phase of my grid connection and happily reports current flow in either direction, the other CT clamp from the EM1 is clamped onto the AC Grid tied solar inverter leg and is also giving me live production readings from that system.

1716022205367.png

How do I go about using the Shelly to feed the MP II as its source of grid flow measurement?

Many thanks, P

shelly implimentation
1716022205367.png (127.8 KiB)
2 |3000

Up to 8 attachments (including images) can be used with a maximum of 190.8 MiB each and 286.6 MiB total.

5 Answers
Alistair Warburton avatar image
Alistair Warburton answered ·

NOT an expert here but...

As far as I am aware your basic GX setup is only capable of integrating a limited range of Modbus meters that it 'understands' how to communicate with and which registers in those devices are pertinent.

If scanning, under Modbus TCP/UDP menu, isn't finding the Shelly then it isn't supported, which I suspect will be the case.

It is absolutely possible to create/build a gateway that has the Modbus characteristics of a supported meter and gets its data from somewhere else. You could do that using NodeRed, although you will not be able to do it on the Cerbo if it is already running its internal Modbus server.

See ... Shelly integration Nodered - General - Node-RED Forum

Hope that helps...

1 comment
2 |3000

Up to 8 attachments (including images) can be used with a maximum of 190.8 MiB each and 286.6 MiB total.

dougle03 avatar image dougle03 commented ·

Ahh ok, so there is a limited method of getting the data into Venus. I already have the data in NodeRed (Via Home Assistant), so there is a possibility there I guess.. I wonder if anyone has already done this...? What about MQTT perhaps?

0 Likes 0 ·
Alistair Warburton avatar image
Alistair Warburton answered ·

Cant you run Large OS on your Venus... Therefore Node Red, easier and better than mucking about with Modbus registers directly. Details... Victron doc.

passing data between Node red instances is easy, Google that.

You can also enable Modbus on any GX and control the GX relay/s directly. Contrib_Modbus will allow you to interact with a Victron system from any NodeRed instance but I don't think you can write to any registers that would show up as a meter.

That said... If you were using a current sensor as a load monitor, in any role, you would be using a tank/voltage input to read it. If you actually connected something like THIS which NodeRed can easily drive, you would be controlling the load reported to the GX with your HA instance and sending the Shelly data to it. If you wanted to drive a Modbus RTU module over Ethernet then look at THIS , or similar.

The gateways are great, cant comment on the analogue IO I linked but at that price I will be getting a couple to mess with.


On you HA server NodeRed instance, you could build a flow that responded as if it were a compliant meter and populate it with the Shelly data, then just point the GX at it. It would even work over Serial with an RS485/USB dongle, linked to that flow, would then look like a compliant meter to the GX.

Less bits, MUCH more work but may be better than a simple current sensor input, it depend on your application and I don't use either so can't usefully offer an opinion on the differences.

2 |3000

Up to 8 attachments (including images) can be used with a maximum of 190.8 MiB each and 286.6 MiB total.

foxos avatar image
foxos answered ·

Hi, not much time. But this: https://github.com/freakent/dbus-mqtt-devices is your friend. With this you can create "Virtual PV Inverter" or "Virtual Grid Meter"... after that they will show up in Victrons MQTT Server and then you can write values into it like that: W/123fs456fhge/pvinverter/<id virtual pv>/Ac/Power . Good luck!

1 comment
2 |3000

Up to 8 attachments (including images) can be used with a maximum of 190.8 MiB each and 286.6 MiB total.

Alistair Warburton avatar image Alistair Warburton commented ·
I didn't know you could do that with MQTT as the source of meter data... Cool
0 Likes 0 ·
matt1309 avatar image
matt1309 answered ·

Others have already shared community made libraries that will work much easier. However here's a victron one in case you're interested. This is installed on venus os by default

However I believe it's written to only work with one ct and either grid or pv out the box.

However I imagine it's an easy fix to add a second one. You'd essentially an indentical copy of this to venus os and just change the device ID's to prevent conflicts and then also the below line in meter.py


d = data['params']['em:0']

to be

d = data['params']['em:1']


(I've not tested this but might be useful)

GitHub - victronenergy/dbus-shelly: HTTP based driver for Shelly energy meters to be used on VenusOS


2 |3000

Up to 8 attachments (including images) can be used with a maximum of 190.8 MiB each and 286.6 MiB total.

goahead avatar image
goahead answered ·

@dougle03 Easy, I was able to do this last week with same Shelly and setup as you:
(easy, but it took me a while to be able to figure this also eheheh)
https://github.com/Goaheadz/dbus-shelly-em-smartmeter
This is my fork from other projects. (forget all instructions from readme..I didnt had time to edit it)

First understand and try to log with SSH to your system (root acess)
If you already comfortable in accessing Venus with putty per example, then go for my fork above.
- You need to make 2 installs. One for the grid and another for the PV inverter.
- Better to make a fork for your self, rename and edit files as needed.
(you will change "goaheadz" from commands bellow to your github user link)
- Grid should be in clamp 0 and PV in clamp 1
- Edit config.ini for different name and instance name for each clamp
- Use dbus-shelly-em-smartmeter.py for the PV and install
- Then use dbus-shelly-em-smartmeter_grid.py (rename it removing _grid, change config and install again)

Be carefull with this.
You can use the code bellow for install one of the clamps, but for the second one you should use diferent directory name

Clamp1 (after choosing correct py and config file):

wget https://github.com/Goaheadz/dbus-shelly-em-smartmeter/archive/refs/heads/main.zip
unzip main.zip "dbus-shelly-em-smartmeter-main/*" -d /data
mv /data/dbus-shelly-em-smartmeter-main /data/dbus-shelly-em-smartmeter-grid
chmod a+x /data/dbus-shelly-em-smartmeter-grid/install.sh
/data/dbus-shelly-em-smartmeter-grid/install.sh
rm main.zip

Second Clamp:
wget https://github.com/Goaheadz/dbus-shelly-em-smartmeter/archive/refs/heads/main.zip
unzip main.zip "dbus-shelly-em-smartmeter-main/*" -d /data
mv /data/dbus-shelly-em-smartmeter-main /data/dbus-shelly-em-smartmeter-pv
chmod a+x /data/dbus-shelly-em-smartmeter-pv/install.sh
/data/dbus-shelly-em-smartmeter-pv/install.sh
rm main.zip

If everything goes ok you should have shelly clamps in venus:
1716308521525.png

It may seem hard, but if I was able to do it..you will also.
G.


1716308521525.png (37.1 KiB)
2 |3000

Up to 8 attachments (including images) can be used with a maximum of 190.8 MiB each and 286.6 MiB total.

Related Resources

Additional resources still need to be added for this topic