question

cedrock avatar image
cedrock asked

Raspberry Pi 3B+ Heat (temperature)

Hi All

Just installed a raspberry Pi 3B+ with Venus GX Firmware as a gataway for my solar system on my boat.

It works pretty fine!

I used the official Pi3 Case for it.

I didn't install any heatsink or fan.

As it can get pretty warm in my boat, just wondering how the device can handle the temperature?

What happen if it would overheat? It will power down automaticly?

Is it nessesary to install a heatsink or fan or I'am good to go how it is right now?


Does anyone has some exprerience on that topic?


Many thanks

Raspberry Pitemperature
2 |3000

Up to 8 attachments (including images) can be used with a maximum of 190.8 MiB each and 286.6 MiB total.

9 Answers
powerace avatar image
powerace answered ·

Hi cedrock,


I've same RPi running in my RV without heatsinks. It is mounted in the 7 inch screen housing which allows a little airflow. When the RV is parked in the sun it becomes easily over 40 degree Celsius inside. Until now i did not experience a heat probleem with the RPI but it is well possible that the processor slows down its clockspeed although i cant really notice that using the gui. Ultimately i expect that the system simply locks up when it becomes to hot.

2 |3000

Up to 8 attachments (including images) can be used with a maximum of 190.8 MiB each and 286.6 MiB total.

cedrock avatar image
cedrock answered ·

Hi Power Ace

I could monitor the System now for a Week on the Lake with high outside temperature.

I agree with you. Couldn't notice any issues so far.


Thank you for your answer

2 |3000

Up to 8 attachments (including images) can be used with a maximum of 190.8 MiB each and 286.6 MiB total.

bradfordharley avatar image
bradfordharley answered ·

I am on the hard in mexico and it's regularly 100 f in the boat. The 3b+ is fine within an enclosure. You can view/monitor the temperature by looking at /sys/devices/virtual/thermal/thermal_zone0#. It's in C and divide by 1000. I also have a rpi4 onboard serving a different function, and it does need a fan..


5 comments
2 |3000

Up to 8 attachments (including images) can be used with a maximum of 190.8 MiB each and 286.6 MiB total.

laurenceh avatar image laurenceh commented ·

Thanks for reminding me where to find the CPU temperature. I’ll write a dbus interface for it and being a temperature it will be visible to the VRM. I’ll post a link to the results here.

0 Likes 0 ·
laurenceh avatar image laurenceh commented ·

Well that went well:

I updated my temperature dbus service to include CPU temperature so it's now visible on the VRM and console.

I also checked the Rasberry pi advice and any CPU temperature below 80°C is fine. My Rasberry pi is in a 7" touch screen case with an analogue board attached.

If anyone would like the code I'll extract it form my other services and post it.

0 Likes 0 ·
kurtinge avatar image kurtinge laurenceh commented ·

Hi!

Great feature. Could you please share the configurations needed to accomplish this?


regards


0 Likes 0 ·
Kevin Windrem avatar image Kevin Windrem laurenceh commented ·

Please put your Venus mods up on GitHub. Links here tend to get buried.

Thanks.

0 Likes 0 ·
laurenceh avatar image laurenceh Kevin Windrem commented ·

I’ll see what I can do over the weekend I am away from my narrowboat at the moment.


I’m not used to GitHub so may need to set up an account and work out how to use it.

0 Likes 0 ·
laurenceh avatar image
laurenceh answered ·

Right all posted to GitHub - as I'm away from my boat at the moment and did not want to break anything in the code I have left in a lot of code (just commented it out) so you get free extras:

  • How to read data from I2c and publish it to DBus
  • How to read data from extra adc inputs
  • How to interface to the Victron persistent setting interface

(so that you can store names, offsets and slopes for extra devices)

39 comments
2 |3000

Up to 8 attachments (including images) can be used with a maximum of 190.8 MiB each and 286.6 MiB total.

powerace avatar image powerace commented ·

Thanks for sharing @laurenceh , i tried to find it on Github but could't. Do you have a link for me?

0 Likes 0 ·
laurenceh avatar image laurenceh powerace commented ·

Still getting to grips with GitHub I think I have made this under my own account it should be open for public reading.

https://github.com/LHardwick-git/Victron-Service

laurence

0 Likes 0 ·
powerace avatar image powerace laurenceh commented ·

Yes, now i found it. Will have a look and see if i can install it on my rpi3+ somewhere coming days.

0 Likes 0 ·
powerace avatar image powerace laurenceh commented ·

Hi @laurenceh,

I've got it working according to your instructions on Github. There is however a small step that can be a problem for other not so skilled users. In step 4 of your instructions you forgot to mention that file "dbus-i2c.py" also need to be made executable like the other files. In case you don't, you end up with permission problems when giving the command "bash start-i2c.sh".

And when it is all running the temperature appeared as battery temperature in my case. This is simply to be solved by manually give a correct name at the device properties.

Again thanks for sharing this with us!

1612019602131.png

0 Likes 0 ·
1612019602131.png (48.7 KiB)
laurenceh avatar image laurenceh powerace commented ·

Hi @PowerAce yes it was more a question that it did say it in the readme but just hidden because I did not know how to split lines in a gitHub README.

I have edited the readme (I guess you can resync to my main) the readme now more clearly says:

Set execute on the following files (Sadly storing things on github does not preserve execute bits)
dbus-i2c/i2c.py
dbus-i2c/start-i2c.sh
dbus-i2c/check-i2c.sh - this is just a simple file you can use to check if the service is running
dbus-i2c/service/run
/service/dbus-i2c

The command is
chmod a+x

0 Likes 0 ·
bleydh avatar image bleydh laurenceh commented ·
Hi @LaurenceH,


it's working great - thanks for that. I've found that you need to chmod dbus-i2c.py as well to 'run' the script.

B

0 Likes 0 ·
Ingo avatar image Ingo laurenceh commented ·

@LaurenceH Just to confirm, is this is for RPi Only as I see you have a couple of references to 'Victron GX' in your readme file. Will this work for other GX devices as well?

0 Likes 0 ·
laurenceh avatar image laurenceh Ingo commented ·

There is a good chance it will work in Victron GX devices as they also use Arm cores.

It is easy to check, have a look and see if the system device used by the service exists and cat the system file to see what it contains.

In the other hand it might rely on a specific device feature of the Arm processor used in the RPi in which case it won’t work. The check above will tell you one way of the other.

0 Likes 0 ·
Ingo avatar image Ingo laurenceh commented ·

Thanks for the reply. I doubt however that it's possible to measure CPU temperature on the AM335x CPUs. From the datasheet it's internal and not user accessible without some work. They call it a Bandgap sensor or something used by the factory only.

0 Likes 0 ·
laurenceh avatar image laurenceh Ingo commented ·

That the sensor is embedded on the chip is kind of the point. It is accessible at register level on the AM335x so if the OS implements the interface then the temperature will be available. The Venus OS on both GX and RPi devices is based on the open embedded linux distro so the interface is likely to be consistent across Arm chips. Do check for the presence of the system file, it is really the only way to tell.

/sys/devices/virtual/thermal/thermal_zone0/temp


0 Likes 0 ·
Ingo avatar image Ingo laurenceh commented ·

It's not present (empty directory). Let me rephrase, the path does not exist as per your example, the only path to a thermal directory is /sys/class/thermal and that one is empty.

0 Likes 0 ·
laurenceh avatar image laurenceh Ingo commented ·

Ok that is clear we should post an idea/suggestion for Victron to make the temperature available. The use case is clear - systems (mobile or static) in hot environments where the risk of device overheating needs to be mitigated.

I’ll post something later today.

0 Likes 0 ·
kurtinge avatar image kurtinge laurenceh commented ·

I absolutely agree. The system temperature is relevant in many installations. Especially where it is installed in small rooms together with other equipments as well

0 Likes 0 ·
laurenceh avatar image laurenceh kurtinge commented ·

I have posted the idea in modifications.


https://community.victronenergy.com/idea/75515/victron-gx-devices-internal-temperature-on-ui-and.html

Do upvote if you think it’s a good idea.

I have no direct interest as I run Venus on an RPi.

0 Likes 0 ·
dirkmuc avatar image dirkmuc commented ·

Hello,

I just installed the addon to read the CPU temperature. Installation was easy thanks to the great tutorial from Laurence.

It directly integrates into the system (Venus Screen, VRM and Node-Red)

Next step is to use the code to integrate some BME280 Sensors. Hope I can manage it.

Thanks again for the great work!

Cheers

Dirk

vrm-cpu-temp.jpg

node-red-cpu-temp.jpg

venus-os-screen.jpg

0 Likes 0 ·
venus-os-screen.jpg (40.0 KiB)
vrm-cpu-temp.jpg (23.0 KiB)
kurtinge avatar image kurtinge dirkmuc commented ·

Looking forward to test this as well..... Also I am wondere how to get the tank levels into the gui as well. I have water and diesel, but not the waste tank. Is there a way to use the existing level sensors in the diesel and water tank? When it comes to the waste tank I am trying to figure out what I need besides of those: https://www.aliexpress.com/item/33041900609.html

0 Likes 0 ·
laurenceh avatar image laurenceh dirkmuc commented ·

BME280 appears to be i2c - you will need to add to config.txt.

Here is a line from my config shell script.

echo 'dtparam=i2c_arm=on' >> /u-boot/config.txt

You will need to add a new device class to the i2c.py lib to read the right registers of the BME280 as the device address and registers are different from the AM2320.

Good luck, I'm interested to hear how you get on.


0 Likes 0 ·
dirkmuc avatar image dirkmuc laurenceh commented ·

Yes the BME280 is an i2c sensor. I use this sensor in my esp32 projects and there integration is not an issue thanks to exzellent libaries.

I will keep you updated.

Thanks again for your effort!

0 Likes 0 ·
mehlers avatar image mehlers dirkmuc commented ·

Hi dirkmuc - have you managed to get your BME280 working....struggling with my limited knowledge....Best Mischa

0 Likes 0 ·
dirkmuc avatar image dirkmuc mehlers commented ·

Hi,

I managed to get sensor readings on the console. I am struggling to get the data onto the dbus. It's a trial and error work for me since I do not now much about programming.

Cheers

Dirk

0 Likes 0 ·
laurenceh avatar image laurenceh dirkmuc commented ·

@dirkmuc if you cut and paste here an example of the console line or lines you need to use and what reply you get in the console. I’ll have a go at updating my code to include the BME280 support.

Laurence

0 Likes 0 ·
dirkmuc avatar image dirkmuc laurenceh commented ·

@laurenceh

I managed to get temperature. Now I have to figure out how to get humidity and pressure onto the screen and into vrm....

Cheers

Dirk

screenshot-20210218-213214.jpg

0 Likes 0 ·
dirkmuc avatar image dirkmuc laurenceh commented ·

Hello @laurenceh, all

hopefully you can figure it out. As written above I can see the temperature value, but no humidity. I do not see any mistake as when I read the humidity value with

dbusservice['i2c-temp']['/Temperature'] = data.humidity

the output is correct. Humidity values are shown in the GUI, yes as a temperature ;-)

But I can not see both or in an ideal world I would like to add the pressure as well and see all three values in the GUI in one line like with the BMV. The pressure values are available with data.pressure.

I attached my version of dbus-i2c.py so if you have time it would be great to have a look into it. Of cause anybody else can also check it ;-)

Cheers

Dirk

dbus-i2c.py.zip


0 Likes 0 ·
dbus-i2cpy.zip (5.0 KiB)
laurenceh avatar image laurenceh dirkmuc commented ·

@dirkmuc

Well done -yes you are right the Console and VRM will only display temperatures automatically, but as you have seen you can label a temperature values as anything, you have already named a temperature as BME280 on the console and it works.

So you need two more temperature services and just give them names which tell you what they are:

I think something like the following will work, find this bit in the code:

dbusservice['i2c-temp']     = new_service(base, 'temperature', 'i2c',      'i2c Device 1',  0, 25, 7) 
dbusservice['i2c-humidity'] = new_service(base, 'humidity',    'i2c',      'i2c Device 1',  0, 25)
# Tidy up custom or missing items
dbusservice['i2c-temp']    ['/ProductName']     = 'BME280'
dbusservice['i2c-humidity']['/ProductName']     = 'BME280'

Change to

Note: you need to increment the instance ID and the setting ID for each new service of the same type, so se I have used 25-26-27.

dbusservice['i2c-temp']     = new_service(base, 'temperature', 'i2c',      'i2c Device 1',  0, 25, 7) 
dbusservice['i2c-humidity'] = new_service(base, 'temperature',    'i2c',      'i2c Device 1',  0, 26, 8)
# Tidy up custom or missing items
dbusservice['i2c-temp']    ['/ProductName']     = 'BME280 temperature'
dbusservice['i2c-humidity']['/ProductName']     = 'BME280 humidity'

Then change where you read the data to this.

        dbusservice['i2c-humidity']['/Temperature'] = data.humidity
        dbusservice['i2c-temp']['/Temperature'] = data.temperature


Yes I know its weird but it should work. The Console and VRM dont care what they are connected to as long as you pretend it is a Temperature!

Then just add extra lines to make a new service for the Pressure.

dbusservice['i2c-pressure']     = new_service(base, 'temperature', 'i2c',      'i2c Device 1',  0, 27, 9)
 dbusservice['i2c-pressure']['/ProductName']     = 'BME280 pressure'

And another line to read the data.

        dbusservice['i2c-pressure']['/Temperature'] = data.pressure

I'm not sure how Venus will react to a temperature of 1,013 which is 1 atm in hPa so perhaps convert to kPa which will sit around 101.3.

Let me know how you get on - sorry Im not at my my boat at the moment so I can't test my suggested changes.

NOTE you can change the device name in the Console settings. You dont have to change the code if you decide you would like to just change the name - the setting screen is here.screenshot-2021-02-19-at-170748.png


Good Luck - Laurence


0 Likes 0 ·
dirkmuc avatar image dirkmuc laurenceh commented ·

@laurenceh

Thank you so much! I will test it over the weekend.

Cheers

Dirk

0 Likes 0 ·
dirkmuc avatar image dirkmuc laurenceh commented ·

@LaurenceH

I tested your solution and yes that was the solution with one little addition.

Instead of

dbusservice['i2c-humidity'] = new_service(base, 'temperature',    'i2c',      'i2c Device 1',  0, 26, 8)

I had to use

dbusservice['i2c-humidity'] = new_service(base, 'temperature',    'i2c',      'i2c Device 1',  5, 26, 8)

The "5" made the difference. The same applied for the pressure, there I use "4, 27, 9"

venus-with-bme280.png 
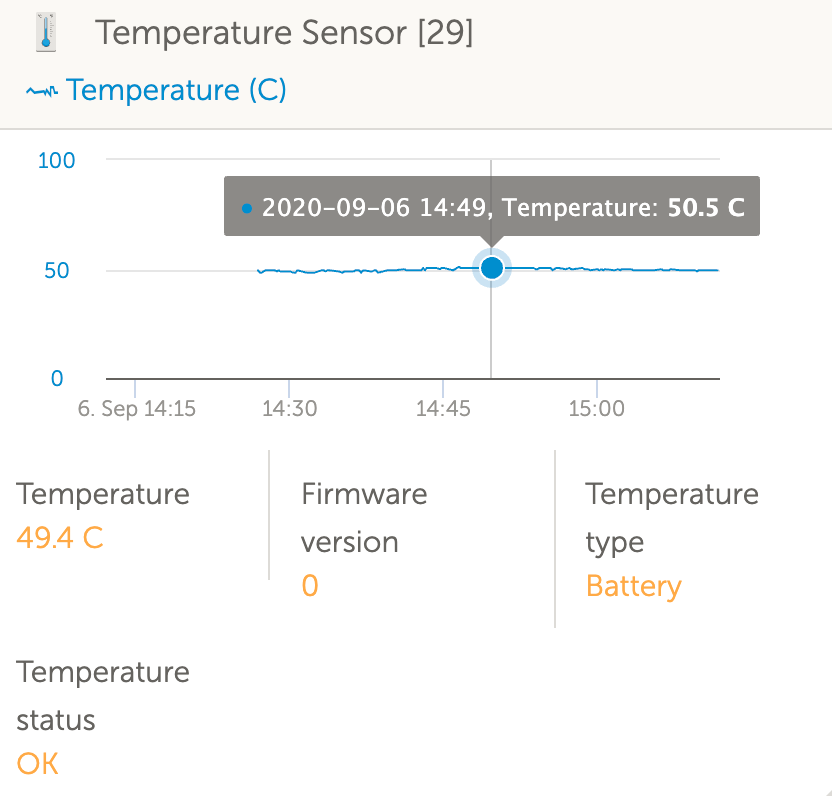
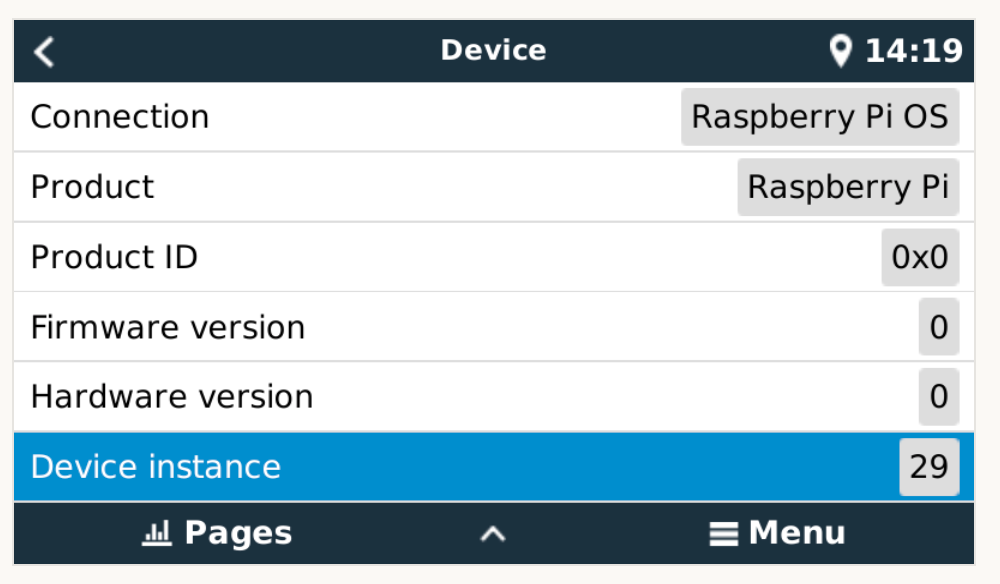
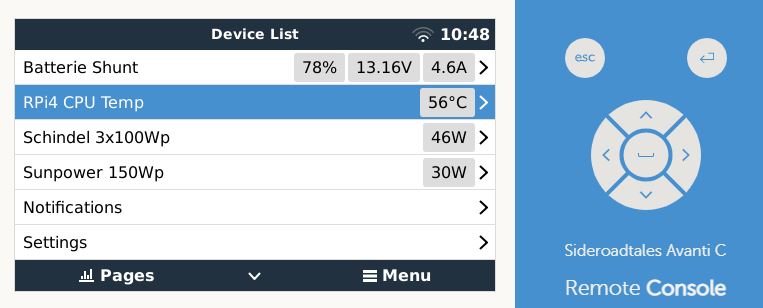
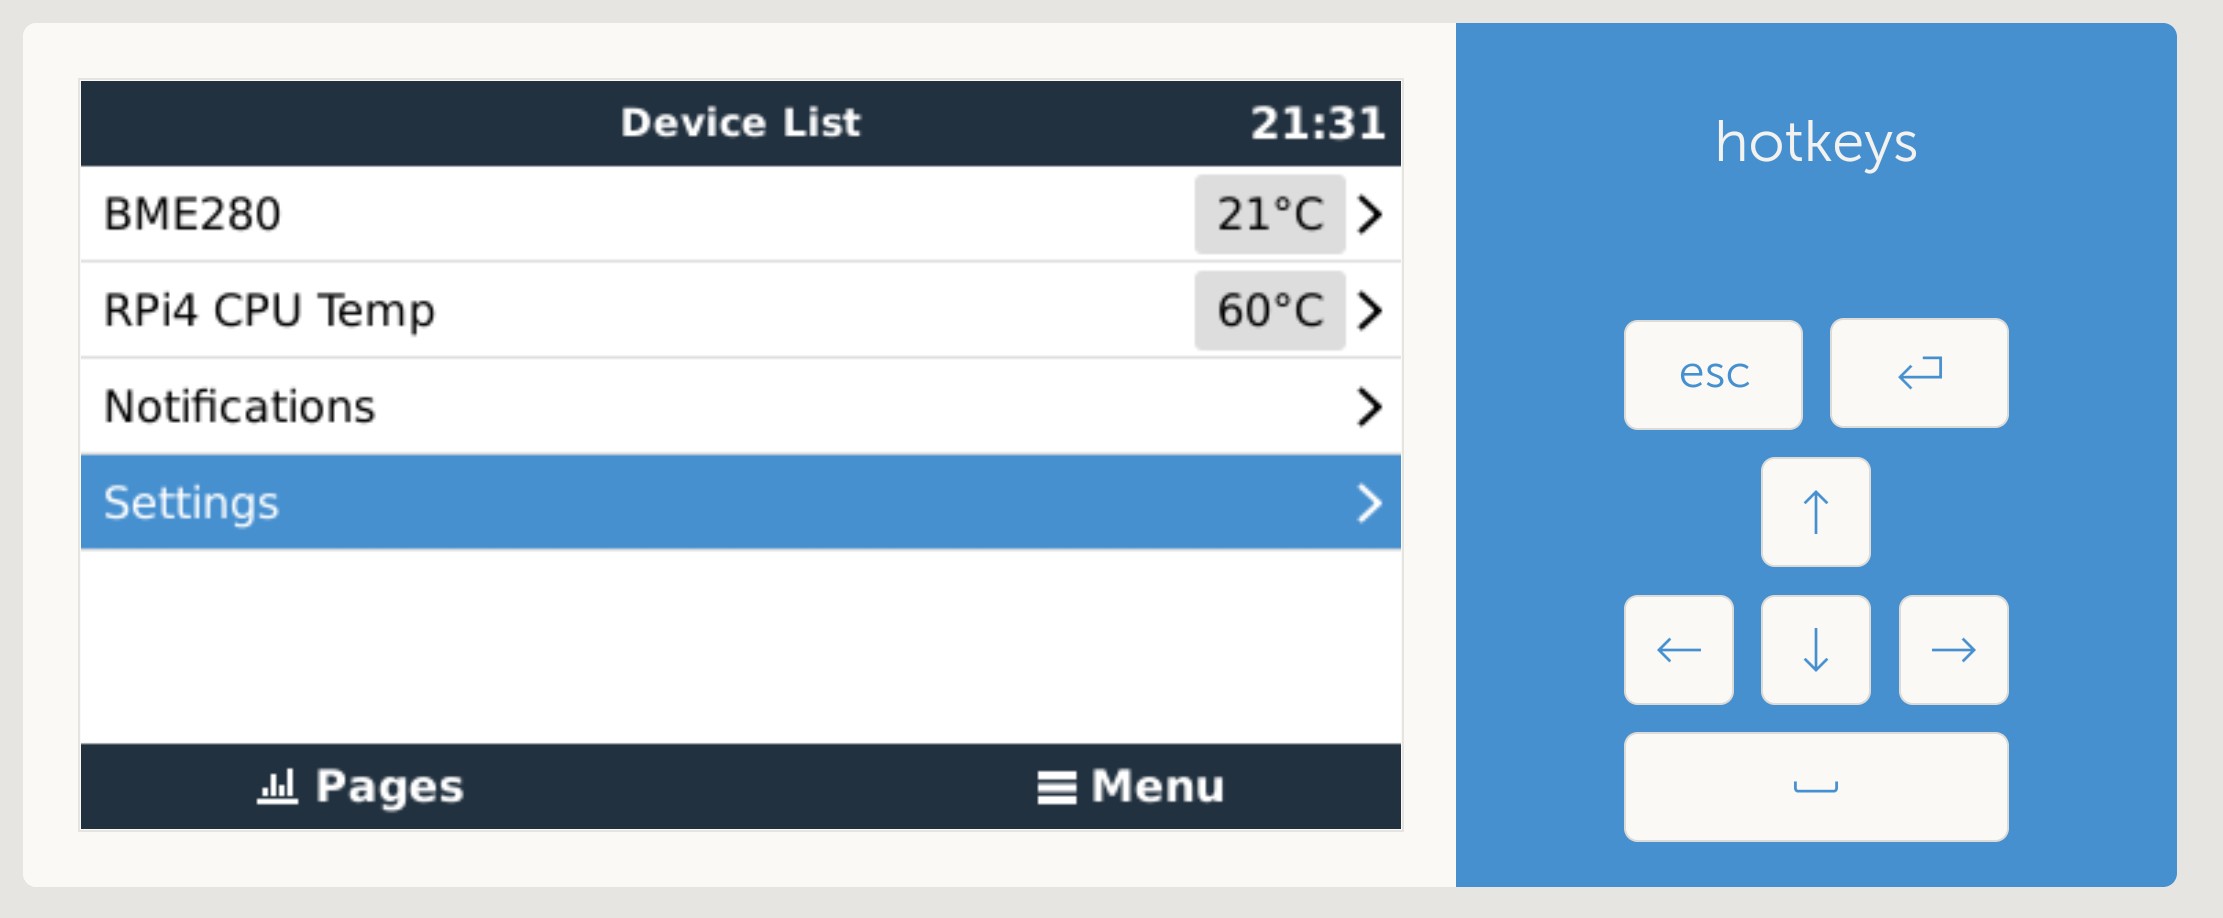
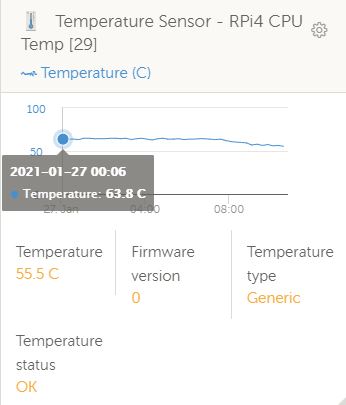
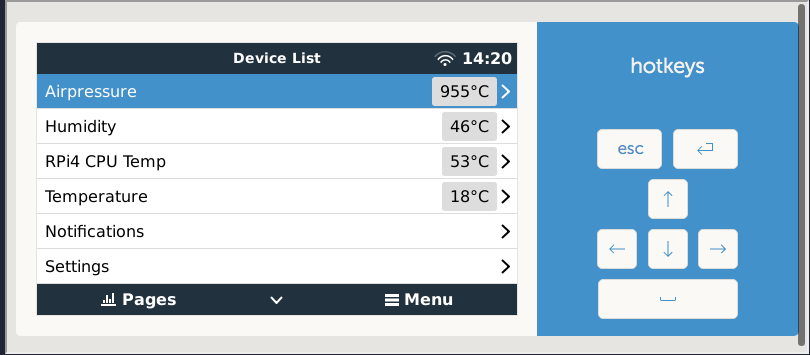
OK, everything is in °C, but that's expected.
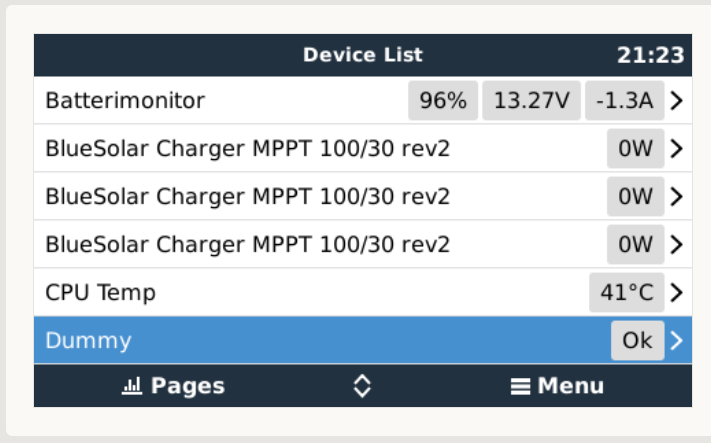
Thanks again fo your effort.

Next step is to combine them to read the values in one line.

My reading/learning starts now...

Cheers

Dirk

0 Likes 0 ·
laurenceh avatar image laurenceh dirkmuc commented ·

Glad it worked, thankfully the °C is not quite as obvious on the VRM.

You are right I should have spotted the 'id' parameter needs to be unique as well when declaring a service.

It really would be nice for Victron to make the minor mods needed in the dBus libraries and VRM to allow users to use the interface for generic values with programable scale text so we could label them kPa and % rel as we have now proved it is possible.

0 Likes 0 ·
mehlers avatar image mehlers laurenceh commented ·

Thanks @LaurenceH and @dirkmuc - all data running from the BME 280 into my Venus Raspberry further on to VRM - and then via MQTT into my OpenHab home automation system, where I can show the real units...

If will see, if I can try this also for an SCD30 (which includes CO2)...

0 Likes 0 ·
dirkmuc avatar image dirkmuc mehlers commented ·

Hello,

@LaurenceH @mehlers I have one question. I have the issue that the values are frozen after around 3 hours. When I change the update time the values are frozen accordingly. I assume that there is a kind of buffer overflow, but I really do not no where to look. The sensor is fine, I can read it out in the console even when the script is frozen.

Thank you for your support

Dirk

0 Likes 0 ·
Show more comments

Took me a bit to get it running on a Pi4. Had to make /service/dbus-i2c/run executable.

Thanks for your effort!

0 Likes 0 ·
kurtinge avatar image kurtinge commented ·

@LaurenceH Hi, after upgrading til 2.66 this seems not to work anymore. I understand a upgrade will delete this hack so I installed it again according to your instructions, but still can't see it working... Did you verify it on the 2.66 ?

Kurt

0 Likes 0 ·
laurenceh avatar image laurenceh kurtinge commented ·

I have just installed a fresh 2.66 test system today, I have the core dbus-i2c code working without problem (returning Rpi CPU temperature). Analogue interface is also working. I don’t have any i2c devices on my bench right now. I was going to try interfacing some 1Wire devices using owfs.

Can you explain what is not working? Have you checked the log files in /var/log/dbus-i2c for any clues?

If dbus-i2c is not running, you can run it from the command line and see what it reports on the terminal.

Laurence


0 Likes 0 ·
kurtinge avatar image kurtinge laurenceh commented ·

Hmmm..... .strange. I have done upgrading earlier without problems so I was thinking there where something with that particular version. I did review the files, rights and executables and so on - so I don't know. I am not at the boat now, but will take a look at the logs as I do not remember the content except it did not make sense to my limited knowledge :-)

I am in the situation to look at forwarding shh through the router, but from a security perspective I do not like the idea... so, then I have to wait :-|


I'll come back to you later on.......

0 Likes 0 ·
Kevin Windrem avatar image Kevin Windrem kurtinge commented ·

I just installed this on an RPI 4 running v2.70~6 and it came right up.

If you are hand installing this, make sure the run files are executable or the service won't run.

0 Likes 0 ·
kurtinge avatar image kurtinge kurtinge commented ·

Did some checks and there was a file without the execute bit. Got it working now :-)

Tnx

0 Likes 0 ·
kurtinge avatar image
kurtinge answered ·

Thanks alot, @laurenceh !! Easy implementation. Really appreciate it. At the moment it is winter here so it stays at 44C. Theis feature will be very nice when summer is coming. The RPi is at the moment mounted in the same room as both the charger and the MPPT which is also neighbour room of the engine room. My guess is that this compartment will be quite warm if I go by engine for hours. Again, thanx alot !!!

2 |3000

Up to 8 attachments (including images) can be used with a maximum of 190.8 MiB each and 286.6 MiB total.

bleydh avatar image
bleydh answered ·

Hi @LaurenceH ( @Kevin Windrem ) - I switched over from v2.70 to v2.80 large and for some reason I don't get it to work. It worked out of the box for me in v2.70, though in v2.80 the process just doesn't run. I'm using a RPi4 v1.2 4GB.

The temp is available /sys/devices/virtual/thermal/thermal_zone0/temp... I also tried to start dbus-i2c.py directly, though it complains about indentation errors etc.

I read elsewhere that the service needs to run now under /opt/victronenergy/service/dbus-i2c rather than /service/dbus- i2c - is that correct for v2.80 large?

The RPI cpu temp was only meant as a stepping stone, as I got the BME280 sensor, which I mainly wanted to get to work.

Many thanks,
B

18 comments
2 |3000

Up to 8 attachments (including images) can be used with a maximum of 190.8 MiB each and 286.6 MiB total.

laurenceh avatar image laurenceh commented ·

@Bleydh the indentation errors are indicative of Perl problems and I know the Perl version has changed so I may need to refactor the code for Perl 3. I am just finishing my summer narrowboat vacation so will be back in my home office from next week and looking forward to bringing all my code up to dat with Venus OS versions for myself and others. Thanks for the heads up.

Laurence

0 Likes 0 ·
bleydh avatar image bleydh laurenceh commented ·
Hi @LaurenceH - thanks for the quick reply and looking into it - once you've got the time. I'm also interested in the BME280 solution, if for any reason, that's on your radar as well.


Many thanks,
B

0 Likes 0 ·
lennycb avatar image lennycb laurenceh commented ·

@LaurenceH hello, could you "rebuild" something here? I would like to continue using it >v2.80. Thanks very much!

0 Likes 0 ·
laurenceh avatar image laurenceh lennycb commented ·
Hi Lenny

I've been a bit busy with other things. I have noticed your post and confirm that will try to get started on the work to fix this.

0 Likes 0 ·
lennycb avatar image lennycb laurenceh commented ·

@LaurenceH ah, great. I've already "adjusted" something here, as this was necessary when the Python version was changed. Please see if there is enough or if something is still missing. PS: Python is not my learned script language.

I have marked the changes with # ------------- in the file.

I also corrected tab errors and "indentations". No idea why this is important from version 3 onwards.

Just look at it :-)

dbus-i2c.zip

0 Likes 0 ·
dbus-i2c.zip (5.0 KiB)
Kevin Windrem avatar image Kevin Windrem lennycb commented ·

I made some tweaks to the code that allows it to run in both python 2 and 3:

dbus-i2c.py.zip

0 Likes 0 ·
dbus-i2cpy.zip (5.5 KiB)
Kevin Windrem avatar image Kevin Windrem lennycb commented ·

And one more tweak to make temp relays work (dbus service names can't include a dash (-)

dbus-i2c.py.zip

0 Likes 0 ·
dbus-i2cpy.zip (5.6 KiB)
crownroyal avatar image crownroyal laurenceh commented ·
@LaurenceH Would be nice if you accept the opened pull requests by kind contributors on github in order to make your code base compatible for 2.80+.
0 Likes 0 ·
laurenceh avatar image laurenceh crownroyal commented ·
Done
0 Likes 0 ·
johnny-brusevold avatar image johnny-brusevold commented ·


Tested this on v2.80-21-lage-23

Works fine without any modification in the files.


Has two problems

The first is the softlink to /service/dbus-i2c disappears after a reboot, since the service folder is read-only. Fixed by creating a softlink by mounting the memory chip on a linux machine.


The second problem is by entering dtoverlay=w1-gpio.dtbo in /u-boot/config.txt it only flashes in the temperature reading in Remote Console so fast that it is not readable.


modprobe -r w1-therm w1-gpio fixes the problem and everything is fine.


If I do not use dtoverlay=w1-gpio, but only run modprobe w1-therm w1-gpio after reboot everything is fine too


EDIT

The symlink became problematic since I also had to add this on some more installations with v2.80-21-lage-23 (rpi 3b +)

This worked fine for me

nano /etc/init.d/w1-wirestart.sh
#! /bin/sh
ln -s /opt/victronenergy/dbus-i2c/service /service/dbus-i2c
modprobe -r w1-therm w1-gpio


update-rc.d w1-wirestart.sh defaults
0 Likes 0 ·
Kevin Windrem avatar image Kevin Windrem johnny-brusevold commented ·
Your issue with the service is that as of v2.80~10, the root FS is read only and the services are handled as a file system overlay from /opt/victronenergy/service. Symlinks are no longer used. You need to COPY the service directory there. Then it will survive a reboot.


There are more details in the community post for the v2.80~10/11 release.

0 Likes 0 ·
johnny-brusevold avatar image johnny-brusevold Kevin Windrem commented ·

@Kevin Windrem

Thanks! it worked excellently


0 Likes 0 ·
ralph avatar image ralph johnny-brusevold commented ·

Hi everybody.

I'm not quite sure that my knowledge on programming is enough, but I´m not able to run the service on my Rpi3+ under v2.80~36 with BME 280 sensor(s). At first wich files including the latest dbus-i2c.py-file from here should i copy where?Maybe a short manual helps me to install and run the service on my system.

Reading all posts on here makes me more confused than it helps me, sorry for that.

Thanks in advance

0 Likes 0 ·
johnny-brusevold avatar image johnny-brusevold ralph commented ·

@Ralph

I use the dbus-i2c.py file that is posted over here in a zip file, as well as downloaded rest of the files from here

https://github.com/LHardwick-git/Victron-Service/tree/main/dbus-i2c

follow the instructions from readme

https://github.com/LHardwick-git/Victron-Service

Except the following point 3.

create a symlink from /service/dbus-i2c to /opt/victronenergy/dbus-i2c/service
ln -s /opt/victronenergy/dbus-i2c/service /service/dbus-i2c

should be

mkdir /opt/service/dbus-i2c
cp -r /opt/victronenergy/dbus-i2c/service/* /opt/service/dbus-i2c/


0 Likes 0 ·
olafd avatar image olafd johnny-brusevold commented ·

Hi


this Service is running:

https://github.com/LHardwick-git/Victron-Service


The cpu-Temp is displayed well but no Temp from a 1-Wire-Sensor!


The 1-Wire-Sensor is on raspis GPIO4 <— is that right?


Should something started additionally?


How do I get a identifierID of the 1-Wire-Sensor?


Is there a description for Venus OS and 1-Wire somewere ?


Could someone give me some hints with 1-Wire-Sensors please?


Thanks


Hardware: Raspberry 3B+

Software: VenusOS-2.8.2-Large

0 Likes 0 ·
johnny-brusevold avatar image johnny-brusevold olafd commented ·

Hi, @OlafD

I have asked the same question here in the forum myself, without receiving any answer.

Guess it's as you mention for a 1 wire sensor

temp-sensor1.png

temp-sensor2.png


0 Likes 0 ·
temp-sensor1.png (64.4 KiB)
temp-sensor2.png (44.4 KiB)
olafd avatar image olafd johnny-brusevold commented ·

Hi @Johnny Brusevold


one 1WireSensor is working now.

2022-02-1wire-temp.png

2022-02-1wire-info.png

Changes for that:

1. Copy this overlay to /u-boot/overlays/

https://drive.google.com/file/d/1CNDbKNRkZoLnMI109RHzxa6OIOvYGT4Z/view?usp=sharing


source:

https://community.victronenergy.com/questions/81215/connecting-1-wire-sensors-ds18b20-to-venus-os-on-a-1.html


add this to /u-boot/config.txt, for [all] at EndOfFile:

# 1-Wire Temperatursensor, Daten an Pin 4
dtoverlay=w1-gpio,gpiopin=4

and

chmod a+x /u-boot/overlays/w1-gpio.dtbo


2. Find the 1WireID (28-xxxxxxxxxxxx)

ls /sys/bus/w1/devices/
28-0123456789ab  w1_bus_master1


3. Add this to /opt/victronenergy/dbus-i2c/dbus-i2c.py and restart.

...
#update W1 temp
def update_W1():
...
-        ###sensor = W1ThermSensor()
-        ###temperature_in_celsius = sensor.get_temperature()
-        ###value =  temperature_in_celsius
+        fd  = open('/sys/bus/w1/devices/28-0123456789ab/hwmon/hwmon1/temp1_input','r')
+        value = float(fd.read())
+        value = round(value / 1000.0, 1)
        dbusservice['W1-temp']['/Temperature'] = value
+        fd.close


Caution:

If there is no 1WireSensor connected, the Temp reading flashes.


Hope that helps.

0 Likes 0 ·
johnny-brusevold avatar image johnny-brusevold olafd commented ·

@OlafD

Thank you for sharing well-detailed information

0 Likes 0 ·
mrhappy avatar image
mrhappy answered ·

Just a tip for node-red, for those who want a solution that does not include the mods in this thread. Using the "file in" node to read the contents of the temp sensor file in the linux file system of the raspberry Pi. The output of the node needs to be divided by 1000.

screenshot-2022-05-14-091037.png

screenshot-2022-05-14-090933.png


2 |3000

Up to 8 attachments (including images) can be used with a maximum of 190.8 MiB each and 286.6 MiB total.

vrm avatar image
vrm answered ·

Thanks for this great work. I will try it out immediately as it helps me reduce my RV by one extra Raspberry ;-)

NooB-question: This mod will disappear as soon as I update the firmware, right? Is there a chance to make it survive on the data-partition somehow?

3 comments
2 |3000

Up to 8 attachments (including images) can be used with a maximum of 190.8 MiB each and 286.6 MiB total.

kurtinge avatar image kurtinge commented ·
yes it will unfortunatly be gone after update. If I do not remember wrong I thin @LaurenceH wrote somthing that did it easier, but not sure. Anyway - the implementation is quite easy after you have done it once so you might just do it manually. Also I realized that the temparature did not got very high so I have skipped it here and there
0 Likes 0 ·
laurenceh avatar image laurenceh kurtinge commented ·

Hi @kurtinge

I’m in the process of re writing all my services. I have some new ones to add and putting them all into one file is getting silly. I have now it un the pipeline:

  • The cpu temperature
  • I2c services temperature, humidity and analogue including analogue voltage tank sensors.
  • 1-wire temperature and relays
  • An engine run time counter
  • A remote service to read other files via json.

Have a look at my Git hub for victron dbus services. I have not posted everything yet as I’m checking against 2.87 and 2.89 as I go.

To answer a question there are differences between 2.87 and 2.89 about how you get services to run and to re-install them after a firmware update. 2.87 need services to be added to /opt/victron energy/service but it is more difficult/complicated on 2.89. Apparently /data is safe for upgrades and scripts will need to be run to re-install the mods after an upgrade.


1 Like 1 ·
kurtinge avatar image kurtinge laurenceh commented ·

How is the implementation of analogue voltage tank sensors? Do I need a addon card? It would be great to have this implemented

0 Likes 0 ·
rikkert-rs avatar image
rikkert-rs answered ·

Hello for everyone who is still interested in 1 Wire Sensors in Venus OS, I have a first version of t the Repo from LHardwick converted in an Setup Helper Package from Kevin Windrem

https://github.com/Rikkert-RS/VenusOS-TemperatureService

1 comment
2 |3000

Up to 8 attachments (including images) can be used with a maximum of 190.8 MiB each and 286.6 MiB total.

laurenceh avatar image laurenceh commented ·

@Rikkert-RS

This looks great thanks, I look forward to using it.

I had not quite got to grips with Kevin's setup tool.

Laurence

0 Likes 0 ·

Related Resources

Additional resources still need to be added for this topic

Raspberry Pi running Victron’s Venus firmware - Blog Post

Venus OS Large image: Signal K and Node-RED - Install

raspberrypi install venus image


Additional resources still need to be added for this topic